 Constructing
a Ghillie Suit
Constructing
a Ghillie Suit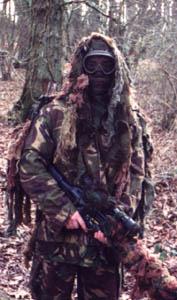 A
ghillie suit is one of the most effective means of camoflauge; it was originally
invented for bow hunting and for catching poachers. The ghillie’s main purpose
is to break up the outline of your body, anyone who has ever read a military
or survival manual knows that breaking up your outline is one of the principle
lessons of good camoflauge. A ghillie is not the magical solution to your camoflauge
problems you have to learn how to use it first. The ghillie must be used in
conjunction with local foliage to allow you to blend in with the background,
the ghillie suit is really just a frame from which to work.
A
ghillie suit is one of the most effective means of camoflauge; it was originally
invented for bow hunting and for catching poachers. The ghillie’s main purpose
is to break up the outline of your body, anyone who has ever read a military
or survival manual knows that breaking up your outline is one of the principle
lessons of good camoflauge. A ghillie is not the magical solution to your camoflauge
problems you have to learn how to use it first. The ghillie must be used in
conjunction with local foliage to allow you to blend in with the background,
the ghillie suit is really just a frame from which to work.
First of all you must decide what you require of your ghillie, whether you need magazine pouches and what size they are going to be, think about webbing and how it is going to be compatible with your suit, if you can pick up a cheap assault vest you may wish to make it an integral part of your ghillie. You need to consider things like how you are intending to carry the ghillie and where it’s mainly going to be used, it’s no good having a grass green ghillie if you are going to be using it mainly in a forest with brown leaf litter. You can sew an assault vest onto you base garment like a DPM jacket or something similar. There are many websites on the Internet (links at the end) concerned with building a ghillie suit, lots of them suggest the use of a pilot’s flight jacket, personally I believe the method of using a combat jacket is sufficient, it is also easier to use as a jacket can be taken off and the ghillie suit can be put on easier than a flight suit can be put over combat clothing.
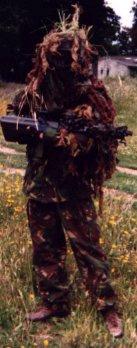
I have made 3 suits each using different methods, my most recent one was the most time consuming although it is the most effective. The two most successful methods of affixing the scrim strips to the jacket are these
1. Getting a jacket and cutting to small slits close together per strip, the slits should be cut like an equals sign, the strip would go in through one slit and out through the other. The problem with this method is that it compromises the integrity of your base garment if you have too many slits in the jacket.
2.This is the method I used for my most recent ghillie suit - Get some netting with squares about 2 inches wide. Get a large section and cut it to the shape of the back of your jacket, (N.B. Don’t go across the shoulder joints as it will restrict movement), then the time consuming part, you have to sew the netting to the jacket where the string of the netting cross, I sewed every other joint which saves time and the netting is still very securely fitted. Next get a smaller piece of netting and sew it using the same method on to the back of the arms of the jacket, only put netting down to the elbows as the strips will eventually cover you forearms any way and they will only get in the way. Then put two smaller pieces of netting onto the shoulders of the jacket at the front; don’t put these too far down, as they will interfere with the shouldering of your rifle.
 There
are a couple of ways that you can complete the head cover part over you ghillie,
it is the most important part of your suit as the head and shoulder silhouette
is one of the most recognisable shapes of the human form.
There
are a couple of ways that you can complete the head cover part over you ghillie,
it is the most important part of your suit as the head and shoulder silhouette
is one of the most recognisable shapes of the human form.
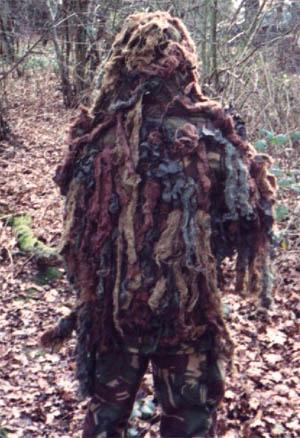
 The
scrim for your ghillie can be made up of literally anything you think is suitable;
materials that have a good texture and will fray would be best. Personally,
I obtained many hessian sacks and dyed them a variety of colours; I used dark
green, olive green, dark brown and mahogany (for highlights). I varied the
length of time the sacks were submerged in the dye to change the intensity
of the colouring. This gave me about 12 sacks of many differing colours. I
used a Stanley knife (be very careful with knives!) to cut the sacks into
strips of width 1- 3 inches and from 1-2.5 feet long, some of the wider strips
I sliced down the middle (but not completely), to make a Y shape. The lines
of the strips at the stage are too severe and they need to be frayed slightly,
do this by generally rubbing them against each other and they fray quite quickly.
The
scrim for your ghillie can be made up of literally anything you think is suitable;
materials that have a good texture and will fray would be best. Personally,
I obtained many hessian sacks and dyed them a variety of colours; I used dark
green, olive green, dark brown and mahogany (for highlights). I varied the
length of time the sacks were submerged in the dye to change the intensity
of the colouring. This gave me about 12 sacks of many differing colours. I
used a Stanley knife (be very careful with knives!) to cut the sacks into
strips of width 1- 3 inches and from 1-2.5 feet long, some of the wider strips
I sliced down the middle (but not completely), to make a Y shape. The lines
of the strips at the stage are too severe and they need to be frayed slightly,
do this by generally rubbing them against each other and they fray quite quickly.