Total
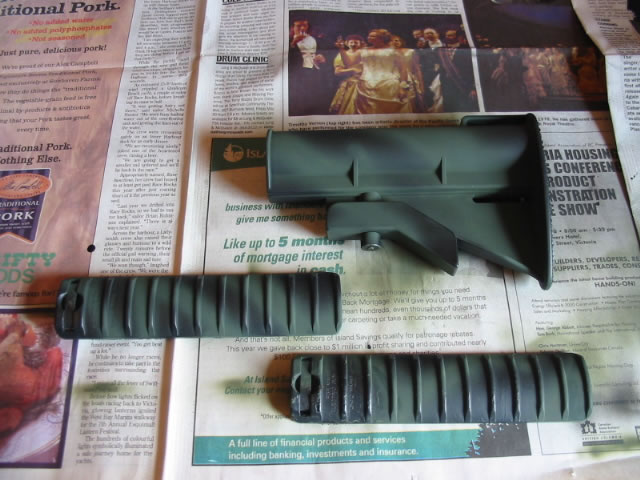
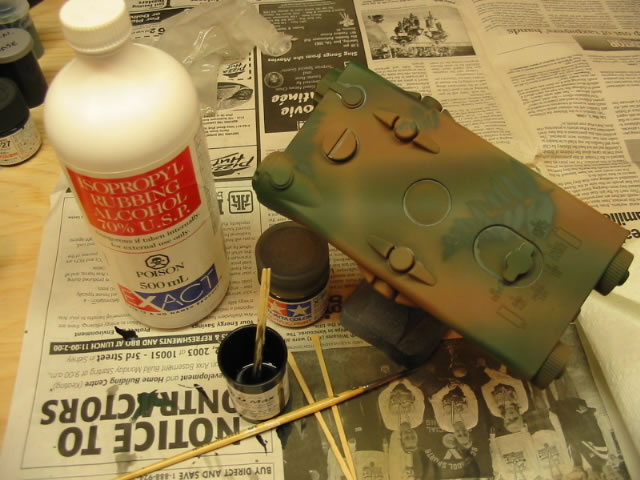
Project Time: 4 hrs Background: Last month I purchased a TM M4A1 from 'Vash the Stampede' on the ASC forum. After initially fixing and replacing the piston and gear set (big thanks to Vash for being VERY helpful and understanding of the situation!) and slapping on a RIS system, I decided to embark on giving it a makeover. I wanted to give it a full camo paint job and keeping with the Woodland style design that is well suited for the West Coast. The following is an overview of the process I used as well as the results of my efforts. Disassembly and Prep: There wasn't much to remove as I wanted the entire gun to be camo'd. I did remove the flash hider, and rear sights, RIS Plates and Stock. I masked the hand grip as well (no point painting that as your hand should be on it at all times!). I gave the gun a wipe down with alcohol and made sure it was free of dirt, no sanding required. Since I was already applying a metallic paint finish to the slide of my WA SV Infinity 4.3" , I decided to paint the upper and lower receiver of the M4 this metallic colour as well. Hey why not, then any body showing through the camo painting will look metallic.   Painting: Once the metallic finish was dry, I was ready to start applying the camo pattern. I did some research on the web about camo patterns and gun painting just to get an idea of what I wanted. As I began painting however, the camo "forms" and "shapes" kinda just started to flow and I ended up not using any of my pic's and notes. To each his own. My choice of paint used was my old, trusty water based TAMIYA Acrylic Enamel. These paints can be found at any hobby store and being water based they are easy to clean up and fast to cure. And NO, they will not 'wash off in the rain'. Once they are cured you cannot wash it off. I used the following paint colour's to achieve the camo pattern.
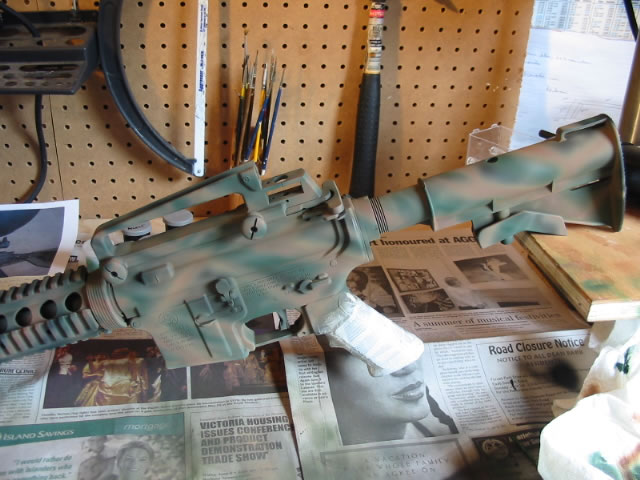
I started with applying the green colour. By mixing the above listed green paints, I came up with a colour that I was satisfied with. I began applying it to the Stock and RIS Hand Plates to get the 'feel' of how it was going to apply and look. If worse came to worse and I screwed up badly, or the colour was wrong, I could easily apply a coat of satin black to them. Once I knew the colour and technique were right, I applied it to the M4 itself. When painting the M4, be sure to paint it form all angles! Painting an AEG is a 3 dimensional process. If you just spray from one angle, you will miss areas and your finished result will look poor. Apply your paint from all sides. The beauty of using an airbrush is that you can 'feather' your spray, resulting in control over shading areas darker or lighter.
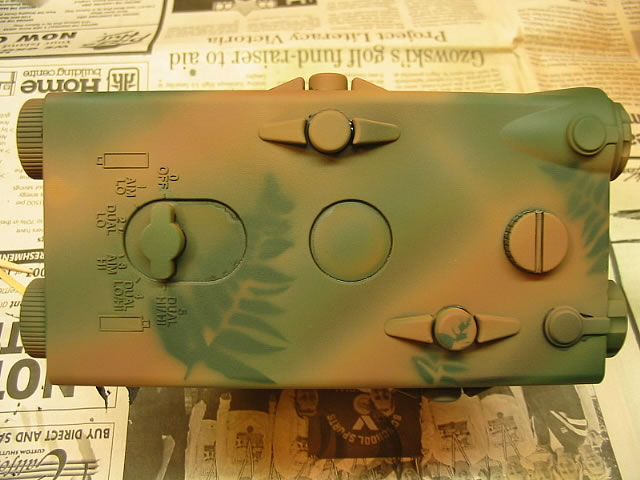
Once the green was applied , I darkened the green more and applied another coat, this time applying the green to the inside of the green I already applied. This gives it a shaded look as well as adding some depth to your paint job. It's hard to tell in these pictures, but there is a darker green applied.    Now it was time for some brown. Using a combination of the brown paints listed above, I mixed up a medium brown colour. I applied it like the first coat of the green; again starting with the Stock and RIS Hand Plates. I randomly applied the brown and created almost a cross-hatching effect over the green by applying the brown in opposite directions to the green pattern.
I again created a darker shade of brown, and repeated the same process as with the dark green. Adding these different shades on top of eachother creates an almost 3D camo pattern. Yes, it is subtle and the pictures don't always do it justice, but the shades are there.
After placing on all the Fern's that I wanted, I decided to apply one coat of a satin (not gloss or flat!) clear coat. You can choose not to do this, but a careful and light application will help prolong the life of the paint job and prevent excessive scratching and paint wear. The clear coat applied to the M4 looks a bit glossy in the pictures below, but that is only due to the fact that it was just applied and had not dried yet. As you will see in the finished results, it dried to a nice, low sheen satin finish.
ICS PEQ2: Added June 3rd I received and painted my ICS PEQ2 on June 2. I used the same materials and technique on it as I did on the M4. Here are a few pics. I also applied a plastic model techniques to enhance the molded lines and grooves. To do this you thin down some flat black so it is the consistency of water. Then using a fine brush, dip it into the thinned paint and simply "touch" the brush to a groove and the thinned paint will run into and all around the groove. Look closely at the picture on the right. Yeah ok, maybe I'm getting a little to artsie-fartsie, but what can I say, it's the plastic modeler in me!
The Results: Now I felt I was finished. The end result was very pleasing and looked very professional. I would STRONGLY recommend NOT using spray paints for doing this type of painting. Yea, I am a bit bias to my airbrush, but you do not have the control and ability to reach every crevasse with a spray can....even with one of those plastic handles on you spray can that "turns it into a spray gun". Spray paint also goes on too thick and you can easily cover up and clog fine details on your gun.    New Outdoor pics! - Added June 2nd, 2003 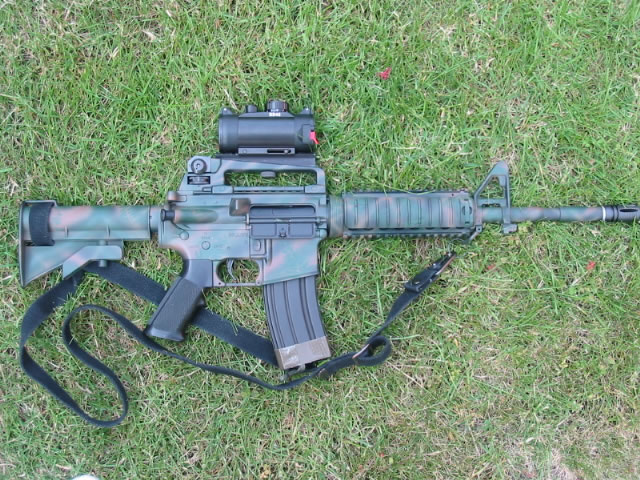   Conclusion: If you have the right tools, you will get the right results! I am extremely pleased with the way the M4 turned out. Not to toot my own horn, but damn I'm good sometimes! One of the main factors that it turned out so well is that I do have years of airbrushing experience behind me. If you are thinking of doing a camo pattern and you don't have an airbrush, borrow or buy one! If you still can't get your hands on one and are going to use spray paints, buy a plastic water gun or some other cheap gun toy to practice on! People often ask "well how exactly do you paint the patter on". The answer is - there is no exact way to do it. I just went with the flow; no stencils (other than the Fern), no tape lines, no drawn on lines, nothing. I just relied on my experience and artistic skill and went for it. If you have any questions or comments about this project, please feel free to send them to me at dmbone@shaw.ca. Until the next project... - Dave B. Comment on this project in the forums Last modified: Sunday, June 15, 2003 5:41 PM Copyright 2003 ArniesAirsoft
|