


Practical Airsoft Recommends:

Black Hawk Down (Two Disc Set) [2002]
Black Hawk Down (VHS/PAL UK Video)

Black Hawk Down (Hans Zimmer soundrack Audio CD)

Black Hawk Down (Book)

Fuji Finepix A204 digital camera

Cobra Microtalk 110 PMR446 2-way radio

A speaker/mike adaptor cable for the Telcom TW1000 PMR446 two-way radio...
If, like me, you recently tried to find an external speaker/mike (or similar) for a Telcom TW1000 PMR446 two-way radio, you will probably have had the same luck I had: There's nothing easily available.
It would appear that Dixons, and The Link, have recently stopped selling accessories - and the TW1000 radios themselves, come to that. Instead, they've moved on to different products, designed to do the same thing. Problem is, nothing on the market appears, on examination, to exactly fit the TW1000, in terms of external attachments, like speaker/mikes, and the like. Which leaves you with a radio that, in a skirmish game, is as stealthy as a brick through a stained glass window, which is not a good proposition.
Or is it?
Well, I'm also a licenced Radio Amateur, and have been for many years (G1LIW, since 1985). Radio Amateurs tend, certainly in the UK, to be able to enjoy their hobby of radio communications on practically a shoe-string. So, with the benefit of this, and some practical experience in adapting different equipment, I'll show you how to adapt a cheap, servicable, alternative speaker mike, made for another radio, for use with your TW1000, instead.
I would also note that this should work for other radios which are based on the Maxon PMR446 radio, of which the TW1000 is one such example.
This adaptator lead, by the way, will leave the speaker/mike you buy unmodified, thus leaving the guarantee INTACT. If you want to modify the speaker/mike itself, you can, but any guarantee will become invalid.
COMPLEXITY RATING:
BEGINNER LEVEL
You should be able to complete this project if you are able to solder, and effectively use the most basic of electronic hobbyists tools.
Components
For this adaptor connector, you will require the following. All of it is available through most good electronics shops; I got mine from Maplin Electronics, purely because they have a shop about five miles from where I live.
Components (listed with Maplin catalogue numbers and prices, for convenience!):
| Description | Qualtity | Maplin part number |
Price |
| Stereo jack plug, plastic, 3.5 mm, with strain relief sleeve | 1 | HF98G | £0.79 |
| Mono line jack socket, 3.5 mm, with strain relief sleeve | 1 | HF83E | £0.49 |
| Mono line jack socket, 2.5 mm, with strain relief sleeve | 1 | HF79L | £0.49 |
| 2-core overall shielded audio cable, black | 1 metre (less, if you already have it!) | XR98G | £1.29 |
| Universal Earpiece, 3.5mm plug | 1, unless you already have a 3.5mm plug equipped earpiece. | BA58N | £3.99 |
| TOTAL COST (as at November 2001): | £7.05 | ||
WARNING!Since writing this article earlier this year, I have discovered that Maplin no longer sell the QS-110 speaker/mike through their website; you may find stores with stock of thit item available, if you pay them a visit, but I wouldn't hold out too much hope. Instead, pay a visit to Walters and Stanton PLC. Their telephone number is (017) 0220 6835 (in the UK, International Direct Dialling code +44-(017) 0220 6835); the website is http://www.wsplc.com/products.html. There, you will find the Watson QS-112Y Handheld Speaker/Mike; Watson recently discontinued the QS-110, and replaced it with this new item, which is just as good, and which is compatible with the adaptor described in this article. It retails (excluding postage and packing, etc) for £16.95, including VAT. |
Tools required:
You WILL require certain electronics tools, in order to perform this modification, and should have these already to hand.
- 25 Watt soldering Iron (or better)
- Desoldering sucker (or desoldering braid)
- Solder (60/40 tin/lead resin core)
- Electrical insulating tape
- Needle-nosed pliars
- Small bench vice (or 'Helping Hands' miniature bench grips or similar)
The first thing to do, is understand just HOW the electronic circuit of a speaker mike (in general) operates.
Speaker mikes are designed to replace the built-in loud speaker and microphone in a hand-held radio. In the case of the TW1000, a normal 3.5mm stereo plug, like you'd find on a walkman radio/cassette, is used to initiate this. When you insert the plug into the radio, a contact is first broken, disengaging the internal speaker. As the rest of the plug is pushed home into the socket, three more connections are made: the external push-to-talk, external speaker, and external microphone.
This, then, is what we need to replicate in our speaker/mike adaptor connector.
The QS110, however, uses a two-plug system to create the external circuit. A pair of plugs, a 3.5mm mono, and a 2.5mm mono, are used. The 3.5mm one is for the speaker, the 2.5 for the push-to-talk (PTT) and microphone. The adaptor connector we will make, then, is to connect these plugs, to the 3.5mm stereo socket in the radio.
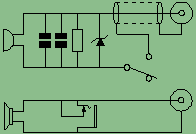 As you can see from this circuit diagram, the QS-110 external speaker/mike is simplicity itself, and no modifications are required to the unit itself. Therefore, an external adaptor is all that we require, to connect this unit, to the TW1000 radio. This will require three connectors, and a very short length of two-core shielded cable.
The TW-1000 stereo connector has the tip of the plug forming the PTT/mike line, and the other positive connection forming the speaker line. The ground, or 'earth', is what is called 'common', meaning that both the mike/ptt and speaker circuits utilise the same connection. This, while fiddley in practice, make our connector dead easy to construct, as no electronics, just hard wiring, are all that is required.
Preparing the cable
First, we'll cut the cable into two 10cm long lengths. Then, strip away about one (1) centimetre of the OUTER sheath from each end of both cables, exposing the two cores and sheild braiding. We will, for the sake of simplicity, label the cable cores red and white. The braiding is not coloured (big surprise).
Taking the Red core of one cable (we will call this cable the 'red cable'), strip away one (1) centimetre of the plastic sheathing at BOTH ends, exposing the braided copper core. Do the same for the other cable, but for the white core (this, unsurprisingly, will be called the 'white cable'!).
We are now going to 'tin' the cables and connectors. If you do NOT know what I mean, OR how to perform tinning, then this project is NOT for you!
Taking both cables, twist together, then tin the braiding, at ONE end only. This forms the common earth of both circuits. You will note that this joined end also contains the exposed ends of both red and white cores. Tin these as well, being careful NOT to connect the two together! Next, tin the other ends of the exposed cable cores and braiding, again, being careful NOT to connect them together.
Now, take the three connectors, and, after you've unscrewed the covers, tin all the tags.
Connecting the cables and the plugs/sockets
The joined end of the cables is the stereo plug end. Take the red core, and solder this to the centre-pin of the plug. The white should then be soldered to the outer, with the braid soldered to the earth. Take care NOT to mis-connect or accidentally connect the three lines across each other, or this adaptor will not work properly. Once you've completed this soldering, take the connector cover, and replace it OVER the stereo connector.
Now, take the 3.5mm mono jack socket, and remove the cover. Slid the cover over the WHITE end of the cable, in such a manner as to allow you to screw it back over the socket, when you've soldered it onto the wires. Now, solder the white cable to the pin, and the braid to the earth, of the socket, taking the same care as before. Once done, replace the cover over the socket. repeat this for the 2.5mm socket and the red cable.
You should, all things being well, now have a roughly ten centimetre 'Y' adaptor cable, one end bearing a 3.5mm stereo plug, the other two ends containing in-line mono 3.5mm and 2.5mm jack sockets.
Proof of the pudding...
There's only ONE way to effectively test this adaptor cable, and that's to use it. Taking your TW1000 radio, the adaptor cable, and the QS-110 speaker mike, plug the stereo connector into the radio, and the free ends of the adaptor over their respective plugs on the speaker/mike. DO NOT, at this time, conect the earpiece into the speaker/mike.
Turn on your radio. You SHOULD hear the automatic triple musical tones as it switches on, through the speaker mike. If you do, then that's fine. Now, watching the LCD screen of the radio, press the ptt button on the speaker mike. You should see the usual lines appear around the radio icon, on the screen. If you do, this means that the ptt works, and the mike should work as well. If you have a second radio handy, switch this on, and set it to the same channel and setting as the first one. You can now absolutely test that the mike on the speaker/mike works, by gently blowing into it while pressing the ptt. Assuming you don't hear a horrible whistling over the second radio (called a 'feedback loop'), then you should hear the blowing out of the speaker on the second radio. If either blowing or feedback is heard, then it's working just fine. If not, you're going to have to re-solder the connector cable, and re-test it.
At this point, and assuming it's working properly, you can connect the ear-piece to the speaker/mike, to provide a little privacy, if you wish. This project, then, is now complete. I hope you have success, and a little fun, with your newly made accessory!
new technical information regarding the TW-1000I recently found some very useful information regarding the TW1000. Originally designed by Maxon as the SL-25, it has been rebadged by several manufacturers, and was submitted to the Federal Communications Commission for type approval for the American Family Radio System (FRS) in 2000. As part of the type approval process in the USA, technical documents are submitted to the FCC Office of Engineering and Technology, which often include details omitted from the final user manuals, such as circuit diagrams, internal layouts, and so on. These documents are then placed on a public web server, for anyone to look at (the US Freedom of Information policy). I've finally found the documents that rel;ate to the TK-14, which is damned near identical to the SL-25 (i.e., the TW-1000). Direct links to these documents are shown below:
While we're on the subject of USMC, they've also completely re-done their website. At the time of writing, however, it's still in French, but at least it's back up again! |

By the way, if you want to know more about the hobby of Amateur radio, please visit the Radio Society of Great Britain.