

bean
-
Content Count
64 -
Joined
-
Last visited
Content Type
Profiles
Forums
Gallery
Blogs
Calendar
Posts posted by bean
-
-
S-Thunder Composite Grenade Launcher Short Barrel.
I have always wanted to have a handheld grenade launcher. Even if most of them are based on fantasy looks it just seemed like a fun thing to play with. The other reason I wanted one is I have three m203 grenades and don't have a launcher mounted on my gun.
Pros
-Competitively priced
-Durable plastic body
-Very little pressure required to fire grenade using CO2
-Compact
Cons
-Safety sticks on occasion
-Seam line for two halves of body is kind of sharp and noticeable in areas
Function
The grenade launcher doesn't have a ton going on making it exceedingly easy to use. On the left hand side of the launcher just above the trigger is the barrel release switch. When pushed towards the end of the barrel it unlocks the barrel allowing it to be tilted forward. Once the barrel is tilted forward you can pop in your fancy chunk of metal or plastic in 40mm format and close the barrel. The three S-Thunder grenades I tested in this unit all slid in and out effortlessly. Even if the shell is too long for the launcher it will just hang out the end like with the long foam ball launcher, or the large gas shell. The Large gas shell just peaks out the end of the barrel while the foam ball one hangs out a good inch or two. The standard shell fits great. Once the shell is in and the barrel is locked down you can either fire the grenade or put it on safe for later. The safety is the switch at the very rear of the launchers body. It is marked with a F for fire or S for safe. I have had it stick a few times when the trigger is pulled while it was on safe. It only took a few seconds to get it going again. With the safety off the trigger is a very easy pull compared to pressing it with your finger. This is great because anyone who has attempted to fire a CO2 shell with their fingers when its charged to max pressure will know it's not an easy task. The grip is a M16 standard grip and appears to be very robust.
Build Quality
The whole unit is made mostly of plastic in one way shape or form. However this does not detract from the overall sturdiness of the unit. The pistol grip appears to be made of a different plastic then the rest of the launcher. My only dislike about the plastic is the two halves that make up the body. The seam line is fairly noticeable. This isn't really a huge thing as it's a cheap toy launcher made of plastic. Hopefully the metal version does not have this problem. There will be several variants of this launcher out in the next while so keep your eyes peeled and check out http://s-thunder.com/en/product/?pid=12 for the various versions.
Conclusion
Overall this is a great little gadget and I thank S-Thunder for sending it in along with a bunch of other toys for review. It is most certainly worth the money. Several of my teammates and I spent an hour shooting shell after shell at things. We had the bb's reaching out well over 50 feet. The launcher is very portable and points naturally at the target. I hope to get the railed version with a longer barrel in the next few months. I recommend this to all of you with shells that want a new toy. These will be available in Canada through http://tacticalinnovations.ca/
Pictures
I had hoped to get outside and take some pictures of this in the sun but it appears its monsoon season on base. So instead you get bed pictures and when I get home next I will have to use my white board for something prettier.
The side of the launcher showing all the controls

Cracked open

Shell loaded into the chamber


Showing the various grenades and how far they will extend past the barrel

-
Those appear to be blackhawk gloves.
-
It holds my 15.4 acer just fine so you should be good
-
There is a color difference between Flyye Coyote Brown & Pantac Coyote Brown. Pantacs newest version of CB is closer to Eagle Industries Coyote Brown.
Awesome thank you for that info
-
I just order them through the forces order program since its the cheapest I have found.
-
Just curious how much are you paying to get these things...? In the word of tactical gloves these are not really expensive for decent gloves. The only issue I have with them though is that palm tears pretty easy. I tore mine going over a pretty old messed up chain link fence but it did it's job to saving my hand from the big gash I would have had!
I get them for around 50-60
-

One of the two top clam shell pockets holding my cell in the front and Zune in the back

The large organizing pocket showing what my Shot Show load out will be

The innards of the bag showing my laptop and a book in the shock cord closed pouch

The reverse of the lid showing the three pouches
-
5.11 Rush 24 Pack
So in my never ending search for a backpack that meets a certain set of needs and this time it was a schoolbag that won't fall apart. I am no longer going to school but sometimes need to drag my laptop pens and paper for work. I sat looking through tactical bags and it finally came down between this bag and the Tactical Tailor Enhanced Day Pack. I ended up picking this bag for the many organizers built into the pack and the fact that it holds a bit more. One of my pet peeves for a day pack is not being able to grab something I need when I need it. I hate fishing around a cavernous bag looking for a pen or knife.
The Features and Impressions
Starting at the top of the bag there are two mirrored clam shell pouches that are about the same size as a point and shoot camera. The two pouches are covered with two rows and four columns of molle webbing. The top row of webbing is covered in Velcro to affix a name tape if you're not covering it with a pouch. Inside the pouch is a zippered mesh pocket on the lid of the pouch. On the back wall of the pouch is a slant pocket with a soft fabric lined pouch in order not to scratch a cell phone or MP3 player.
Beneath that pouch is the large outer pouch. This pouch is a great organizer filled with separate pockets for all the things you may carry in a day. The outside of the pouch is covered in five rows with six columns of molle webbing. However at the last row 5.11 decided to stick a large rubber 5.11 Field Tested VTAC which takes up two of the right hand columns of webbing. It's not the rubber label that bothers me it's the placement of it. I would have been much happier with this at the top of the bag or side. Instead it ruins part of the molle real estate on the front of the bag. I don't plan to actually attach anything there but others will. At the top of this pouch there is three and a half by two inch Velcro square for morale patches or a large flag. Inside the pouch are two seven and a half by five inch stuff pockets. At the back wall of the pouch is a full width zippered pouch with a beefy YKK zipper pull closing it. At each side of this pouch is a key hook so you can keep your keys in place. Under that is a full width stuff pouch. At the left side of the pouch is three pen holders. A pocket with a Velcro strap to secure the contents to keep your camera or notebook from floating around. The right hand side also has a pouch like this and it has a stuff pocket of a suitable size to hold a folding knife
At each side of this pack is a long zippered pocket covered in five rows and three columns of molle webbing. Inside the pocket is a diagonal slash pocket at the top for storing smaller items and the rest of the pouch is just a pocket. At the top region of this bag there is a UTX buckled compression strap with an elastic strap retainer. I would have liked another further down the pack to fully compress the contents of the bag.
At the top of the bag is a zippered pocket that is lined in soft fabric to store your sunglasses. There is also a reinforced grab handle at the top which is comfortable in the hand even when the bag is weighted. To either side of this handle you get the hydration tube slot that is covered with a Velcro lid. The lid opens nicely and contains an X cut in the fabric to allow the routing of the hydration hose out of the bag. However this X is made in a thick abrasive material which is kind of sharp so make sure to use a tube cover with this bag or the contents may get wet. I would have preferred a hole or rubber opening.
At the back portion of the bag are two nicely padded and shaped shoulder straps. The straps have a large two and a half inch webbing strap at the upper portion of the pouch to tuck your hydration tube into so you don't lose it behind you and to keep it from flapping around. Under that there are three rows of molle webbing with two columns. Attached to the middle row is the sternum strap with a elasticized piece of webbing to allow a comfortable wear. At the bottom of the strap is another strap like the one used to route the hydration tube. This can be used if the sheath or cell case you have is too long or you want it mounted lower as it is properly spaced for molle attachments. The quick release buckle at the bottom of the buckle is covered in an elasticized tube which I can only assume is so it protects the buckle from wear and tear since it is what holds the bag onto your shoulder. This bag does not include a chest strap which I was fine with because it rides higher on your back and isn't meant to be loaded enough to warrant using one.
Underneath the shoulder straps you will find a cleverly concealed zippered pocket. this pocket is where you would put your hydration carrier. At the top of the pocket is a pass through slit with a Velcro hanger to hold up your hydration bladder. The back of the pouch has a nicely curved plastic support plate. This plate helps from odd shape object pocking you in the spine and helps mold the pack to your back even when its packed full. The internal pocket housing both of these items has a large drainage grommet at the bottom of the pack to allow draining in case of a hydration bladder rupture. This grommet is one inch above the actual bottom of the bag and it would have been nice to have it just a little bit lower. There are also two leather like patches at the bottom of the back to stop the pack from creeping up.
Moving to the inside of the bag we find surprise surprise more organizing pouches. On the lid of the pack you will find three zippered pouches two mesh, and one nylon. The top and smaller of the zippered pouches has a zipper at the top and bottom to make it easier to grab items from it. The middle mesh pouch is the same size as the nylon pouch under it. Someone recently asked me why a pouch is made of mesh. The reason a pouch is made of mesh sometimes is so that you can easily identify the contents of the pouch. This helps in getting what you need quick instead of fishing around blind in a pouch. At the back of the pack you have two more pouches. The top pouch is a large single zippered mesh pouch similar to the middle one at the front of the inside. Underneath this is a shock cord adjusting dry bag which seems like a great place to store a laptop. At the very bottom of the pack are two more drainage grommets.
Conclusion
Having used this bag for a couple of days I can say I honestly like most of the design concepts of the bag. As I said I would have preferred another set of compression straps, the 5.11 VTAC logo to be placed elsewhere and the hydration tube holes to be less sharp. The only other problem with the bag is minor loose thread throughout the stitching which I will have to burn later so they don't get caught. I think this is a great bag despite its failings and is fairly comfortable to wear. The true test will be when I wear it for a week straight at Shot Show. I purchased my bag through The Tac Shop http://www.thetacshop.ca/ because they had a shipping special. These should be available from any 5.11 distributor. They come in four colors black, olive drab, coyote, and emergency red.
Photos

The front of the bag showing the Velcro spots as well as the 5.11 VTAC logo to the bottom right

The rear of the bag showing the shoulder straps

Side view where the side zippered pouch is visible to the top

Top of the bag showing the reinforced carry handle and sunglasses pocket

Bottom of the bag nothing special to see here but cat hair

The back plate and hydration carrier area

The sunglasses out showing my Oakley Gascans in there bag
-
I have a CB Flyye RRV and my mate has one in Khaki and one also in CB, but havent had the issues with the PALS webbing row you mentioned. I guess they fixed it after you notified them (we ordered CB RRVs in May 09, one Khaki RRV in November 09).
Yeah they mentioned they fixed it.
-
nope I ran the belt through the large open end. A carabiner can be attached to the fabric side to do the same thing I just didn't have one on hand.
-
I've got the air-pack, it's lighter weight and I've had it for 10 years.
It hasn't gone wrong, other than the cuffs and the zip, and the zip only failed last week.
Brilliant piece of kit.
Glad you like yours. They make great winter jackets.
-
Um, great review but two glaring ommisions that come to mind, how much? and where from?
I typically don't post where I got it from since I don't want to favor one retailer over another. However Redwolf does carry every Pantac item as far as I know.
http://redwolfairsoft.com/redwolf/airsoft/...il?prodID=27715 $84 USD
-
Dont worry with Christmas break comes many many more reviews.
-
Thank you and yes they are very widely used. I would love to review the clones against them but am to cheap to pay for them lol. A lot of magazine ads for real steel companies have these gloves in them too.
-
Oakley Pilot Glove or SI Assault Glove
I have yet to review a pair of gloves but these gloves have seen hard use from me over the past year and a half and I figure its time they get there day in the spotlight. I would also like suggestions on a glove to possibly replace these. It needs to be fairly breathable and not bulky and knuckle protection is a plus.
Material
The Oakley Pilot gloves are a mish mash of various materials that in the end seems to make an exceedingly comfortable glove. I cut the tag that says the materials and to be honest most of you dont really care but I will list them from memory. The palm is a very thin leather with tiny vent holes. The knuckles are carbon fibre with a padded underside. The section closest to the wrist is made of neoprene. Above that is a ridged weaved fabric complete with a firmly affixed Oakley O. The area surrounding the knuckles and at the base of the fingers is a nice and strong died leather. The top of the fingers have neoprene leather and the ridged fabric on them. The sides of the finger are covered with leather at the tip and a stretchy venting fabric along most of the length. The tips of the pointer and middle finger have a thicker piece of leather on them to aid in longevity and grip.
Features
The Oakley Pilot is a mid length glove that extends slightly past the wrist joint. It is made with warm climates and manual dexterity in mind. The entirety of the glove is covered in a way to let out moisture and heat to keep your hands fit to fight. This makes for a fairly light glove but it comes at a cost. The thin materials can give up along the seams of the fingers and I have witnessed this in friends as well as my own (pictures of this later in the review). That said these gloves do hold up fairly well to the abuse of military life. I have been using mine for a bit over a year and a half and use them for almost everything. I use them in the wood shop, as moving gloves and throughout the rigors of my Army job. I liked them so much I ordered a black pair for my motorcycle.
At the wrist of the cuff there is a textured grip of nine raised rubber nubbins which aid in putting the glove on. These work well but will eventually start to come off. The wrist part of the glove can be tightened with a Velcro strap to ensure your gloves doesn't come off or foreign object like a shell casing or bugs get in. I have fairly large wrist and hands so I don't often use this strap other than to secure my gloves to my gear when not in use. The cuff is made of a neoprene material and is holding up great so far on all of the gloves I have seen.
The tan leather in the knuckle region of the glove is stained with a nice tan die. It is a smooth piece of leather on the tan version while a slightly textured version on the black. The carbon fibre knuckle is double stitched in to ensure it doesn't get ripped off easily. The underside of the knuckle is padded with a nice foam that even when you give a decent punch to something it's not really felt. I can confirm that it is very painful to get it in the face. My hands were soaked and I was yanking at something and my hand came free and met up with my lip. It hurt a lot and my teeth made a visit to the inside of the back of my lip. This knuckle has also protected my real knuckles from all sorts of smacks and dings in an urban environment. Just above the knuckle are four rubber exhaust ports. I haven't really noticed them doing a whole lot except with a strong wind or when on my bike.
The fingers are made up of several materials and different features. The tips of the middle and pointer finger are covered in a thicker leather to stop them from wearing down. They were also given little grippy circles on them made of a rubber like material. This material will go away eventually with repeated use. You should be able to see this in my photos.
The palm of the glove is made of a thin perforated leather. I like this a lot because I can feel my weapon a lot better and it allows for awesome breathability.
Faults
All good things must come to an end and these gloves are not the exception. I have had the textured grip on the wrist lose its nubs, the grips on the fingers come off, and holes through the side fabric of the fingers. Does this bother me well yes and no. I really like these gloves and I know sacrifices need to be made in order to have the level of breathability, flexibility and weight these gloves have. I also put them through a lot of hell for example tons of rain CLP from the machine gun shoot and wear an tear as work gloves. They held up decently well for that but they are decently expensive and some of the faults happened early in its life.
I do think I got my money's worth and would recommend these gloves to others. If you have a glove you would like to recommend me to try that has similar features please go ahead.
Photos
I know the quality of the pictures is still fairly sad but it's the best I can do with a point and shoot camera and the lighting in my barracks.


-
Update I kitted it out with pouches and added the kangaroo/yote to it.


-
Pictures of questionable quality

-
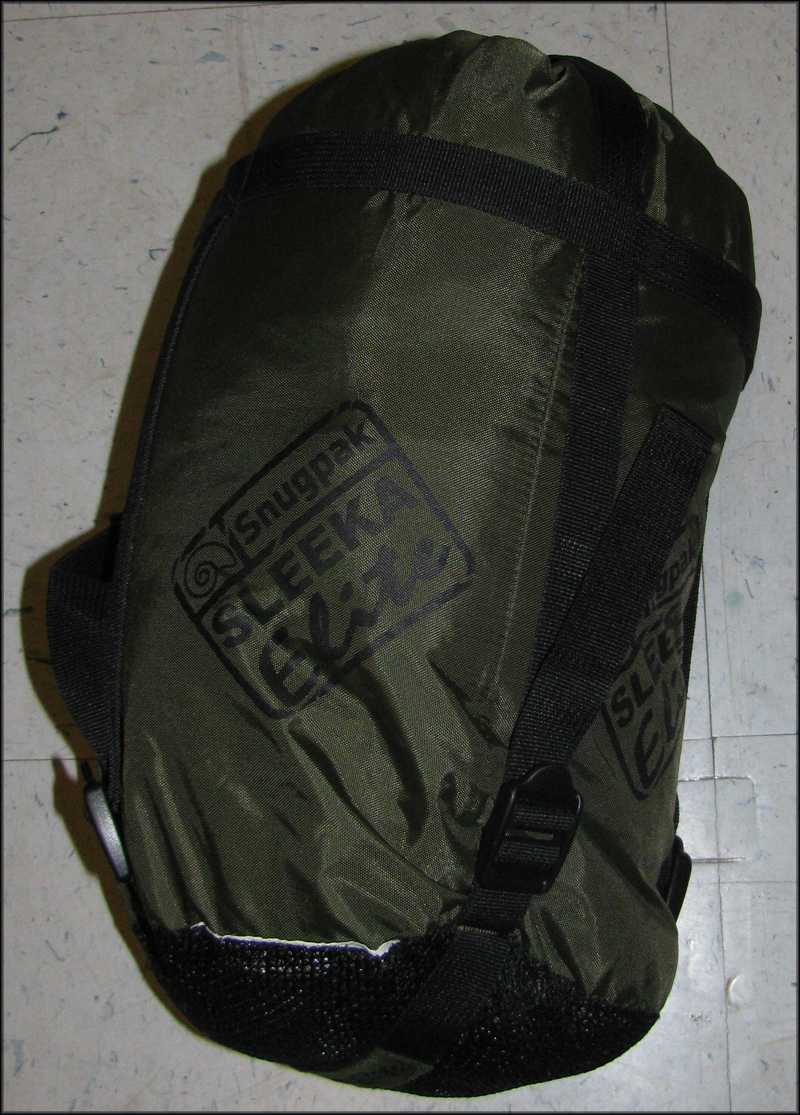
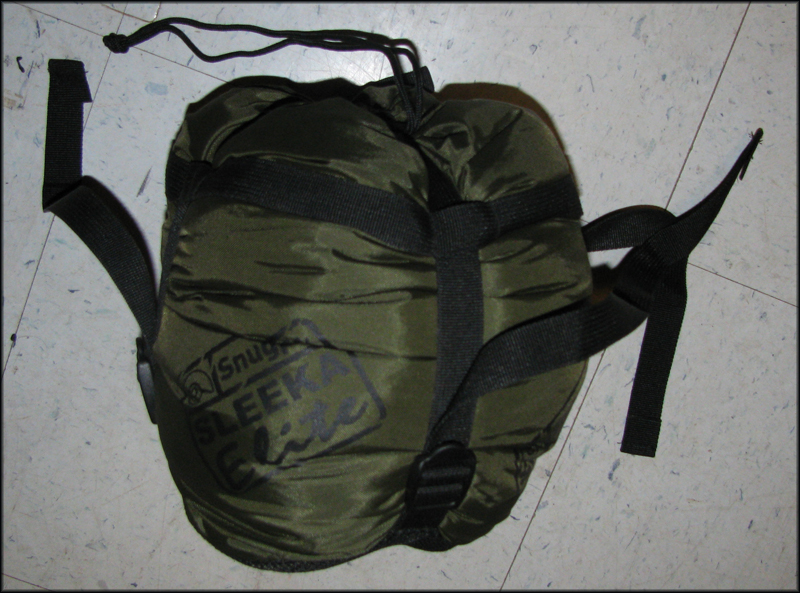
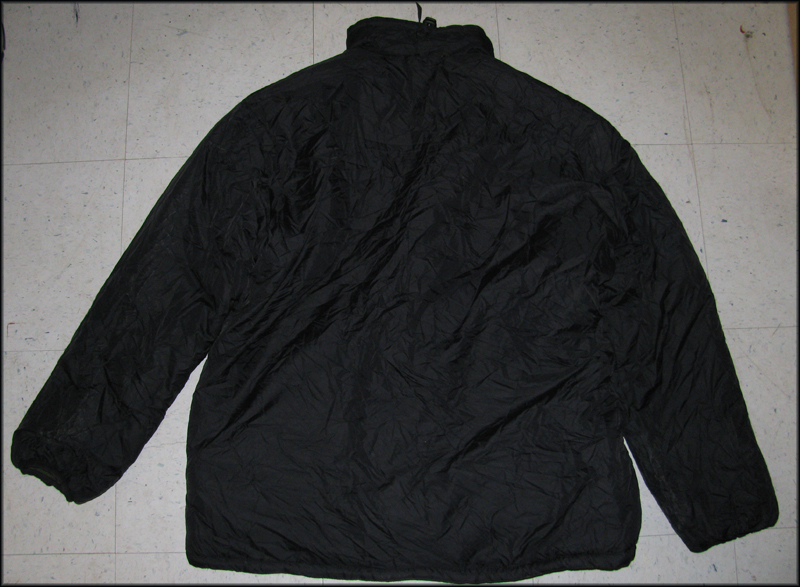
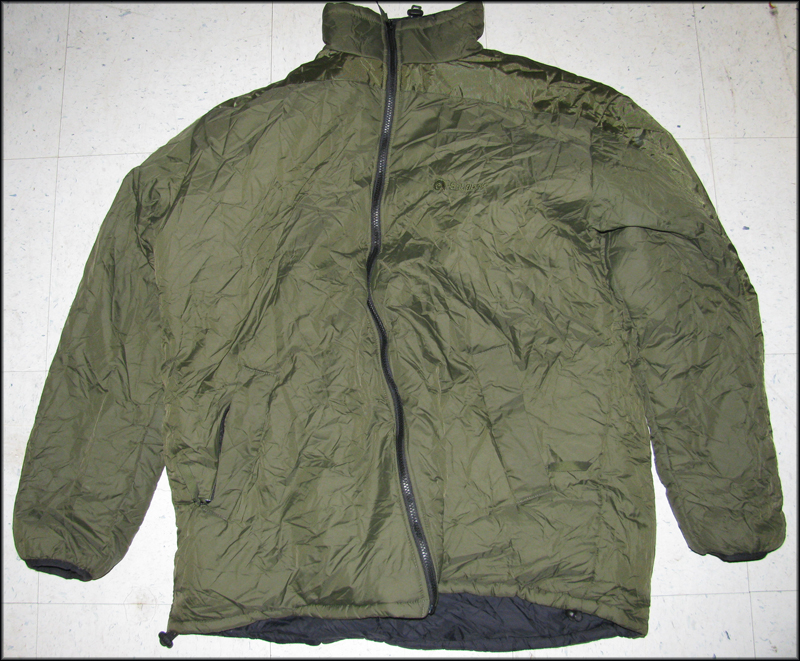
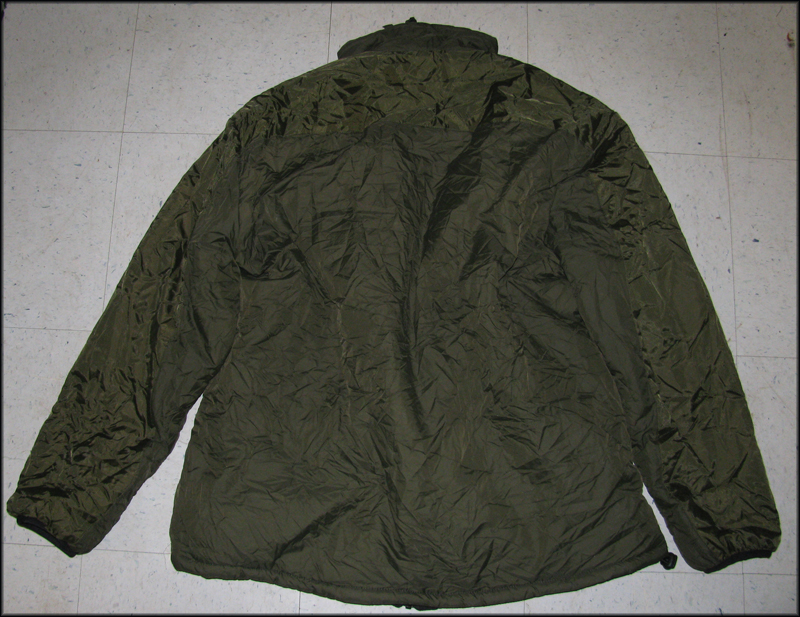
Snugpak Sleeka Elite Reversible
Sometimes a product comes along and makes you want to shout from the rooftops. This is one of those products. I picked this coat up as a multi-purpose coat. I had recently got issued the new Cadpat Gortex raingear and wanted something to layer under it. I am not a fan of a bulky winter coat because if you get warm you don't have anything to room to moderate your temperature. Having owned several Snugpak items I assumed this would be a quality piece and I wasn't mistaken. Now I shall run through the features of both sides of this coat.
Green Side
The green side is the reinforced side of the jacket made for military style work. The Snugpak logo is nicely stitched on the left breast of the jacket in an unobtrusive green thread. The tops of each arm are covered in a reinforced strip of a nylon like material. This strip of reinforcement goes from the wrist to the collar of the jacket and travels around the backside of the shoulder area. You may ask why this reinforced strip is there and it's actually a really good idea for it to be on the jacket. The main body material for the vest is made of a sleeping bag material. This material isn't exactly tear or scratch resistant. Snugpak has reinforced the area that a rucksack will bear down on and the arms so that when they brush up against things you won't have a tear. I like this idea because I am a clumsy person.
The collar for the green and black side are the same sleeping bag material which I am lead to believe is called PARATEX LIGHT. It feels very nice to the touch and seems to be semi windproof. The collar did not chafe me even when I had a bit of facial hair going on. This is key because when zipped up the collar goes a good distance up your neck. For you large necked people out there like myself this next feature is not as useful but to the skinny necked ones it's great. The back of the collar has a draw string that can be used to cinch the collar tight so wind doesn't blow into your jacket from the top.
The green side of the jacket has less pockets then the black side of the vest. This is due to the fact that it is meant to be a layer and not an outer garment so you can wear your lovely camouflage items on the outside. The green side just has the two pockets one at each side just above your hip. The pockets are spacious and fit my massive hands in them which is a plus. The pockets are closed with a zipper which thankfully doesn't seem to catch on the fabric.
Black Side
The black side is meant more for wearing it as a civilian coat. It is devoid of the reinforced shoulders and arms that the green side has. I would like this as a feature on both sides because life is full of places to ruin your fancy jacket and I seem to find them often. The black side has one of the features of this jacket that I don't like. The wind flap that runs the entire length of the zipper seems weirdly designed to me. The only attachment point for the flap is a Velcro square at the very bottom of the flap. SO if you are using the black side and its windy the upper region of it flaps around a lot. This could have been remedied by several other Velcro spots. Another thing I don't like about the flap is the four rows of vertical stitching running the length of the flap. I think this just isn't aesthetically pleasing but that's just me. Otherwise when you are using the green side of the vest it does seem to keep the draft out so mission accomplished in that respect.
The black side of this jacket has an extra pocket not found on the green side. It has a chest pocket at the left breast with a weather flap covering the zipper. This flap is also the location of the Snugpak logo on that side of the jacket. All three pockets are a generous size and allow me to put my hands in them to retrieve things or in case of the ones above your hip hide them from the elements.
At the bottom of the coat there is a draw string which allows you to cinch up the coat stopping wind from blowing up into your coat and trapping all that nicely built up heat. This is also where my only other issue with the coat comes in. The cord that comes out allowing you to cinch the fabric down is coming out of a seam where the black and green side meet. This area doesn't appear to be reinforced so I can see it coming undone with repeated cinchings. I would think a small grommet would hold up to the wear and tear of the string better than nothing. This also goes for the one in the collar.
Conclusion
I have now had the chance to use this coat in two weeks of army work. I used it in conjunction with my rain jacket and it kept me warm in the freezing cold wind and at night. The material feel very nice on the skin too. I also wore this jacket under my riding jacket on the way home on my motorcycle. This jacket is worth its weight in gold. My trip was 5 hours at night where the temperature was around -1-+2 degrees Celsius. My upper body was never once cold the entire trip going at a determined speed on my bike. My legs on the other hand felt like they were two solid blocks of hamburger meat. Other then the cosmetic issue and the draw strings this jacket gets top remarks in my book. It has a comfort level of -5 but is rated to -10 degree Celsius. As part of a layering system this will serve you well into the winter. The vest comes with a very nice stuff sack. It crunches down to half its size when in the stuff sack and makes packing it a breeze. My stuff sack did come with two ripped stitches where the mesh meets the bag material but hasn't seemed to worsen with repeated stuffing's yet.
Pictures will come when I get a chance to take them but for now
-
Any time I enjoy writing reviews. I have a few reviews lined up for the next few weeks all things I use very regularily.
To Review
Snugpak sleeka elite reversible
Snugpak stratosphere bivvy tent
Belville 490(I believe thats the right number there the us army issue desert boots)
Oakley pilot gloves
Super feet insoles
As always feedback to my reviews is much needed as no one ever tells me what they like and dislike about them. So I am stuck playing the guessing game.
-
Pantac Kangaroo Pack (CB)
The Pantac Kangaroo Pack is a copy of the Eagle Yote. It is a backpack capable of using straps for a regular pack setup or using the molle attachments on the back to attach it to a vest. Unlike previous hydration carriers Pantac has released this has actual straps and not just pieces of webbing. The straps are removable when using the molle attachments to save on weight. Unlike the Yote this pack does not come with a hydration bladder.
On to the features of this lovely bag that might have a chance to replace the MBSS as a favorite hydration carrier pack. At the lower end of the pack is a wedge shaped circular pouch. This pouch is closed with two zippers with braided para-cord on them as pulls. The zipper is a chunky ykk zipper that is certainly not going anywhere. The pouch has two rows of Velcro on the outside forming a rectangle roughly 3 inches tall and 6 inches wide. This can hold the larger unit or morale tabs that people love to affix to their gear. The pouch is a bit bigger than an old school Discman. Above this is another Velcro tab that you can use to affix a smaller name tag, flag or unit tab etc. At the top of the outer flap is a covered zipper closed pocket that runs the length of the pack. This is good and bad. Its good because its added storage but bad because its exceedingly hard to get things at the bottom of the pouch due to a narrow top and the flap. Admittedly I have large hands so this may not be a problem for smaller handed folks. If the pouch was an inch wider it would be a great size for people of all hand sizes. The large outer flap that is used to hold a helmet to the pack (more on that later) is cinched down by 6 compression straps. Each compression strap has a quick release buckle and a TAD style Velcro webbing keeper (still not sure what to call these things but I love them). The back of the large flap is made of 420D nylon to save on weight.
Behind the outer flap is the helmet storage area. It's a mesh bucket that has elastic stitched to the top to help retain your helmet. The compression straps are then used to further tighten things so you don't lose your brain bucket. This system works well and holds my Canadian Army helmet just fine and I have a large head. At the top of the back section where the main body of the pack is located you will find another zippered pouch running the length of the pack. This pouch is much better than the previous one because my meat hooks manage to fit in nicely and grab things. Much like all other zippered pockets this one has para-cord pulls on it. On each side of the pack are a utility pouch that is an inch deep 6 inches tall and 3 inches wide. Each pouch has a single drainage grommet at the bottom. This pouch would be good for storing a multi-tool and other small bits you might need easy access to. A daisy chain row runs the top half of the pack to allow another way to rig it onto a vest. The Molle mounting on the back consists of two straps and it is 4 channels wide. The length of real-estate it can take up on a vest is 8 rows of webbing. This will allow the vest to be securely fastened to the vest with no hint of moving. Each shoulder strap is held onto the vest with two easily removed pieces of webbing. Each strap has 2 1 inch plastic d-ring so that you can route a hydration tube through them or a similar item.
The inside of the main body is lined with 420D nylon and has a mesh pouch. At the top are three Velcro tabs so that a hydration carrier can be secured to the top of the pack. There is a Velcro pouch that runs the length of the interior and I can only assume it's meant to hold the hydration bladder to separate it from the contents of the pouch. There is a single drainage grommet at the bottom of the main compartment.
All in all I am fairly impressed with this bag. I don't know if it will replace the MBSS due to it requiring me to attach the back panel to my RRV which adds even more weight to my hefty vest but it might be a good candidate for my SPC. I do plan to use this bag in the colder temperature because it will hold my Snugpak Sleeka Elite jacket for when it gets cold.
The back

The molle attachment

The shoulder straps

Side

-
Pantac Personal Retention Lanyard
Caution: This device is made to complete a look and is not intended or certified to be used as a load bearing cable.
With that warning on to the review. This will be a small one because there aren't exactly a ton of features to something like this. The intended purpose of the real one is to provide a method to attach yourself to a solid structure in case you are worried about losing your footing.
The lanyard itself unstretched is roughly 30 inches long and extends by about 5 inches when extended. The coil is made of 1000D nylon with a bungee cord on the inside of the tube. The stitching is good and strong and despite my warning I did test its ability to hold my large self off the ground. We attached it to a chin-up bar and I hung my entire weight off the ground using only the bar. I bounced several times to see if I could get anything to break and it didn't happen. We also tried to release it under tension to see if it could fail that way. The key ring started to bend but it would not release.
The metal quick release catch is actually pretty cool. It can be closed with one hand because the retaining bar is rounded at the top. This also stops it from getting partially latched and having it fail under stress. There are no casting lines on the catch to wear on your gear. The release latch is opened by tugging on the yellow release cord which is made of nice yellow nylon. The release strap is reinforced by two straps around the key ring so that if one fails there is a backup. If the latch is clamped onto something like a carabiner and the release is pulled the catch falls effortlessly off of the carabiner.
Where the strap attaches to your gear you can attach it to your belt by a carabiner or using the large strap to put right over your blast belt or some other similar belt.
With that said this is a pretty cool piece of kit to complete a load out and at over half the price of the original makes a great substitute. Most airsofter's wont actually require the capabilities of the real one.
The whole deal

The belt loop

The clasp

-
Do the marines no use the Super FLC? Sadly I dont know much about American Kit. I mainly talk about the features of vests and what I dislike and like. Now if were talking Canadian kit I can speak for days on how sub par most of our stuff is

-
I got it as a review set so I dont know how much it cost. It will be released in ACU and CB
-
So I was given a review sample of the Pantac Molle FLC Full Set in Coyote Brown to review. I had originally heard of the vest being produced by Pantac a month or two back but was sceptical. I wasn't sure why Pantac choose to make a vest that is so easily acquired. Turns out it is because they were releasing an entire kit. When I received the kit I was quite surprised. First here is a list of the items included in the kit.
The kit is a replica of items produced for the United States Army by www.specialtydefense.com
1x M/A Fighting Load Carrier Load Bearing Vest w/Front Zipper (FLC)
2x M/A 5.56 Triple Magazine Pocket 30 Round Direct Action (holds 3 m16 magazines)
3x M/A 5.56 Double Magazine Pocket 30 Round Close Quarter Battle (holds 1 m16 magazine)
2x M/A 1 Quart Canteen/Utility Pocket
2x M/A 100 Round Ammo/General Purpose Pocket
2x M/A Hand Grenade Pocket (holds 1 grenade)
1x M/A Canister Pocket Smoke/Flash (holds 1 smoke or flash grenade)
1x Bandoleer 5.56-6 Magazines (holds 6 m16 magazines)
1x Butt Pack with additional strap to wear as a belt
1x SDS Military Hydration System
1x M/A Assault Pack Large
Materials
The materials and stitching are all high quality stuff like you have come to expect from Pantac. The material is 1000D Cordura, UTX snaps, ITW Nexus buckles and high quality mesh.
The Vest
The front of the vest has 8 rows of molle webbing but due to the cut of the vest it would be annoying to say how many columns so I will let the pictures speak for themselves. The top front of the vest has two fabric loops one on each side. These would be good to attach a one point sling to and the right hand side has plastic d ring just under the loop. The upper 5 rows of molle on the vest are attached to mesh to aid in breathability and reduce weight. The fourth row of molle down from the top is the chest buckle for when you are running the vest without using the zipper. The lower three rows of molle are attached to 1000D Cordura.
The waist belt is adjustable due to an interesting attachment method and can be sized from really small to very large. There is a T made of webbing that is pulled out from two rows of webbing. The waist belt is also nicely padded albeit a bit stiff but will soften up in time. I found the buckle at the bottom of the zipper area to be attached oddly and made it hard to zip up if attached. I removed the buckle to make it less bulky. This buckle is also used for attaching the vest without the zipper. The back is four straps of webbing and a buddy handle at the top.
Inside the vest there are two stash pockets for maps and other small items. The vest is an exceedingly simple vest so there isn't a whole lot more.
The Pack
The Assault Pack Large is a similar size to most other three day assault packs. The front of the pack has one row of 5 columns of molle webbing. There is also a very large square pouch at the front that is almost 4 inches deep. The main body of the pouch is closed by a zipper and has two buckled cinch straps to help compress things down. Inside the pouch there is a large Velcro pocket capable of holding documents and other small non bulky items. There are also two male UTX metal snaps on the inside of the pouch capable of attaching the bandoleer to. On the outside of the pouch is another Velcro enclosed pouch. It is similar sized to the one on the inside but has a zippered organizer and pen holders in it. The large inner pouch has a single drainage grommet at the bottom. On the sides there are three rows of two columns of molle webbing and two compression straps. At the top there is a carry handle and two hydration or communication routing holes. The back part of the bag has a large insert area for padding. There is also a clear plastic slot for putting your name in at the lower section of the back. The shoulder straps are one of the only faults I have with the bag. The straps are two close together and I find they cut into my neck. If you're a large necked person you might not have an issue with this. There standard straps otherwise and have quick detach points at the bottom.
Inside the main pouch near the front there is an enormous mesh zippered pouch. At the back is a padding sleeve filled with a centimeter thick piece of foam and a large plastic sheet to add stability.
The Hydration Carrier
The hydration carrier is a fairly standard piece. It has a large screw off black cap on the outside for filling. There are three rows of five columns of molle at the bottom of the carrier. At the very bottom is a single drainage grommet. At the top of the carrier there is a carry handle made of regular webbing. There is also a carry handle just under the filler cap.
At the rear of the bag there is a slot to remove the hydration bladder through however I have not tested this yet for fear of breaking something. The nozzle on the bladder is the same one Pantac has been using ever since they were called Phantom.
Pouches
The pouches aren't anything really all that fancy there just the normal way a pouch looks. They are all built well and will serve their purpose fine.
Pictures
I have been overly busy with the army and am currently unavailable to take more detailed shots. When I become less buys I will take my normal detail shots.

KJW M4
in Rifles (Gas)
Posted
The little spring attached to the valve knocker on my gun seems to have possibly ate it. I say this because its always forward and the hammer hits it but cant make the mag release gas. Has anyone else had this issue? The bolt also sometimes get hung up there so I am assume the spring is pushing on the bolt catch pushing it up into the bolt as it attempts to slide forward.