

machgo
-
Content Count
376 -
Joined
-
Last visited
Content Type
Profiles
Forums
Gallery
Blogs
Calendar
Everything posted by machgo
-
WOW--that is a big help! :) My lifter works exactly as you described, so my problem seems to lie in the forks. I will inspect the action as you've outlined. Thanks very much!
-
I seem to have shells jamming. When pumping the gun without shells, the action is smooth. When loading as you do, the shell jams--when I pump to load--and excessive force is required to open the bolt to get the shell loose. And I think the lift plate thingy doesn't move right, but I don't know how it is supposed to. Sometimes it feels like it is binding, others it feels smooth. Is it always supposed to be able to move up and down, you know, spring loaded? Because mine doesn't always.
-
Meaning don't eject the last, spent shell?
-
I have a dumb question for those who own one of these awesome shotguns, and please bare with me--I have no clue what the correct terminology is: How do you load the weapon? By that, I mean exactly what motions do you go through? Seems my action is not smooth at all unless I load a shell directly into the barrel, move the front hand guard forward, then load a shell into the magazine tube from below (I only have two shells right now.) This leads to the second question: are you guys leaving the breech open? Because if you rack the hand guard forward after firing all the shells, the trigg
-
The GHK AUG just turned up stateside at Evike...
-
And a sear only set... http://www.redwolfairsoft.com/redwolf/airsoft/Accessories_GBB_Hammers_and_Triggers_Z_Parts_CNC_Steel_Sear_Set_for_WE_TA_2015_GBB_WE_Original_Part_21_22.htm
-
Lesser parts set for $58.50 as well... http://www.redwolfairsoft.com/redwolf/airsoft/Accessories_GBB_Hammers_and_Triggers_Z_Parts_CNC_Steel_Trigger_Set_for_WE_TA_2015_GBB_WE_Original_Part_14_17_20_25.htm
-
Just for the record: Leaking reservoir tank--fixed with automotive gasket maker Leaking magazines--fixed with silicone grease Mags don't readily/easily line up with fill nipple--fixed with piece of 1mm rubber sheet added to gun Trigger too hard--slipped in a piece of zip tie between the bar and trigger Broken bolt stop--currently trying out a new part made from nylon--too early to tell (in my case) Upper receiver sloppy/loose Body is thin plastic Body spreads a fair bit when inserting the upper receiver To be continued, I'm sure... I never expect airsoft
-
That's interesting. I won't try making one of metal, but I may incorporate that notch in my next try.
-
Not forgetting, but on the factory part the amount of material you are referring to is negligible. In fact, it tends to bias the front of the bolt stop to the right as it slips past the edge of the hop up housing. One of my designs incorporated extra material--more than stock--to absorb the blow of the bolt where you are referring. Unfortunately, there is so little space available, due to the nozzle, that not much more can be added. Add in the fact that I have only the most primitive machining capability--I'm using a drill press as a milling machine. I settled on the materials I chose
-
This is my third, and most successful replacement part. Notice the extra material forward of the pivot hole. This extra material prevented the piece from breaking where the factory part did, but it cracked at the new weakest link--the spot indicated by the red arrow. Again, this is where all the force is transmitted when the bolt stop rotates to contact the hop up housing. The crack above the pivot hole happened after the crack below the hole...
-
The red arrow indicates where the first break happened on the factory part. This is the weakest point. When the bolt slams into the stop it rotates until it contacts a small ledge on the hop up housing. All the force is transmitted to the area indicated by the green arrow--but that area is marginally stronger than the area by the red arrow, thus it breaks at the red arrow. The blue arrow indicates the area contacted by the BB follower in the mag. There is a small "ledge" here. It does not provide any support for the bolt stop as it does not contact the hop up housing. In fact, this le
-
I'm having difficulty with the bolt stop. The original will almost certainly break, because the design is inherently lousy. I've made three so far, and they have all failed for different, but related reasons. I've tried two different plastics--Delrin acetal and HDPE. The HDPE part failed immediately as this material is too soft. The Delrin part lasted as long or a little longer than the original, but ultimately failed. Another Delrin part failed more for design reasons. A re-design is in order, as the failures are happening due to where the load is concentrated--the small area in fro
-
Pretty, but not necessary, upgrade. LIke alloy wheels on a car.
-
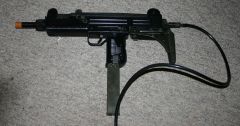
From the album: JAC UZI
-
Classis JAC UZI pictures
-
-
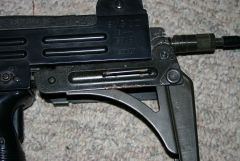
From the album: JAC UZI
-
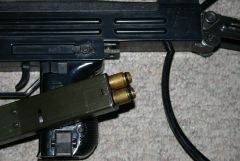
From the album: JAC UZI
-
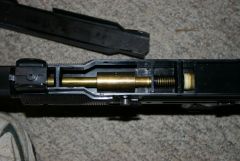
From the album: JAC UZI
-
That video was disappointing because a replacement bolt lock or stop is much needed. Mine broke, predictably, but it's a bummer just the same. Going to go the home made route after I source some suitable material--nylon I think. How have the home made bolt stops been doing? Had a magazine output valve start leaking, but some heavy grease seems to have fixed that, at least temporarily. On the plus side, the manual lists the O-ring sizes. I didn't have any, but I probably could have sourced some if I had needed to...
-
Seems to be all better now...for the moment at least. As said above, O-ring between tank halves is mighty thin. I added some automotive gasket maker around the seam and let it set up per the instructions. I added gas from a magazine before reassembly and no hissing was heard. Put gun back together and fired through a magazine in full auto bursts--no hissing. I then removed the magazine and fired the gun while holding down the disconnector. Oddly enough I only got three semi shots out of the reservoir. Before, I was able to shoot well over a dozen...Will have to keep an eye on it I gu
-
I can see why you suggest to remove the magazine catch first...but how does one do that? I've removed all the screws, but it appears the magazine catch holds the halves of the shell together. I've carefully pried around the catch with no success so far... I got it. Trick is to push only one side of the catch in, then pry the other side. I used my fingernail and it came right off. Using a screwdriver blade was getting me no where. Tank doesn't appear to be bulging. If it is bulging, it is very subtle. Leak is at the joint of the tank halves. I have some gasket maker compound set
-
OK thanks. Going to try to open it up later today. Will report back any findings.
-
Both.
-
Well, my drama started. While the gun still functions well, the reservoir in the gun has developed a very steady leak. I can't be sure, but it seems like it is NOT from the brass nipple area. It leaks with or without a mag installed. I do not relish the idea of opening this clam. If any one has split this thing open, can you chime in as to any surprises or areas where special care has to be taken? On a brighter note, after inserting a piece of zip tie between the trigger and trigger wires/rods, the trigger pull is crisp and double taps are very easy--something the stock trigger could

