

RSP1
-
Content Count
379 -
Joined
-
Last visited
Content Type
Profiles
Forums
Gallery
Blogs
Calendar
Everything posted by RSP1
-
-
Blender. I'm still well under my self-imposed polygon limit for this project though so most of the really visible problems are actually just surfaces yet to be modeled (the hinge, for example). This was just a quickie render with no normals and no glow/spec.
-
A couple shots of a low poly (1251 faces) G36K I modeled this afternoon. It still needs work, but it's presentable for now.
-
-
Thanks for your comment Sale. To get a better view of the grouping, I fired a 6-shot group into foam at the same 20 foot range. It's easier to see where each BB struck the target this way, vs. with paper.
-
Your APS-3 is now, for the most part, detail-stripped. The cylinder can also be disassembled and removed from the lower receiver, but this is fairly time consuming as the allen screws that hold it to the receiver are recessed into the sides of the gun and so can only be turned about 1/2 turn at a time. I would not recommend doing this unless you have an upgraded piston to install (there are none available at the time of this writing) or need to fix a compression issue. Reassembly is disassembly in reverse. If you have trouble with the trigger unit, here is a top-down view of what it
-
Now look at the left side of the gun. Tap out the pin that secures the loading lever, then remove the two brass flathead screws, being careful not to lose the small bushings on the opposite side. Finally, unscrew the black Phillips head screw from both sides (near the bottom of the frame by the back of the trigger guard. At this point you can remove the sideplates of the receiver and set them aside. There is no need to remove the spring from the right sideplate; you can just leave it there and leave the small bushings in their respective places in the left sideplate. Now,
-
The safety is a simple crossbolt type which is pressed in from the right to ready for firing. The gun cannot be cocked with the safety on, so I don't apply it at all unless I am not going to fire for a significant period of time. Finally, one very important feature for a target pistol: the adjustable rear sight. This sight is adjustable for windage and elevation by two knobs which click every quarter turn. Two indicators show how the sight is adjusted so it's easy to return it to its zero-adjustment position. This one shows the elevation - I've adjusted mine by a significant amou
-
The magazine is a small plastic assembly which mounts to the right side of the gun. Attaching it is a little like inserting an AK magazine backwards - it's first notched into place at the back of the gun, then clicks in at the front. The spring-loaded latch, however, is on the magazine rather than the frame of the gun, which gives the right side of the APS-3 a neater appearance when used as a single-shot pistol: Here's what the magazine looks like detached. The black, BB-shaped protrusion is actually the follower. The magazine features a catch like that on an AEG magazine to hold th
-
My only real complaints with this part are regarding the casting marks. There are two very visible circular marks on the right side from the casting process. I'd rather these marks than a large seam line, but they're still a little annoying: A spring-loaded catch extends from the front of the trigger guard (which also has a few casting marks) to interface with the lever, holding it in its normal position. It's not designed to lock in place, just give a positive indication that the lever is closed and offer some resistance to opening it: When the lever is pulled d
-
A large palm rest is present, and can be adjusted by loosening the two allen screws on the right side (the largest included wrench is the correct size) then sliding to change the height and angle. These screws thread to a metal bracket inside the grip: This rest has a light, pebbled texture on its surface which is comfortable. I would not want anything too abrasive on this: The shape of the grip can be seen most clearly from the back: Moving forward along the bottom of the gun, the next item of discussion is the trigger. This is very important for a target pist
-
From left to right, this pictures shows a 4.8mm wide front sight (interchangeable with the stock 4.5mm one), a package of BBs, and a set of four allen wrenches. The BB supply provided seems somewhat measly - mine included 52 BBs instead of the usual 100 or so expected with a new gun: There's also plenty of paper included - from the looks of it, two targets, two instructional sheets, one instruction booklet, and two warranty-related papers: I left those behind the foam and moved the accessories to the front. The pockets are sized well, and the smaller one is idea for littl
-
When Maruzen released their APS-3 in 2007, the response from the U.S. and U.K. was minimal, and it's not surprising. At $250 in Hong Kong stores, the gun is expensive for a pistol, and fills a target competition niche that isn't to be found outside of Asia. As such, little has been heard about this unusual handgun on airsoft discussion forums. I had been mildly curious about the APS-3 when it began appearing in stores. The compressed air power method was interesting, and I wondered what sort of accuracy the pistol was really capable of. But I never seriously considered purchasing one unti
-
That is VERY cool. Love the two tone and of course the slide/frame cuts.
-
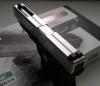
Barrel Comparison: PDI 6.01 vs. First Factory 6.03
RSP1 replied to RSP1's topic in Tactical Equipment and Accessories
Thanks for all the comments. I am leaving on vacation and so will not be able to reply to any further comments on this review until the 19th. As far as the PDI .05 barrel, my curiousity is piqued but I've got a busy schedule - a few days after I get back I'm leaving again for a month. We'll see. -
Barrel Comparison: PDI 6.01 vs. First Factory 6.03
RSP1 replied to RSP1's topic in Tactical Equipment and Accessories
I might try a PDI .05 because so many people seem to either be interested in them or swear by them, but of course it will depend on whether I find room for it in the airsoft fund to throw one in. It's not that they are very expensive - just that in purchasing a barrel vs. purchasing several thousand more BBs and some gas I usually give the edge to the gun food. -
Barrel Comparison: PDI 6.01 vs. First Factory 6.03
RSP1 replied to RSP1's topic in Tactical Equipment and Accessories
Enough on the physical differences - time for the tests. My testing platform is a Tokyo Marui Glock 17 with the following upgrades that could potentially affect accuracy: BoomArms Shuey Custom G34 Slide and Outer Barrel FireFly Recoil guide w/ bearings FireFly Aluminum Floating Valve for G26 Firefly soft V-hop bucking SD Hammer spring SD 150% recoil spring PDI Piston head It was very important to avoid variances in assembly of the barrel unit that could throw off the tests. As such each barrel was cleaned with seven cotton patches and hop-up unit parts were dusted with compu -
At times, I've wondered which is truly best for accuracy: PDI's 6.01mm barrel, or FF's 6.03. This review compares one to the other, in the same pistol and with the same barrel length. With a sample size of one, it shouldn't be considered a be all and end all guide to barrel accuracy, but it does allow one to draw some reasonable conclusions. First, let's look closely at the two barrels. They're both stainless steel, and as such won't tarnish like a stock brass barrel. Additionally, they are both cut to fit a Tokyo Marui Hi-Capa 5.1 or M1911A1, 112mm in length with a hop-up cutout for a VS
-
I'm not that person and I'm not looking to buy. But I think zenazareth is the person you are looking for. Edit: I see, oh well. Good luck.
-
Well then how about a KJW M700 non-takedown which you can imagine is a takedown model if you want? Small suppressor.
-
You're not going to clean the mud off of that M249? I think the wear looks great and adds some character, shows it's used... but in my opinion cleaning mud off is a matter of maintenence.
-
It is modified from the original stock. I filled in the hollow spaces and cut the shape I wanted. On the back of the grip where one's thumb goes, I layered epoxy on and pressed my hand into the stock as though gripping it normally so as to get a very close fit.
-
-
It's not a very large suppressor, but it is there:
-
Try looking over here for a bunch of airsoft raceguns all in one place.