

ardrummer292
-
Content Count
1,528 -
Joined
-
Last visited
-
Days Won
32
Content Type
Profiles
Forums
Gallery
Blogs
Calendar
Posts posted by ardrummer292
-
-
On 10/1/2023 at 7:45 PM, 3vi1-D4n said:
Games aren't getting better, in fact games are getting worse. Players have trouble listening and taking instructions, or be able to play for more than an hour or two. Milsim has become more LARP and tactical fashion cosplay that favours those who have money for kit, while conventional gaming has become counterstrike with paintball guns. Gone are the days where we would raid a base, conduct a fighting patrol at night, and do a dawn attack.
Its all a bit boring now.
More hardcore/realistic events (such as Milsim West) are a mainstay on this side of the pond. Rucking in, setting up patrol bases, conducting raids, and sharing a bit of misery are all part of the experience.
As for conventional pickup games, I've learned that it's all about who you play with. I've been blessed with a solid group of teammates (and more importantly friends) who are all on the same page. Win or lose, we're all having fun.
-
Another update: I'm having good luck with the Lonex LMG air nozzle + Bullgear hopup unit combo. I have installed this setup on a second Lambda Maximi with similar results to those above. I plan on doing the same to a third Maximi, which will be gracing my work bench shortly.
-
 1
1
-
-
Does the inner barrel have room to wiggle? If so, an easy fix is wrapping a layer of tape around it to "shim" it into the center of the outer barrel.
-
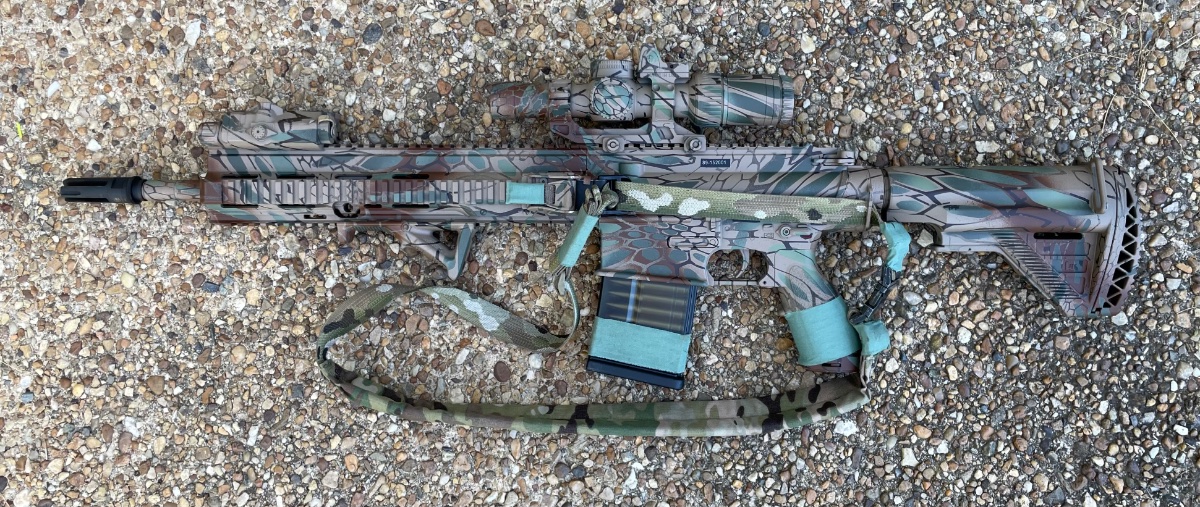
Nothing especially noteworthy, just a VFC HK417 with some accessories and a truly horrific paintjob. UKSF fellas seem to like their Kryptek paint schemes, so off I went.
I "retired" from machine gunning due to a back injury, but I still had a hankering for some sort of special-purpose weapon. This is my first DMR and it's quite lovely to use.

-
3
-
-
Quick update: got the Bullgear hop unit installed, plus a Lonex LMG air nozzle. Preliminary results are excellent. These parts, combined with a Prometheus 460mm 6.03 tightbore and purple bucking, yield ~386 +/- 4 fps w/0.30g bbs. This is about 2.09 J, or 475 fps w/0.20g bbs. Results were obtained with the stock M140-ish spring installed.
Fair warning, the Bullgear hop unit has a weird clamshell design. It took me a bit of head-scratching to figure out the proper method for installation.
-
1
-
-
On 5/15/2023 at 10:29 PM, NevadaZielmeister said:
Highly recommend AGAINST that unit. It would not fit the internal dimensions of the outer barrel/receiver and when I tried to get it to fit, it jammed with BB's, thereby breaking/stripping the gear teeth on the piston. I asked for a refund, still waiting.
I would recommend instead the Macaron bucking. with a M120 spring, I was getting 435 FPS with a .20g BB.
Well sh*t, I already have it in hand. Was really hoping to use it to improve the airseal, since the stock unit seems a little leaky.
I'll fiddle with it to see if I can make it work. Either way, I'll report back with my results.
-
Does anyone have any information on the new Bullgear hopup unit for these guys? Link:
https://bullgear.net/hop-up-lambda-defense-mk48
It seems there's some demand for a replacement hop unit, presumably because the stock cast unit doesn't have great airseal. I'm wondering which air nozzle they're designed for.
-
Almost forgot a section. Notes from my cancelled S&T HK417 build.
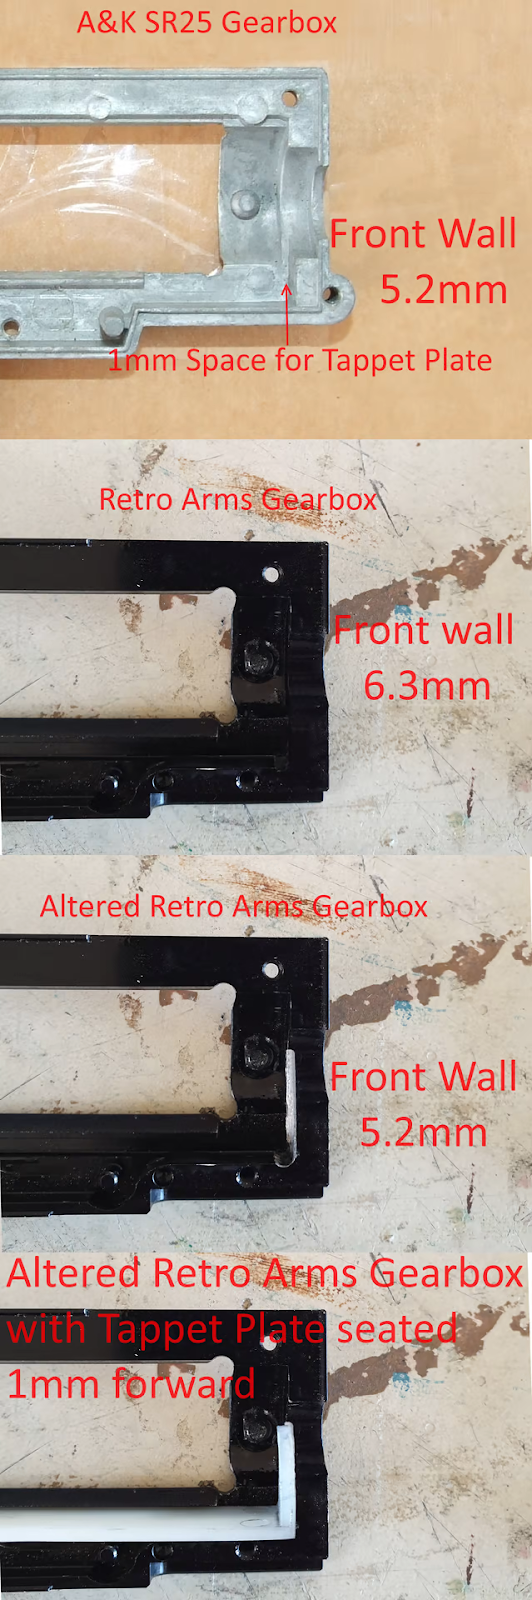
Retro Arms V2.5 SR25 gearbox modification: reducing front gearbox wall thickness to restore correct tappet plate range of motion. This modification is not required for the Retro Arms V2.2 HK417 gearbox.
Retro Arms SR25 gearbox installed in S&T HK417 lower receiver
Example of cracked S&T HK417 upper, taken from AirsoftPro’s website
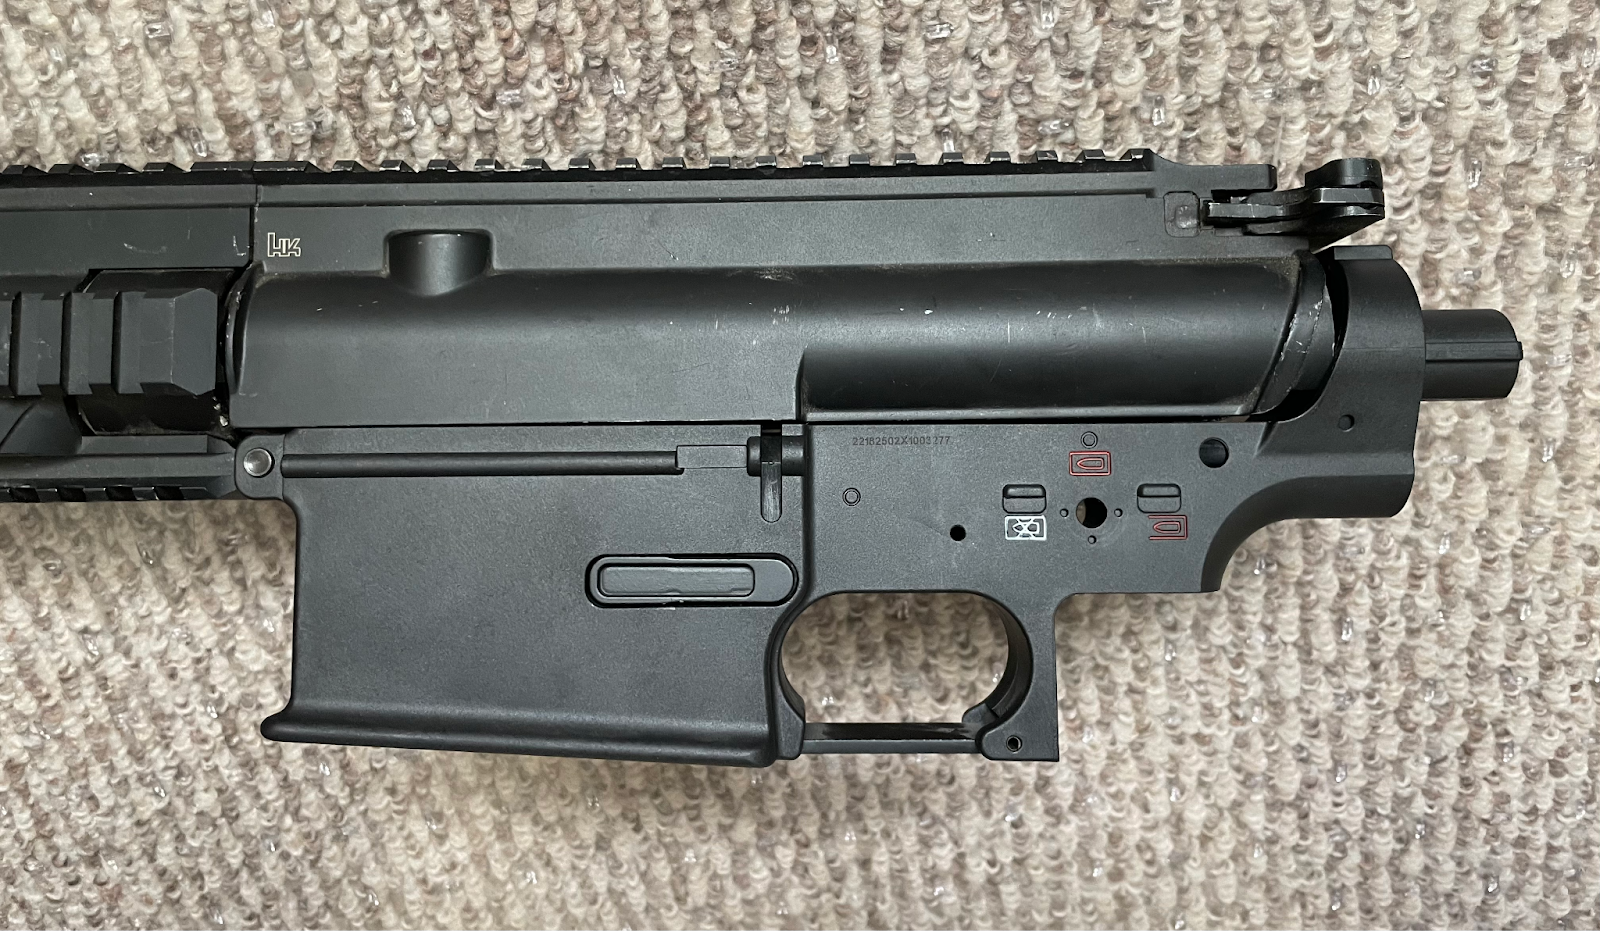
VFC HK417 upper installed on S&T HK417 lower, demonstrating dimensional differences
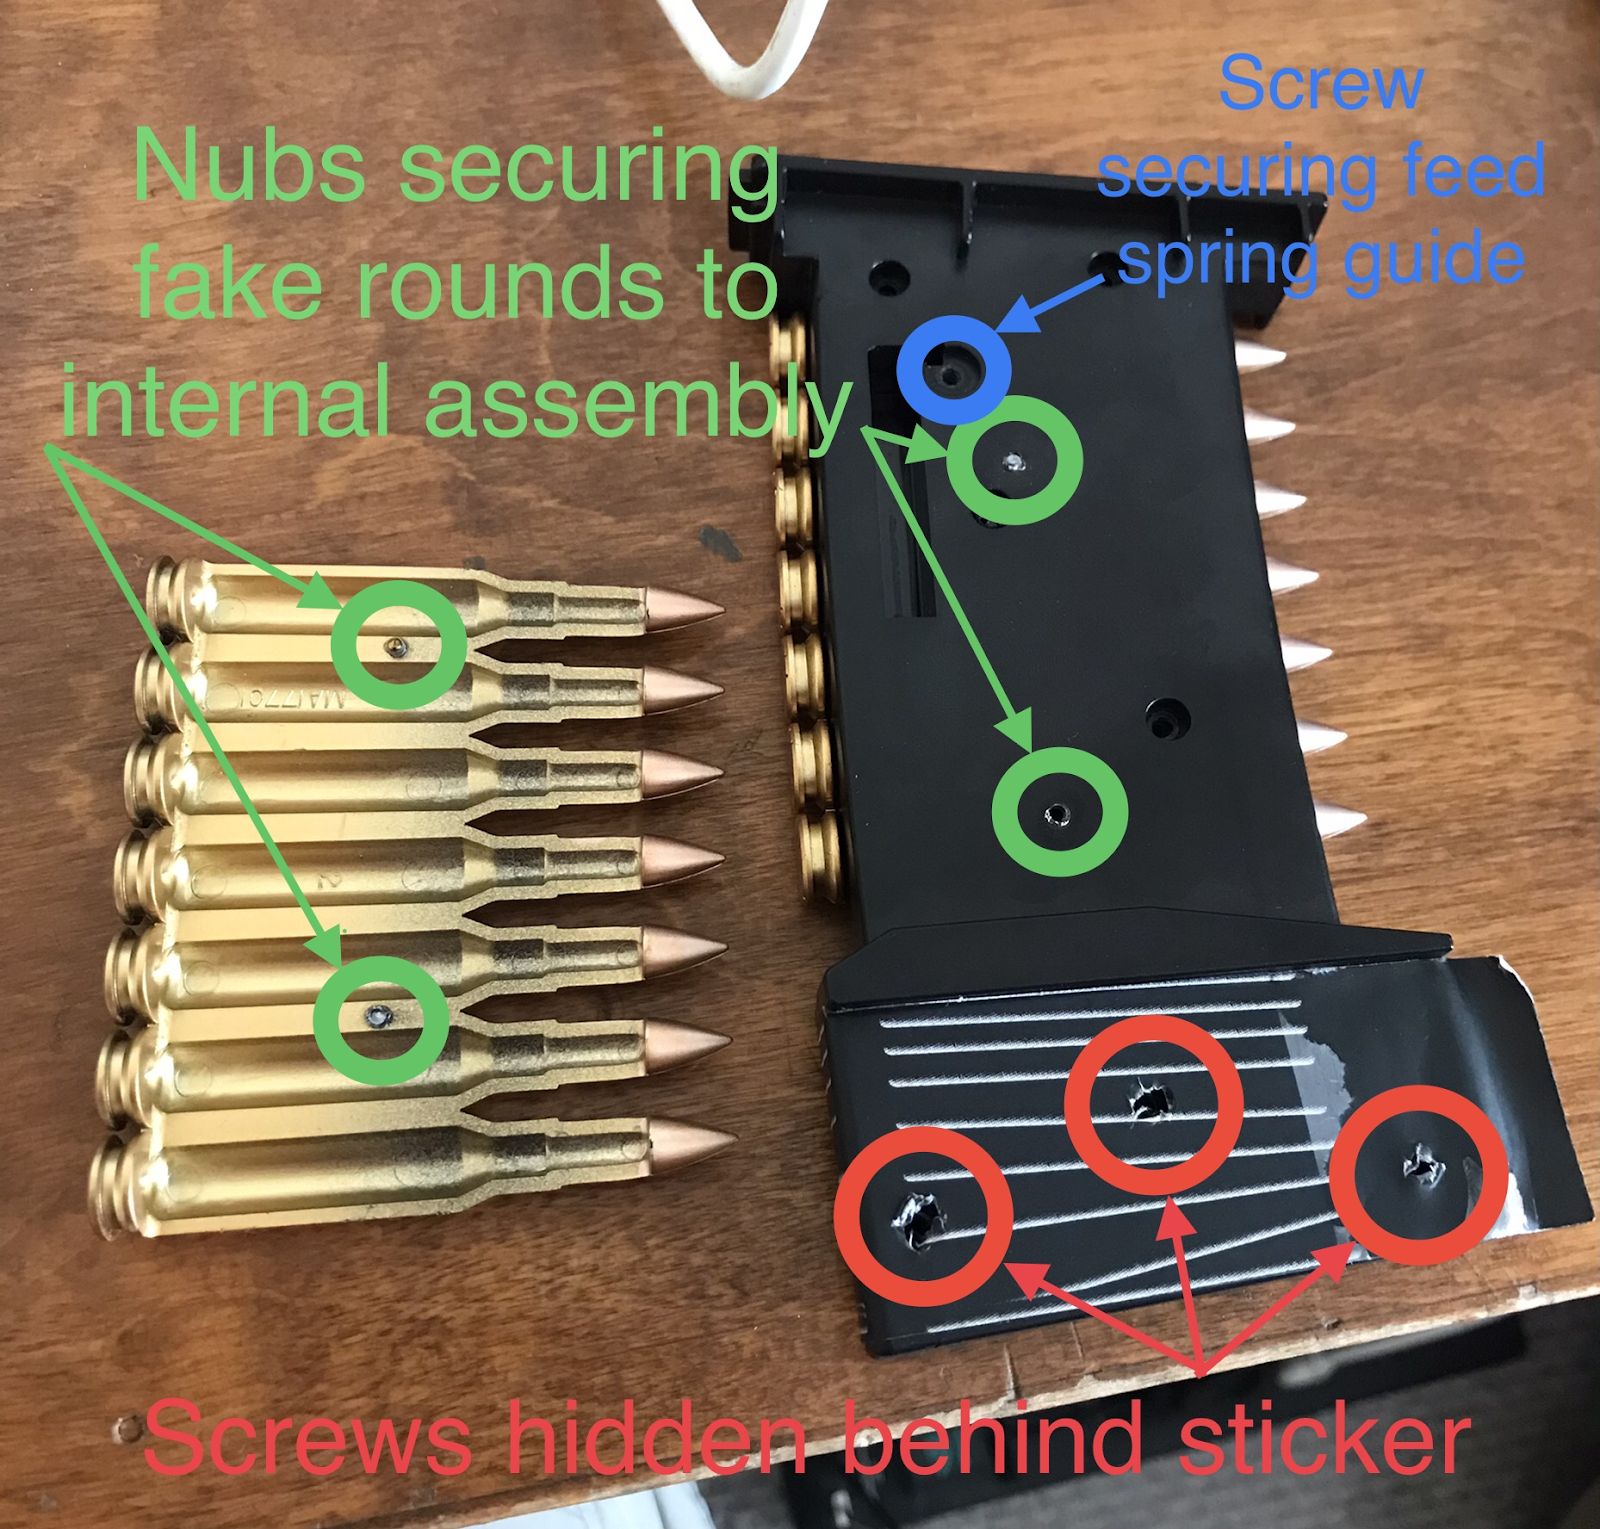
S&T HK417 standard mag disassembly
-
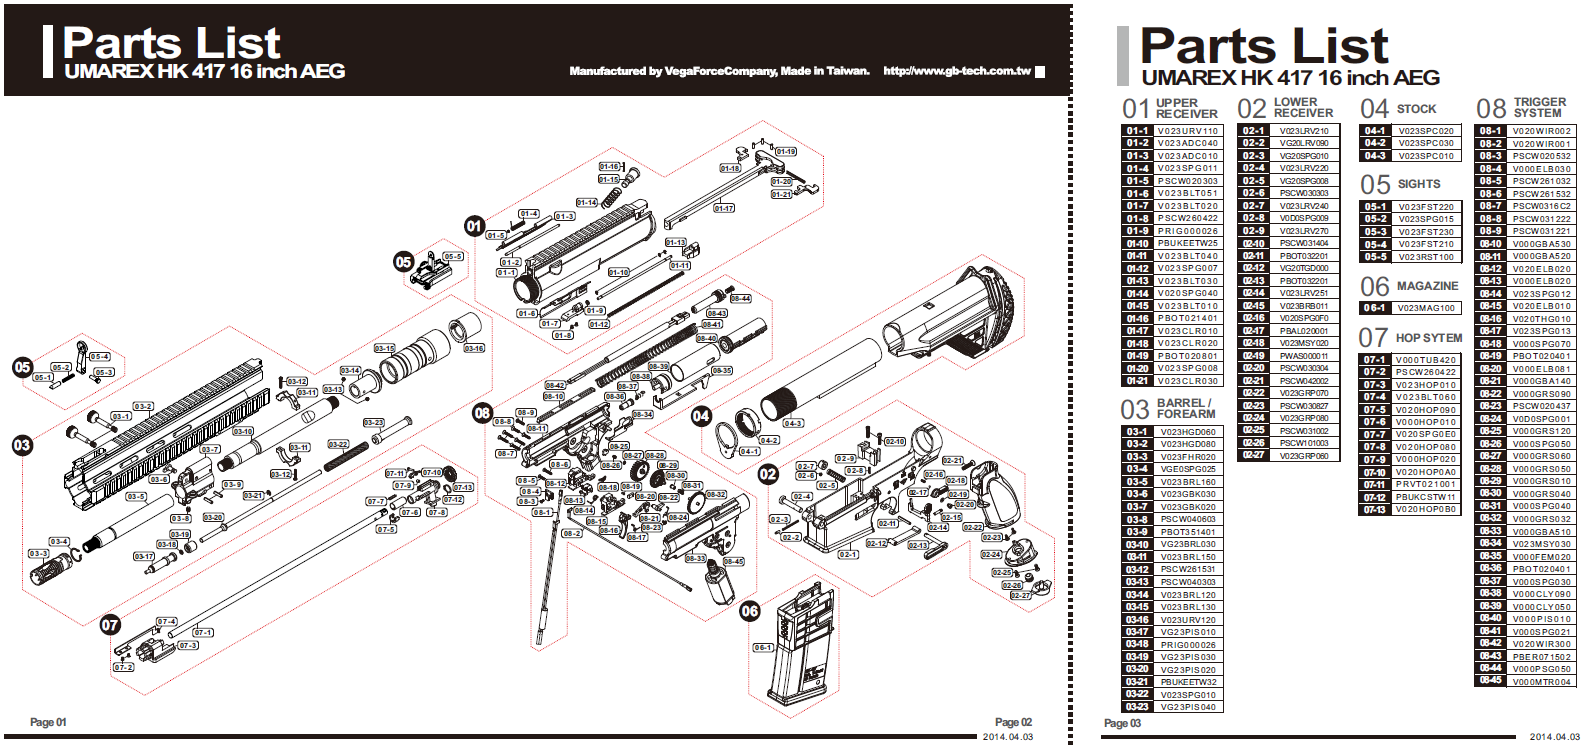
A bit late to the game, since this rifle has been out for 10 years. The lack of technical details available led me to write an internal and upgrade guide myself. Taken from a writeup I put together for my local group:
https://docs.google.com/document/d/19EZn2DgiSSANZsLn4gtlVTp4V9gO-Yv_RZc2uJPndm0/edit?usp=sharing
I'll leave all the UKSF impression-specific stuff out and just repost the technical bits here. If you're interested in building a UK-spec HK417 (a.k.a. the L2A1 SACTARASS), I believe I have most every relevant detail covered in the link.
Without further ado...
-
HK417 options
Tokyo Marui Recoil Shock HK417
-
Pro
-
Full metal construction
-
Readily available
-
Stock gearbox shell may be able to survive a DMR-strength spring
-
Excellent TM hopup unit
-
“Recoil,” if you’re into that
-
Available in 12” assaulter and 16” recce configurations
-
Con
-
Very expensive (around 640 USD)
-
Prone to locking up in semi auto, more so than standard AEGs due to slower gearbox cycle time
-
NGRS-specific upgrade parts are more difficult to source than standard AEG components
-
Stock NGRS gearbox uses a standard size V2 AEG cylinder, which does not have sufficient volume to propel heavy bbs through long inner barrels without significant joule loss; see “Internal upgrades” section for details
-
Reinforced gearbox shells, if needed, do not seem to be available
-
More moving parts (in the recoil system) means more stuff to break
-
-
Verdict: A decent option, but awfully pricey for a nice hopup unit and a bunch of extraneous moving parts. I didn’t do a terrible lot of research into this platform because it seemed to be a bad fit for my needs.
S&T AEG HK417 (ST47D)
-
Detailed review video available here (in Russian):
https://www.youtube.com/watch?v=myml7v4ITcg
-
Pro
-
Relatively inexpensive (around 270 USD)
-
Almost fully V2 compatible, with the exception of the cylinder head and tappet plate in stock form
-
Uses a lot of standard M4 parts, such as the motor grip and hopup unit
-
A proper V2.5-type SR25 gearbox (with elongated cylinder and 19 tooth piston) drops right into the lower receiver, which provides enough volume to propel heavy bbs through long inner barrels with minimal joule loss; see “Internal upgrades” section for details
-
-
Con
-
Almost entirely plastic; only the outer barrel, charging handle, and controls are metal
-
The front end of the gun flexes considerably, significantly reducing accuracy potential
-
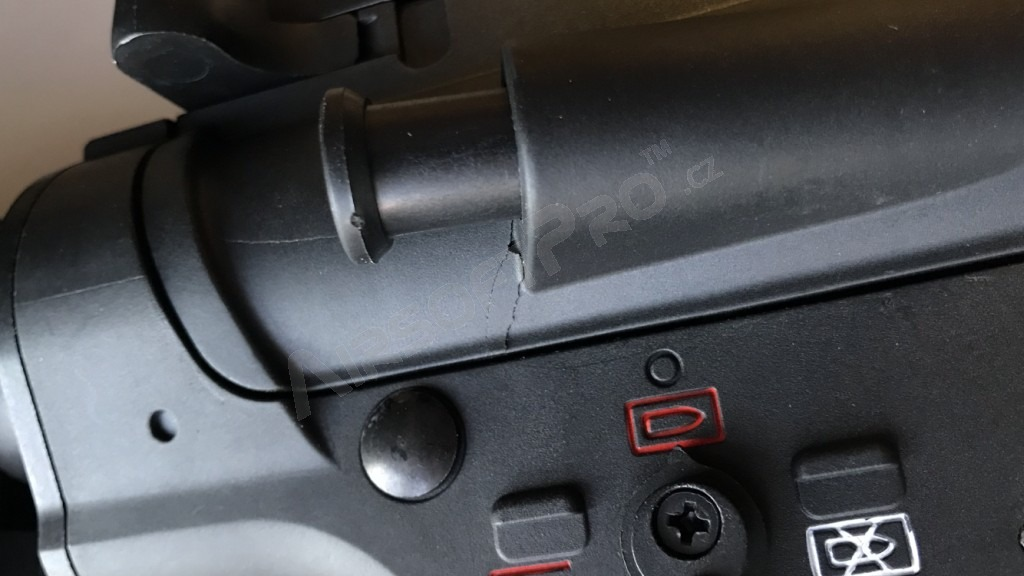
Upper receiver is very thin plastic, and will crack under stress
-
Metal VFC HK417 upper receivers cannot be transplanted onto the S&T lower receiver due to dimensional differences, so there is no way to reinforce this part
-
-
Not a 1:1 scale replica, since it uses a standard AR buffer tube
-
Magazine release has no anti-rotation feature, meaning the mag release can get stuck in the depressed position
-
Many of the fasteners are simple wood screws, secured directly into plastic instead of a bolt into a metal threaded insert
-
Stock JG/GE/Echo 1 “elongated V2” type SR25 gearbox uses a standard V2 AEG cylinder, which does not have sufficient volume to propel heavy bbs through long inner barrels without significant joule loss; see “Internal upgrades” section for details
-
Not readily available in the US
-
Only available in the 16” recce configuration
-
-
Verdict: This was the option I initially selected. It had the highest performance potential of the lot, at least on paper. In reality, the shoddy construction (especially the awful flexing of the gun’s front end) meant it was not viable as an accurized, hard-use platform. I ended up selling it and buying a VFC HK417 AEG instead.
VFC AEG HK417
-
Pro
-
Full metal construction
-
Mostly V2 compatible, with the exception of the antireversal latch spring, trigger mechanism, selector plate, cutoff lever, and tappet plate (kinda)
-
Available in 12” assaulter, 16” recce, and 20” sniper configurations
-
Pistol grip is at the same angle as the real HK417, if that’s important to you
-
-
Con
-
Difficult to find parts and accessories in stock
-
Expensive (around 440 USD), especially considering the inherent internal issues
-
Stock semi-proprietary V2.2-type gearbox uses a standard V2 AEG cylinder, which does not have sufficient volume to propel heavy bbs through long inner barrels without significant joule loss; see “Internal upgrades” section for details
-
Original production run of the stock V2.2 gearbox shell is prone to cracking when used with any spring stronger than an M120
-
Only aftermarket reinforced gearbox shell (made by Retro Arms) can be difficult to source and tricky to install
-
Only alternative gearbox shell (VFC XCR split gearbox) requires permanent modifications and isn’t any stronger than the stock gearbox shell
-
XCR gearbox conversion guide: https://www.airsoftsociety.com/threads/guide-hk417-gearbox-conversion.101142/
-
-
Newest version (designated “V2”) of the stock gearbox can reportedly handle up to an M130 spring without cracking, but this has not been verified
-
-
Mid cap magazines will not work reliably without replacement feed springs
-
-
Verdict: In stock form, it’s an overpriced body kit. Getting the gun up to DMR specs will require extensive internal upgrades, either in the form of a reinforced gearbox or HPA conversion. Once the S&T HK417 proved insufficient for the project, I got my hands on a Retro Arms reinforced V2.2 HK417 gearbox and started building out my VFC HK417 AEG.
VFC GBB HK417
-
If you want reliability and consistent performance, just don’t.
-
VFC HK417 externals
Weight: ~8 lbs unloaded, with no accessories fitted
Construction
-
Metal components: pretty much everything, with the exceptions noted below
-
Plastic components: pistol grip and stock
-
Rubber components: butt pad
Muzzle thread: 14mm negative
Battery compartment location and size: two compartments in the stock plus space in the buffer tube, max cell length 125mm
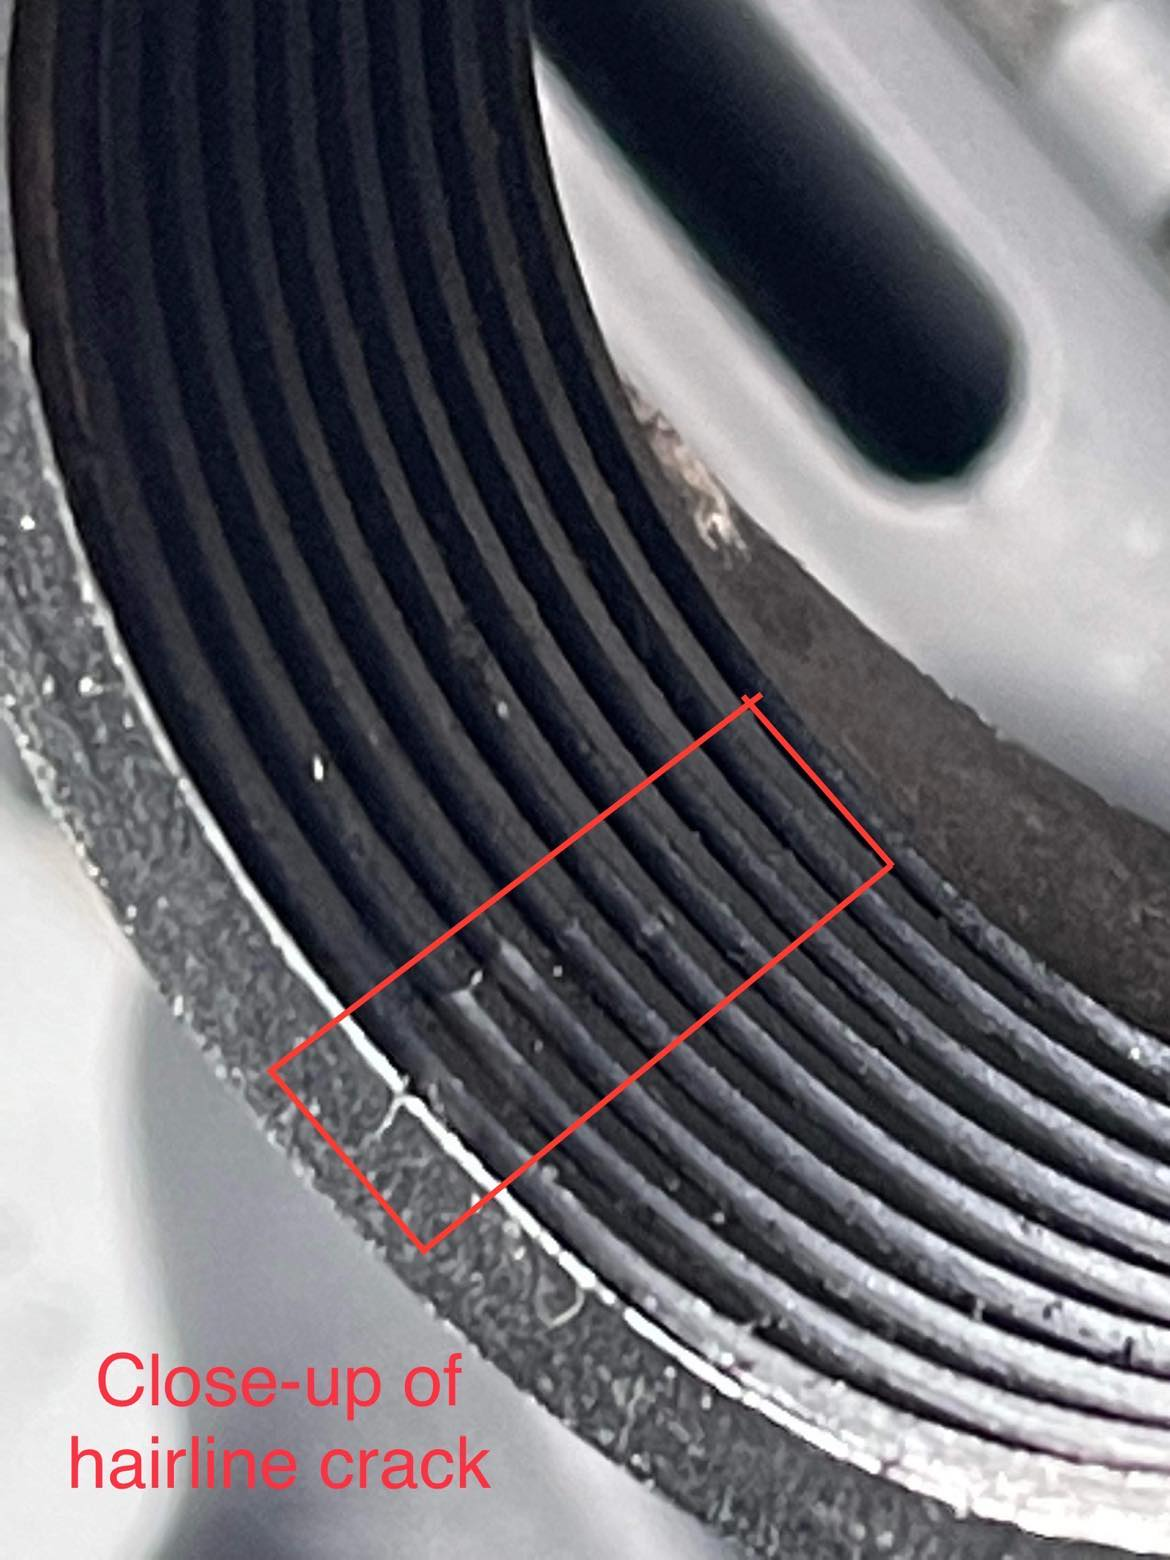
Structural weak points
-
While the VFC HK417 is a sturdy product, there is one potential weak point present in its design. The buffer tube doesn’t have a through-bolt securing it to the spring guide and gearbox, which is the standard attachment configuration for most airsoft M4 variants.
-
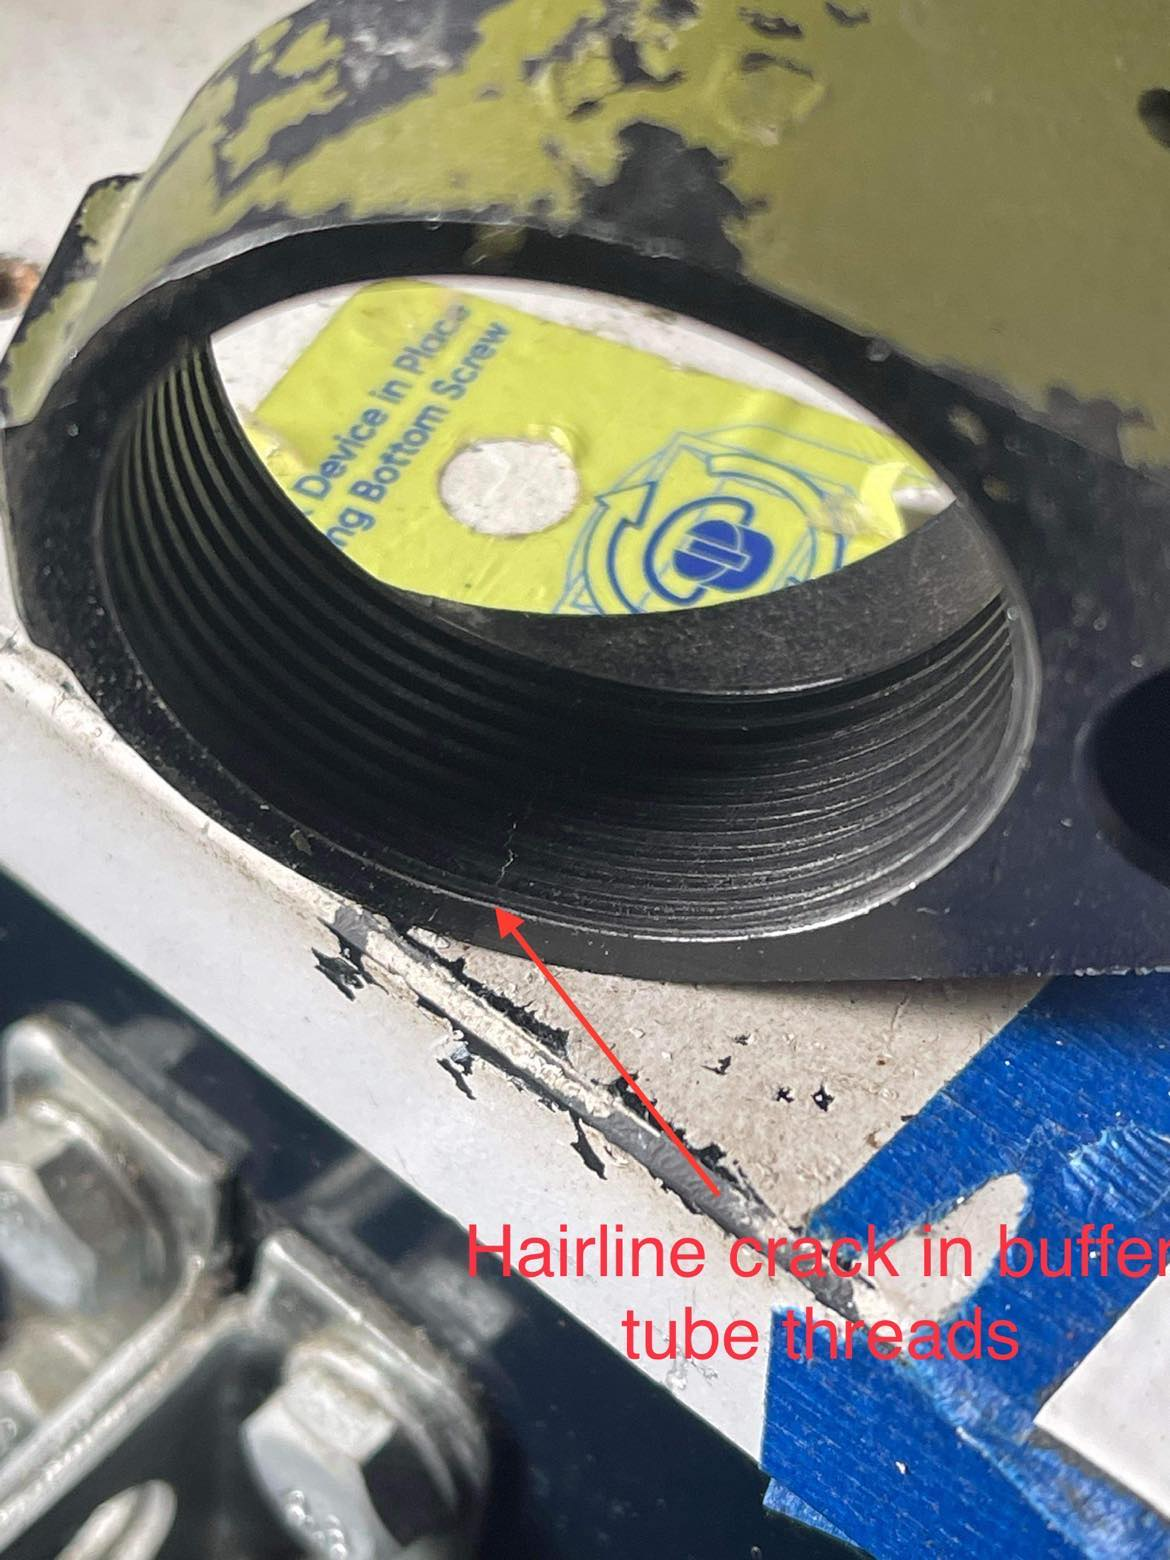
The buffer tube threads directly into the lower receiver, and is unsupported by any other components. This results in bending and shear forces being transferred directly into the rear of the lower receiver.
-
The end result of subjecting the lower receiver to these forces, long term, can be seen above. Hairline cracks can form in the lower receiver, eventually resulting in the buffer tube and stock breaking free.
-
Krytac uses a similar method to secure their buffer tubes, and their lower receivers are known to break in a similar manner. Granted, a standard M4 lower is significantly less beefy than a HK417 lower, but the possibility remains.
-
There is no method available to correct or repair this design weakness, shy of contacting VFC for a replacement lower receiver. Their contact email is service@vegaforce.com.tw.
-
VFC HK417 internals
Stock internal components
-
Video review of stock internals:
https://www.youtube.com/watch?v=SxoLyjhoRcA
-
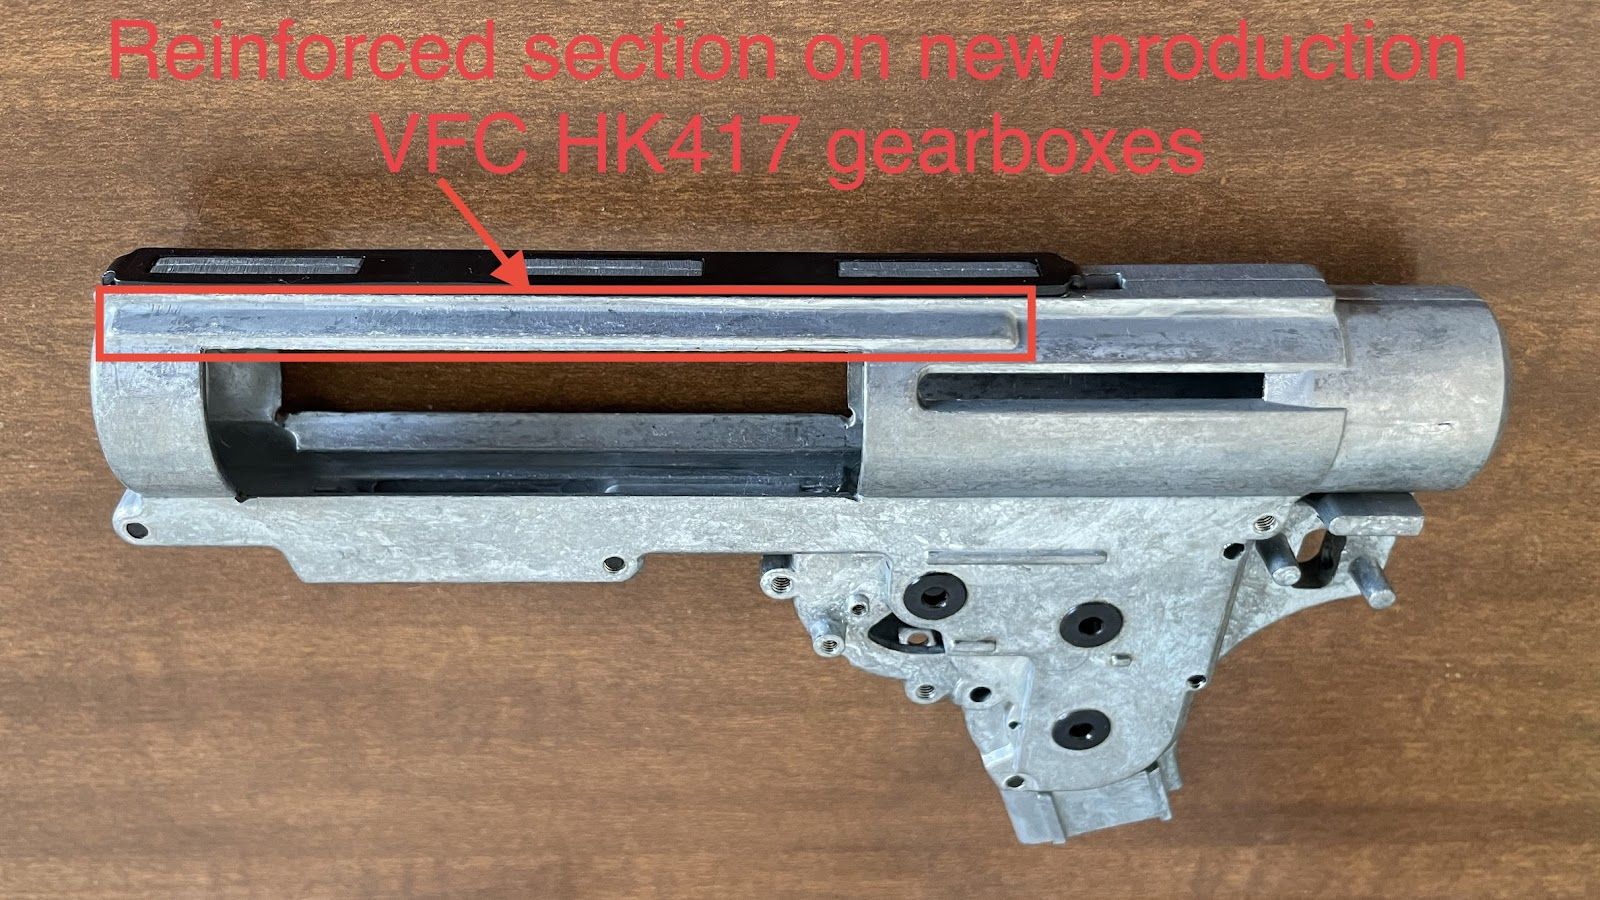
Gearbox shell
-
Proprietary “V2.2” design, peculiar to the VFC HK417.
-
The gearbox shells from the first production run of these rifles were notoriously weak, and prone to experiencing catastrophic failures when used with any spring stronger than an M120.
-
My rifle is from a newer production run, so the stock gearbox has some reinforcement from the factory. The practical result of this reinforcement is unclear; a CNC'd Retro Arms gearbox is a safer bet for high power builds.
-
Gears
-
Stock gears are decent quality, no need to replace unless going for an aftermarket gearbox shell.
-
Newer production runs have done away with auto-shimming springs, which is a good thing for high power builds.
-
Bushings
-
8mm steel bushings as standard, which seem to be glued into the gearbox shell.
-
Motor
-
Stock motor is the typical low TPA long type included with most VFC rifles. Laggy semiauto and a fast fullauto rate of fire.
-
Antireversal latch
-
Standard V2 ARL with proprietary spring, spring part number V0D0SPG001.
-
Cutoff lever
-
Proprietary to the V2.2 gearbox, VFC part number VF9-GBX-CUTV2.2-01.
-
Selector plate
-
Proprietary to the V2.2 gearbox, VFC part number V023MSY030.
-
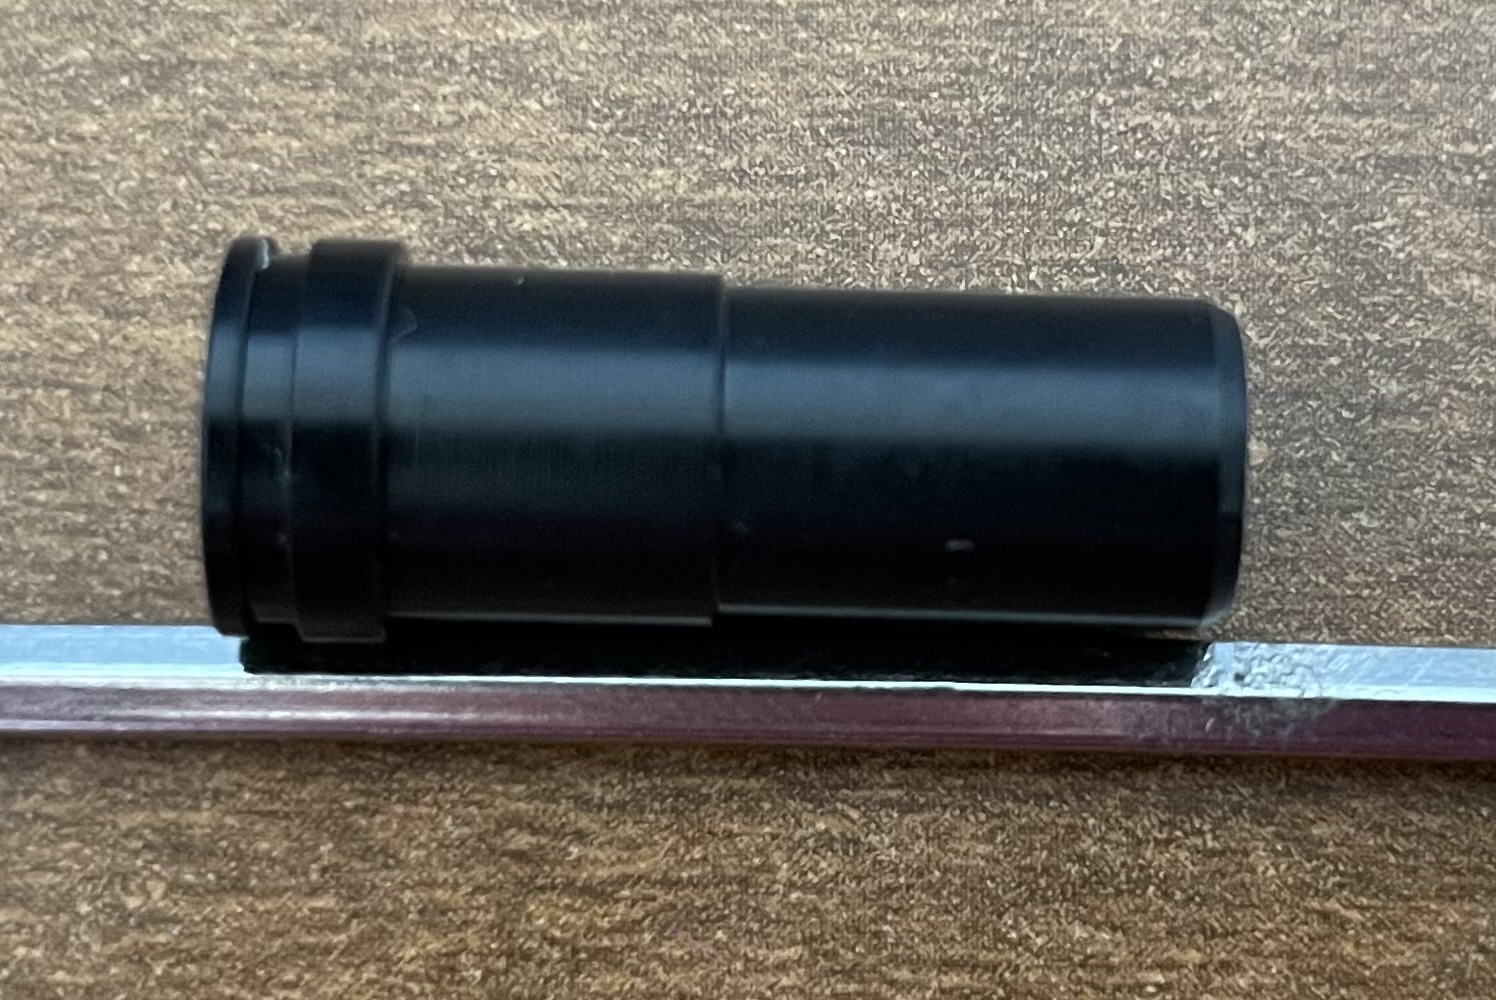
Air nozzle
-
Plastic, with a single internal o-ring.
-
21.2mm overall length, with a step built into the body.
-
Tappet plate
-
Very similar (but not identical) to a standard V2 tappet plate, VFC part number VF9-GBX-TPTV2-01.
-
The difference between a standard V2 tappet and the HK417 tappet is the lack of protrusions on the underside of the tappet plate. The above picture shows the VFC tappet plate on the left (no protrusions) versus a standard V2 tappet plate on the right (with protrusions).
-
Cylinder and cylinder head
-
VFC includes a ported cylinder for… reasons? This is only really appropriate for the assaulter length variant (and the accompanying short inner barrel).
-
Standard V2 cylinder head.
-
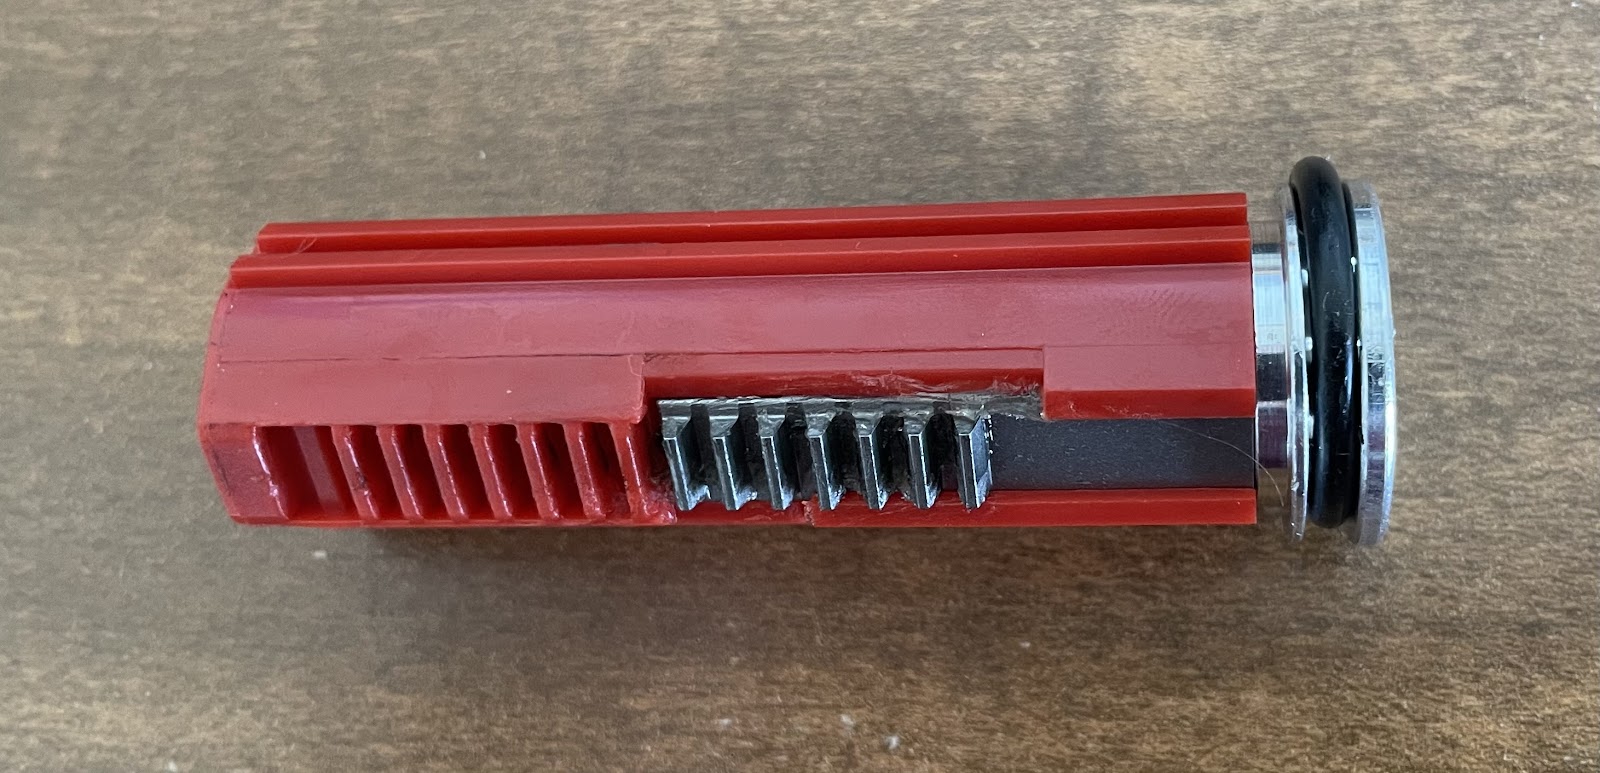
Piston and piston head
-
Decent quality half steel rack piston and rather nice aluminum piston head.
-
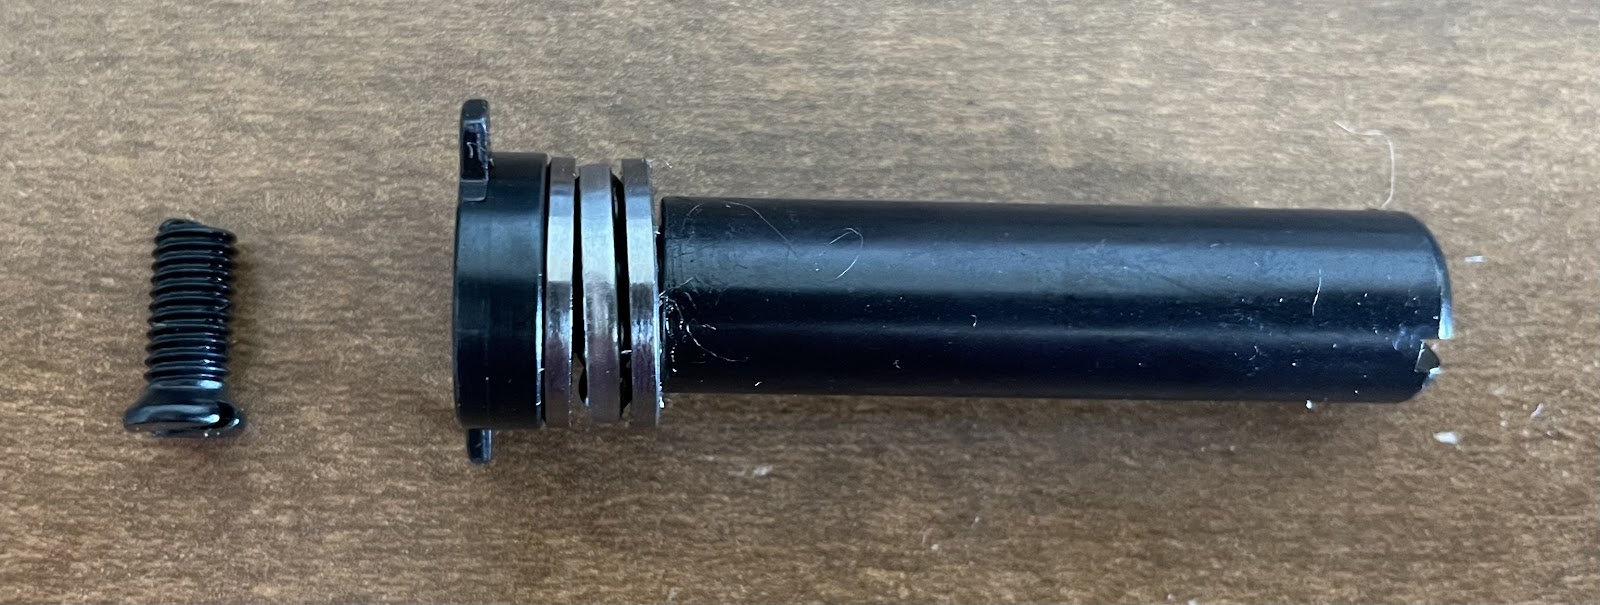
Spring guide
-
Appears to be a V6/V7 spring guide, with a screw that attaches from the outside of the gearbox to keep the spring guide aligned.
-
Spring
-
Standard AEG type, comes with an M110-equivalent spring stock.
-
Hopup unit
-
Stock unit is plastic and of decent quality.
-
Takes standard hopup rubbers and nubs.
-
The stock hopup unit spacer is pictured to the right of the hopup unit. This part gets installed in the chamber area of the upper receiver and keeps the hopup unit aligned.
-
Hopup rubber
-
Standard black rubber.
-
-
Inner barrel
-
Stock inner barrel is brass, length is 420mm for the 16” recce variant of the rifle.
-
Trigger switch assembly
-
Proprietary to the V2.2 gearbox, entirely external to the gearbox.
-
MOSFET
-
Newer production runs seem to have a simple inline MOSFET included. Not a sophisticated unit, but effective for protecting trigger contacts.
-
Fuse
-
No fuse included.
-
Battery connections
-
Small tamiya connector.
-
Magazines
-
Mid cap magazines cannot reliably feed 0.32g or heavier bbs quickly enough to keep up with the gun. Modifications are required.
-
M4 mag-shaped speed loaders can’t reach inside the lips of the HK417 mid caps, so you’re stuck with using either a pistol mag-size speed loader or an Odin loader with a Bingo Airsoft Works HK417 mag adapter.
-
Hi cap magazines feed without issue. I tested mine with 0.40g bbs and experienced no problems.
-
VFC HK417 internal upgrades
Post-upgrade performance goals
-
My desired end result is a semi-locked DMR, pushing 2.0 +/- 0.05 joules of muzzle energy. For reference, my local site’s DMR limit is 2.09 J.
-
There are a few critical performance parameters to keep in mind:
-
Reliability: this should be the driving force behind any modifications or upgrades you perform. Achieving peak performance doesn’t matter if the weapon can’t be trusted to survive a game.
-
Minimizing joule loss with heavy bbs: this can be done by ensuring the compression ratio is correct (see the “cylinder volume relation to barrel length” section below), or if that isn’t possible, by ensuring perfect airseal and increasing the mass of the piston assembly.
-
Consistency: repeatable shots are key when engaging through restricted lanes of fire. Tune your compression and airseal components to maximize efficiency and minimize velocity deviation from shot to shot.
-
Range: over-hop your bbs so they “float” during their trajectory. Don’t over-hop them to the point of losing them within your sight picture, just apply enough overspin to squeeze out that little bit of extra range.
-
A note on HPA systems
-
HPA systems have an extremely narrow practical scope of application due to limited energy density. You can carry 3 batteries in your pocket good for at least 15k rounds, or you can carry a bulky, heavy air tank good for the same amount.
-
DMRs require less stored energy because DMs generally shoot fewer rounds than other guys. That means energy density considerations are more of an annoyance than a show-stopper. Therefore, HPA systems are a technically viable option for use in a DMR.
-
I’m not a fan of HPA setups for a host of reasons, so I opted instead to make the best AEG HK417 I could.
A note on cylinder volume and its relation to bb weight and optimum barrel length
-
To ensure peak performance, DMRs should be fed heavy bbs. Heavy bbs retain their backspin and kinetic energy longer than light bbs. This means that heavy bbs give you more range, accuracy, penetrate brush more easily, and reduce your flight time to target.
-
Heavier bbs require a higher cylinder-to-barrel volume ratio to be propelled efficiently. This is due to compressibility effects of air and a bunch of other fluid dynamics stuff.
-
Full cylinders in standard V2 gearboxes don’t offer enough volume to push heavy bbs through long inner barrels efficiently. This issue manifests at the chrono station, where you can chrono over the site joule limit with 0.20g bbs, but chrono under the site joule limit with the heavy bbs of your choice.
-
The chart below shows the most efficient inner barrel length for each bb weight. Note the increase in inner barrel length from the standard V2 gearbox (center-right column) to the elongated V2.5 SR25 gearbox (far right column). The S&T HK417 is the only model that can be modified to accept a V2.5 gearbox, which is why I initially tried to use this rifle as my base platform.
| Req’d cyl : IB | Assuming perfect airseal, most efficient 6.03mm inner barrel length for:
BB weight | volume ratio | Std V2 gearbox + full cyl. | V2.5 SR25 gearbox + elongated full cyl.
*0.12g | 1.91 : 1 | 481mm | 560mm
0.20g | 2.17 : 1 | 435mm | 505mm
0.23g | 2.19 : 1 | 430mm | 502mm
0.25g | 2.22 : 1 | 425mm | 495mm
0.28g | 2.24 : 1 | 420mm | 490mm
0.30g | 2.27 : 1 | 415mm | 484mm
0.32g | 2.36 : 1 | 400mm | 467mm
0.36g | 2.48 : 1 | 380mm | 442mm
0.40g | 2.65 : 1 | 355mm | 414mm
0.43g | 2.73 : 1 | 345mm | 402mm
0.45g | 2.81 : 1 | 335mm | 391mm
*0.48g | 2.87 : 1 | 326mm | 381mm
*0.50g | 2.94 : 1 | 317mm | 371mm
*: example values calculated using trendline analysis
-
All credit for this data, as well as the experiment that produced it, belongs to 1tonne and his excellent thread here: https://www.airsoftsniperforum.com/threads/what-barrel-length-goes-with-what-bb-weight-in-an-aeg.55635/
Overview of upgrades
-
For the compression system, I swapped out the stock parts for aftermarket components that I know work well together. Parts are as follows:
-
Prometheus rotary M4 hopup unit, modified, with 3D printed M4 hopup adapter
-
Prometheus purple hopup rubber and nub
-
Prometheus 455mm 6.03mm tightbore
-
SHS M4 air nozzle
-
Lonex full cylinder and V2 cylinder head
-
Lonex high torque piston, AoE correction piston head, and hollow piston head o-ring
-
-
For the drivetrain, I replaced the gearbox shell with a Retro Arms reinforced unit, then did all the other tedious things that are associated with such a fundamental modification. Parts are as follows:
-
Retro Arms reinforced V2.2 HK417 gearbox
-
M140 (ish) spring
-
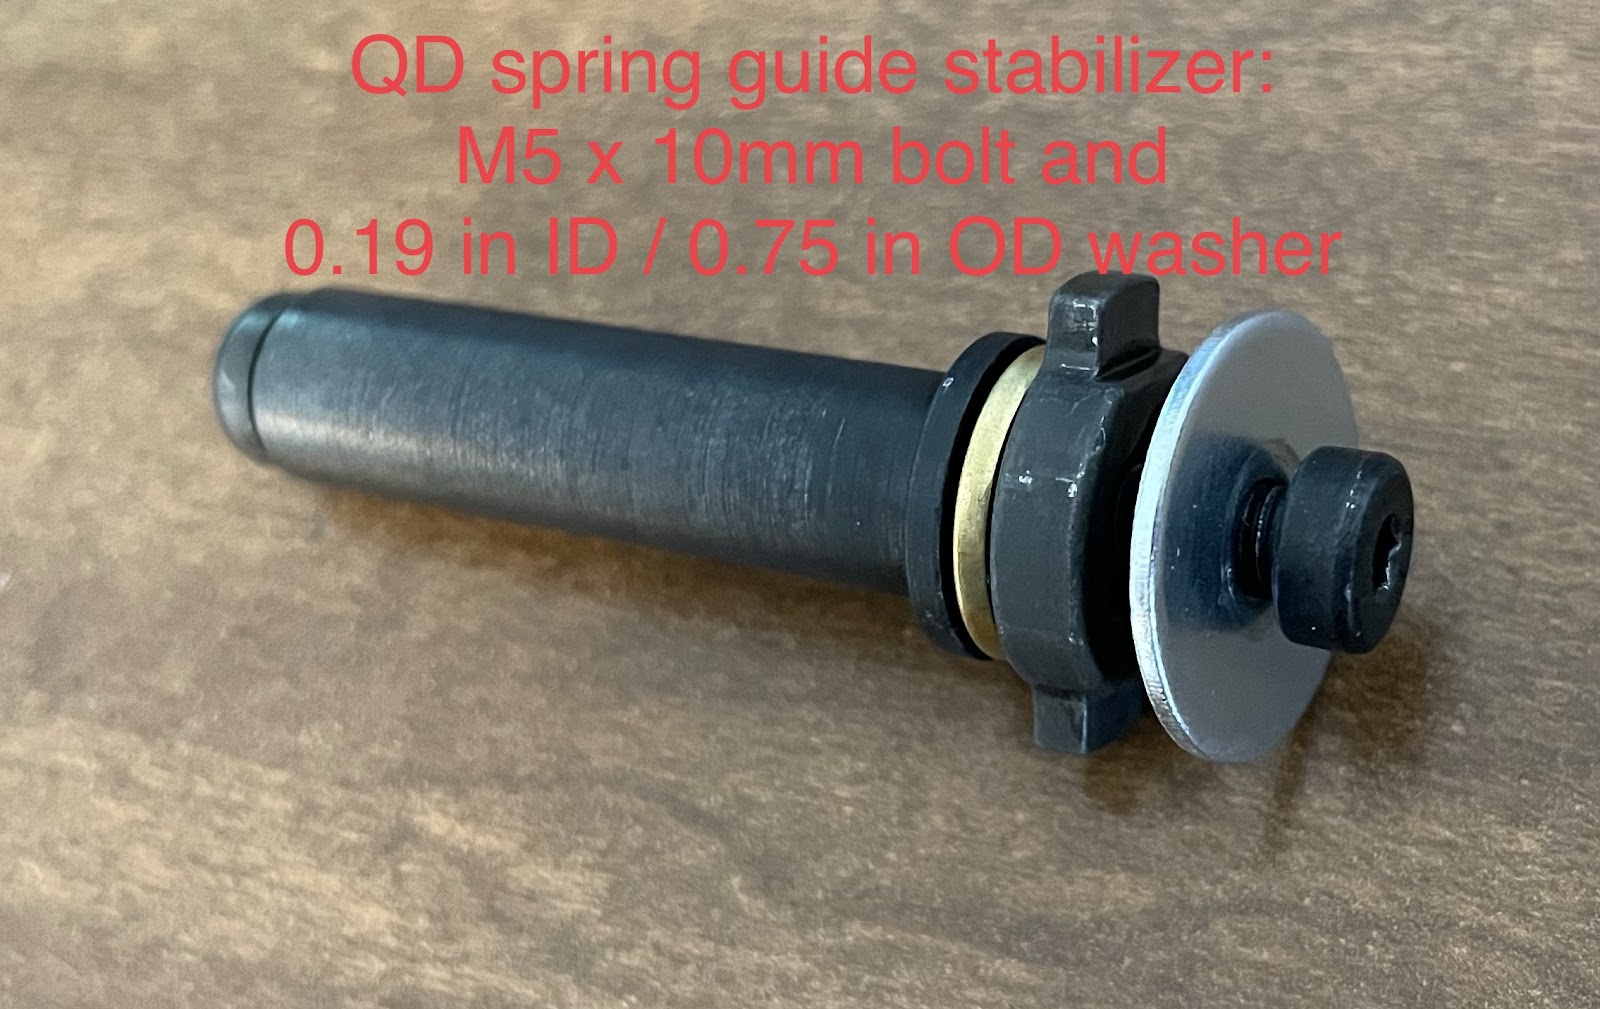
Added a bolt and washer to the Retro Arms QD spring guide included with their gearbox
-
Re-used the stock gears, which I wouldn’t recommend
-
Installed FLT 8mm bushings, because removing the stock bushings from the stock gearbox shell wasn’t going to happen without damaging both components
-
-
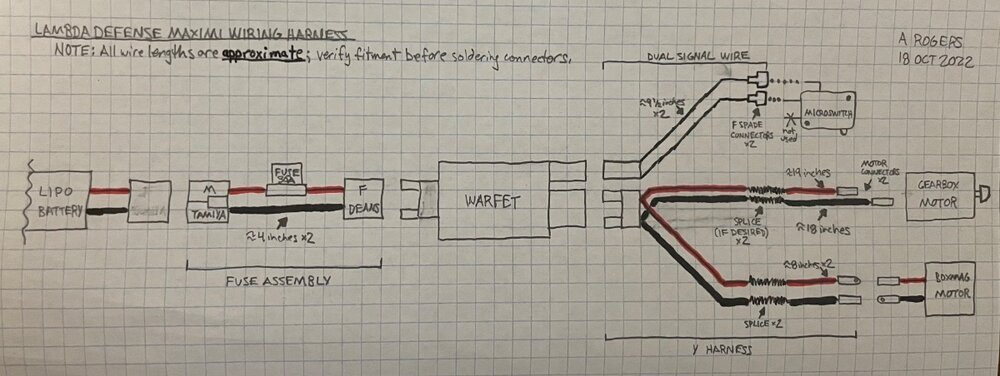
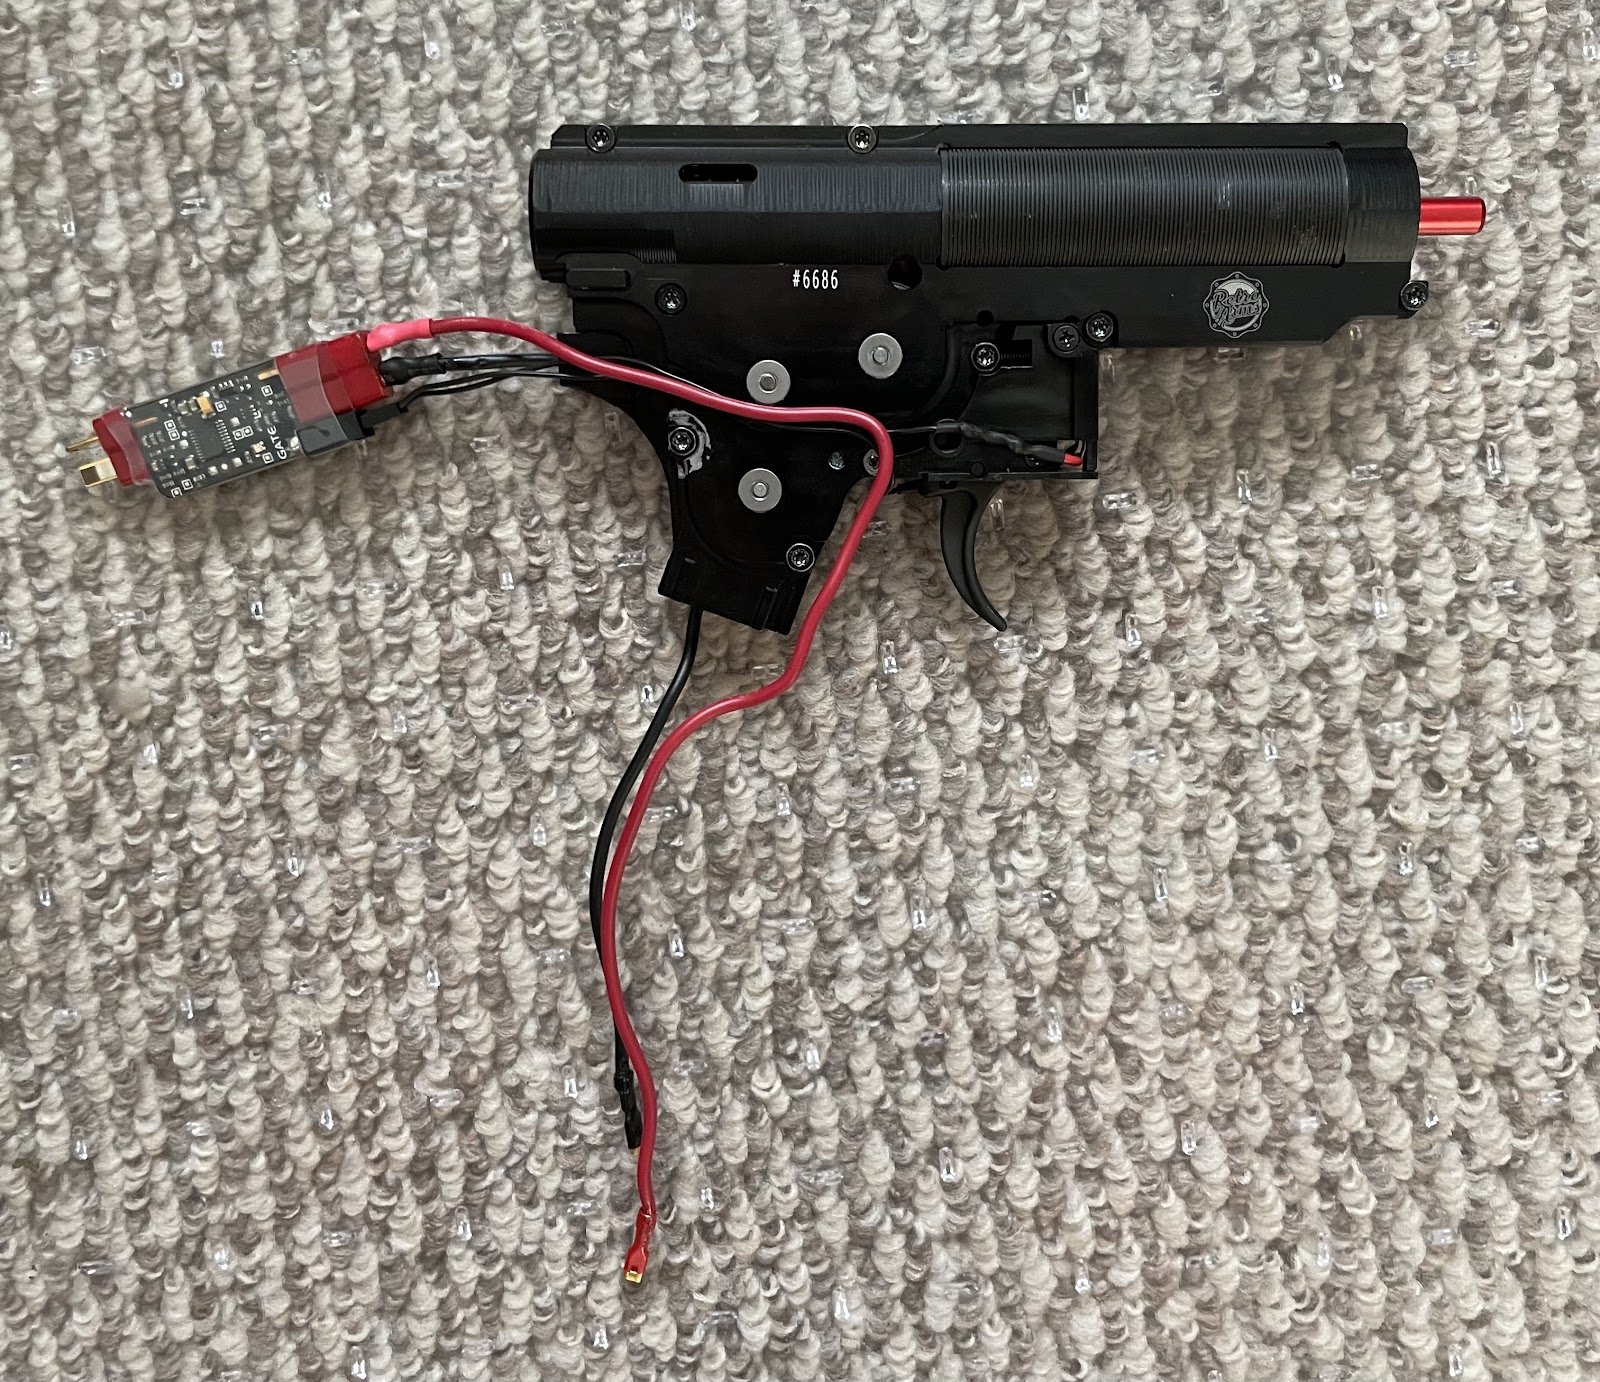
For the electronics, I wired in a programmable MOSFET to protect the trigger contacts and electronically semi-lock the gun. Parts are as follows:
-
ASG CNC Ultimate 18k motor
-
Gate WARFET, configured with a WARFET programming card
-
New 12 AWG wiring harness with ATM fuse holder and deans connectors
-
-
For the magazines, I exchanged the terrible stock mag guts for some beefier components. Parts are as follows:
-
MAS SuperFeed springs, cut to 26 inch length
-
PTS EPM magazine followers
-
Results of my chosen upgrades
-
My rifle is pushing an average of 1.99 J using BLS 0.40g bio bbs, with a standard deviation of 4.3 fps. This brings the muzzle energy to 1.94-2.04 J with my chosen ammo.
-
With 0.20g bbs, the muzzle energy increases to an average of 2.13 J. This represents about 9% joule loss when running 0.40g bbs, and is the result of an insufficient cylinder-to-barrel compression ratio. With a lighter piston assembly, the joule loss would be even more significant.
-
Effective point target range is around 250 feet. I can stretch that out to 280 feet for suppression or engaging area targets, but I’d rather leave that to the machine guns.
VFC HK417 disassembly video:
https://www.youtube.com/watch?v=lsdh9fNg5YI
Compression system components
-
Hopup unit
-
I replaced the existing plastic hopup unit spacer, which is installed in the chamber area of the upper receiver, with a 3D-printed adapter designed to accommodate an M4 hopup unit. These replacement spacers can be 3D printed yourself, using the file here:
https://cults3d.com/en/3d-model/game/vfc-g28-hk417-hopup-adapter-for-maxx-retro-arms-chamber
Or can be purchased ready-to-go from HP Airsoft:
-
Once I had the hopup unit adapter installed, I purchased a Prometheus rotary M4 hopup unit. Prometheus hop units have yielded excellent airseal and performance in past builds, so using one would eliminate a variable when troubleshooting airseal issues.
-
I reused the small spring on the front of the stock hopup, reinstalling it on my Prometheus hopup unit. This is a crucial part, which presses the hopup unit fully into battery and ensures proper airseal.
-
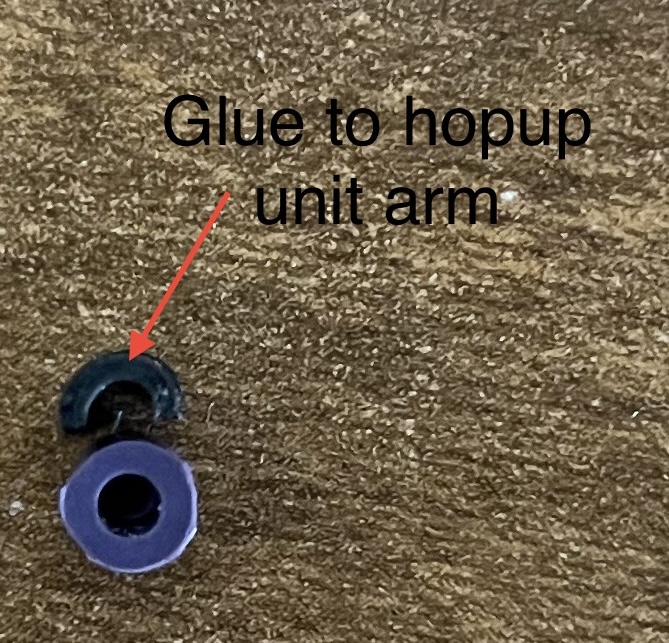
The Prometheus unit struggled to lift 0.40g bbs, so I had to superglue half a hopup nub to the hop arm. This provided additional hop rubber penetration into the inner barrel, thereby providing more backspin.
-
Hopup rubber and nub
-
I’m a big fan of Prometheus purple (soft) hopup rubbers/buckings. They provide consistent backspin, improving groupings at range. They also last a pretty long time, about 50k rounds.
-
I used the included Promy purple hopup nub, once again in the interest of accuracy, consistency, and reliability
-
I advise against using flat hops or R-hops, since they are more finicky and don’t last as long as standard hopup configurations. The small amount of range lost can easily be made up by using fire and maneuver.
-
Inner barrel
-
A maximum 447mm inner barrel will fit, if using a 3D printed adapter and M4 hopup unit. A 455mm barrel will extend slightly into the flashhider, but will not be visible.
-
Such a long barrel doesn’t yield optimal efficiency with heavy bbs since the compression ratio is already so low. I opted to use this barrel length to squeeze as much velocity out of my bbs as I could without further increasing spring strength.
-
The stock outer barrel is a bit oversized, leading to some inner barrel play. I added some teflon tape to the outside of the inner barrel to reduce this movement, thereby increasing accuracy.
-
-
-
Air nozzle
-
I installed an SHS M4 air nozzle, which has yielded excellent results when paired with Prometheus hopup units on previous projects.
-
-
Tappet plate
-
No upgrade needed, unless you break it.
-
With the stock gearbox shell, a standard V2 tappet plate can be used.
-
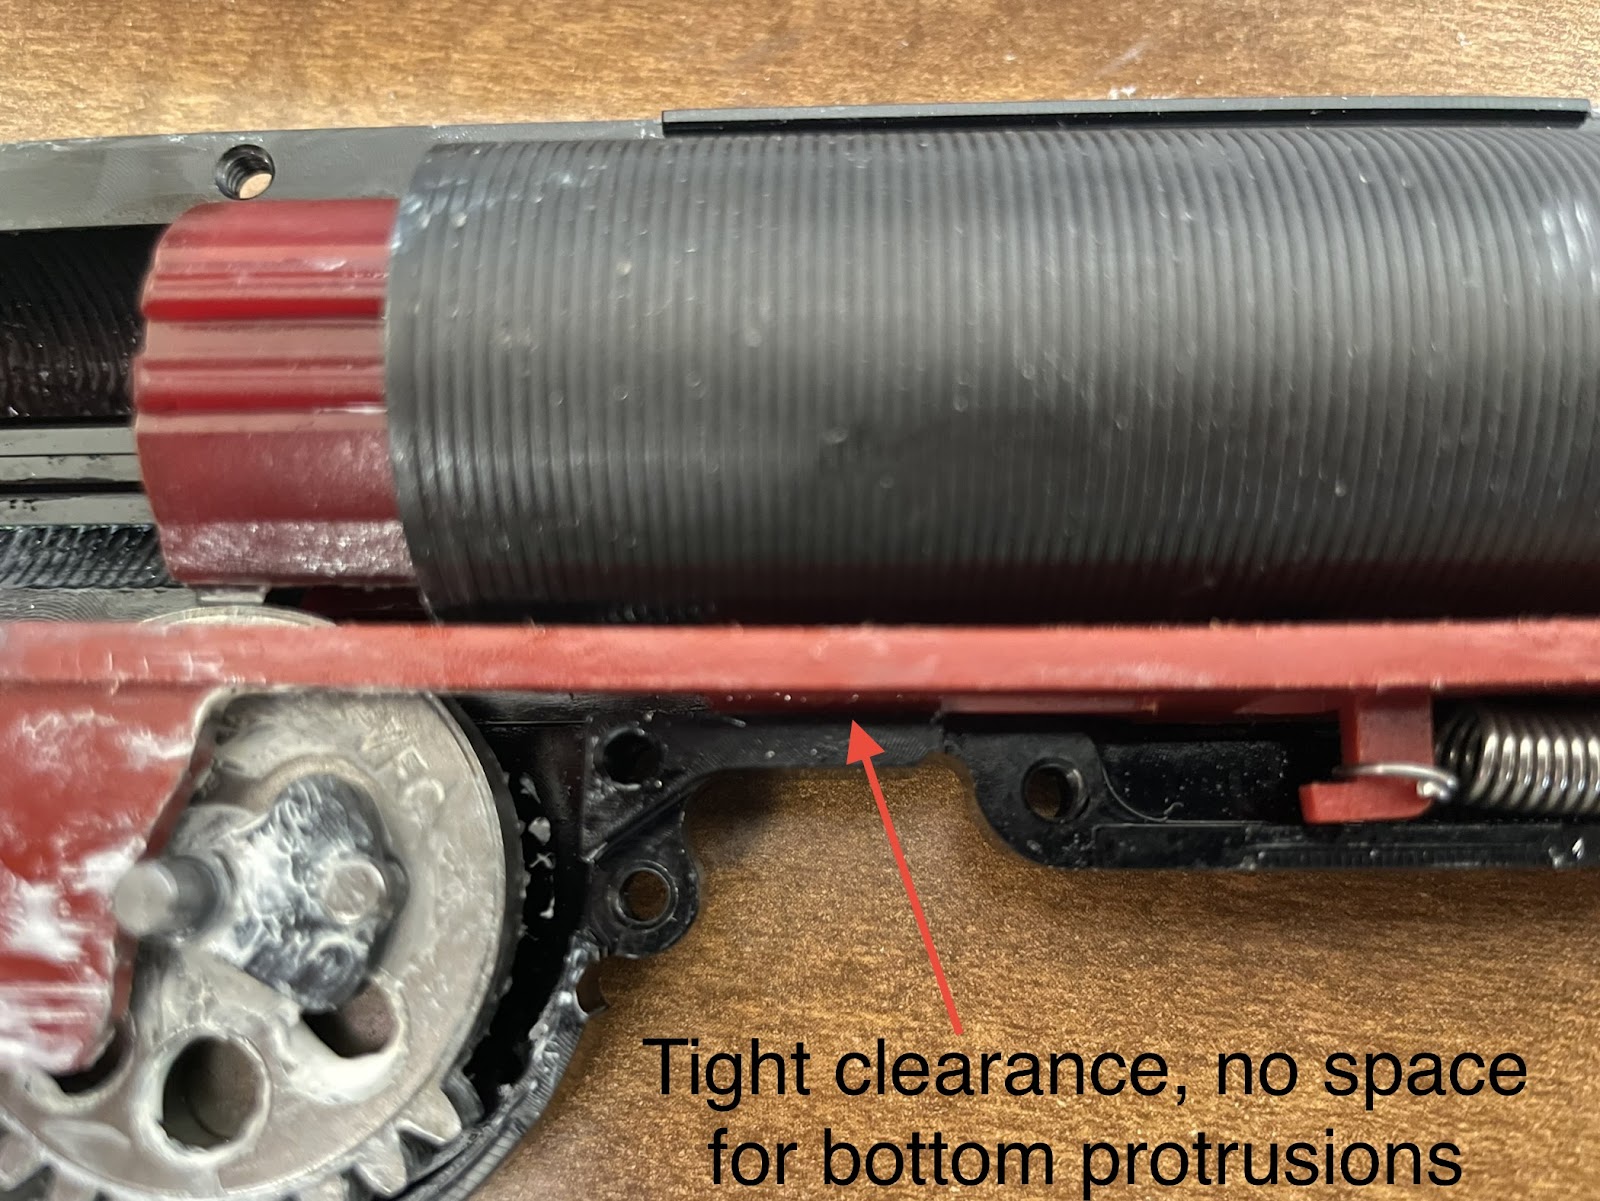
With the Retro Arms gearbox shell, you have to use the VFC HK417 tappet plate, or you could try to file down the bottom protrusions on a standard V2 tappet plate. The RA gearbox does not have space to accommodate these protrusions.
-
It may become necessary to shave down the tappet plate’s width to ensure reliable air nozzle cycling. This may only be an issue if using the stock VFC gears in an aftermarket gearbox shell.
-
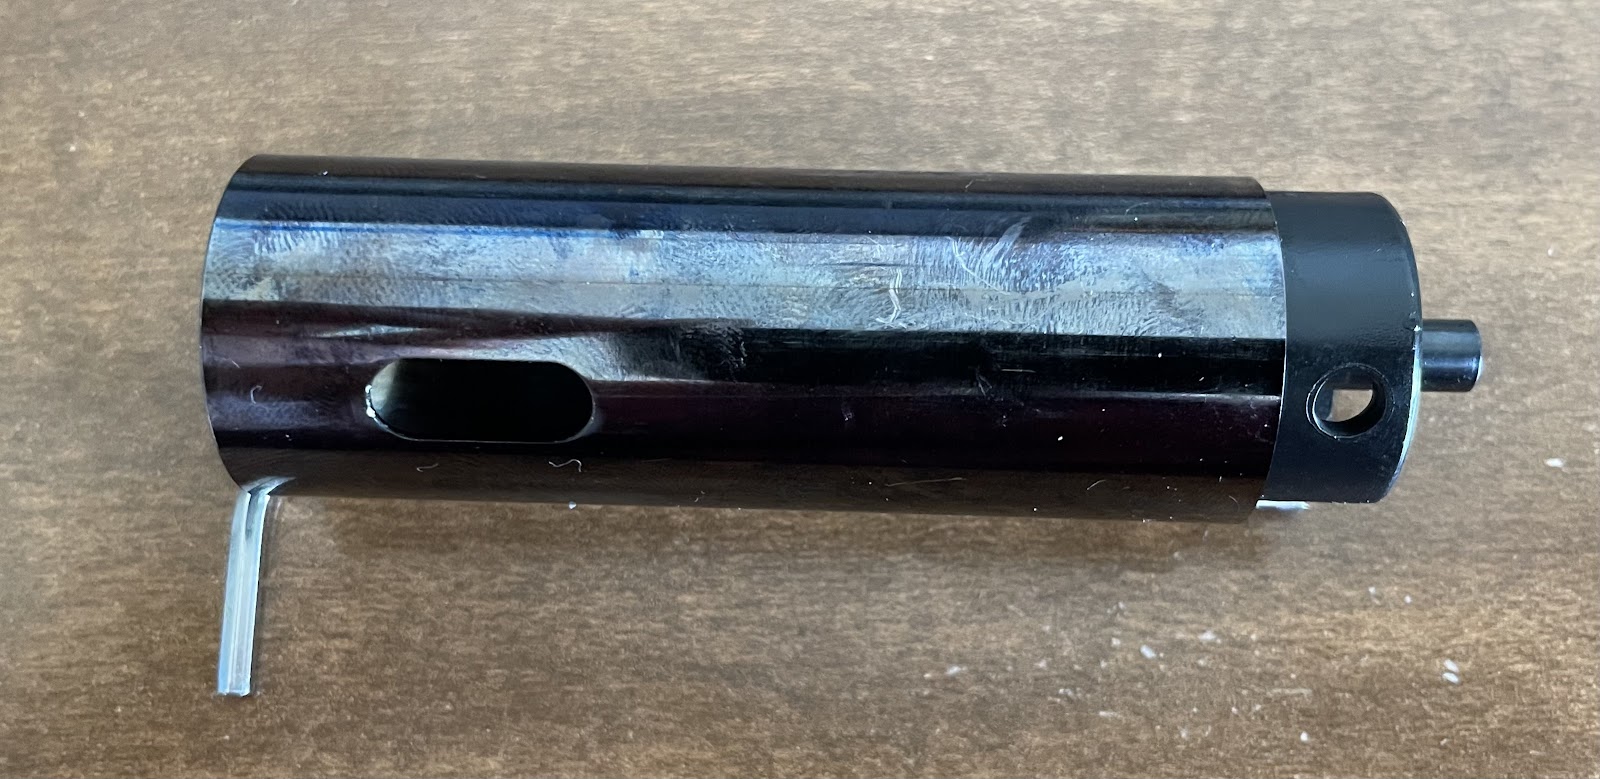
Cylinder and cylinder head
-
Replacing the stock ported cylinder with a full cylinder is needed for recce and sniper variant L2A1s with their accompanying long inner barrels.
-
Some AOE correction is needed: either a sorbo pad on the cylinder head or a Lonex AOE correction piston head will work.
-
Aside from AOE correction, the only meaningful cylinder head upgrade is the addition of a shock transfer system (STS) to take some stress off the gearbox shell. The Lonex V2 cylinder head has an o-ring embedded in its front face, which kinda-sorta works to reduce the intensity of the shock transferred to the gearbox shell. Not a proper STS, but better than nothing.
-
-
Piston and piston head
-
Increasing piston + piston head mass is a good way to minimize joule loss when using a long inner barrel.
-
Using a Lonex red high-torque piston (P/N H-P21-989-6) coupled with a Lonex AOE correction piston head (P/N H-P39-989-3) is recommended to minimize the joule loss induced by an insufficient compression ratio.
-
Lonex hollow o-rings (P/N GB-01-66) give a better, longer-lasting seal than standard o-rings. I use them in everything.
-
Drivetrain system components
-
Gearbox shell
-
I got my hands on a Retro Arms gearbox shell, which I installed before ever fielding the rifle.
-
Note that, because of tight tolerances, the Retro Arms gearbox “clicks” closed. If you didn’t hear a click, something is probably misaligned.
-
-
Spring
-
The spring you choose depends on your target muzzle velocity; Guarder springs are recommended for longevity and stable output.
-
A new Guarder SP130 spring netted me around 505 fps w/0.20g bbs, which was about 30 fps higher than my desired muzzle energy. I ended up installing an unbranded spring that looks suspiciously like a very broken-in SP130, but I had labeled as approximately equivalent to an M140.
-
-
Spring guide
-
Retro Arms includes a QD spring guide with their gearbox, which simplifies maintenance and repair. That said, QD spring guides are inherently unstable without some sort of aligning hardware.
-
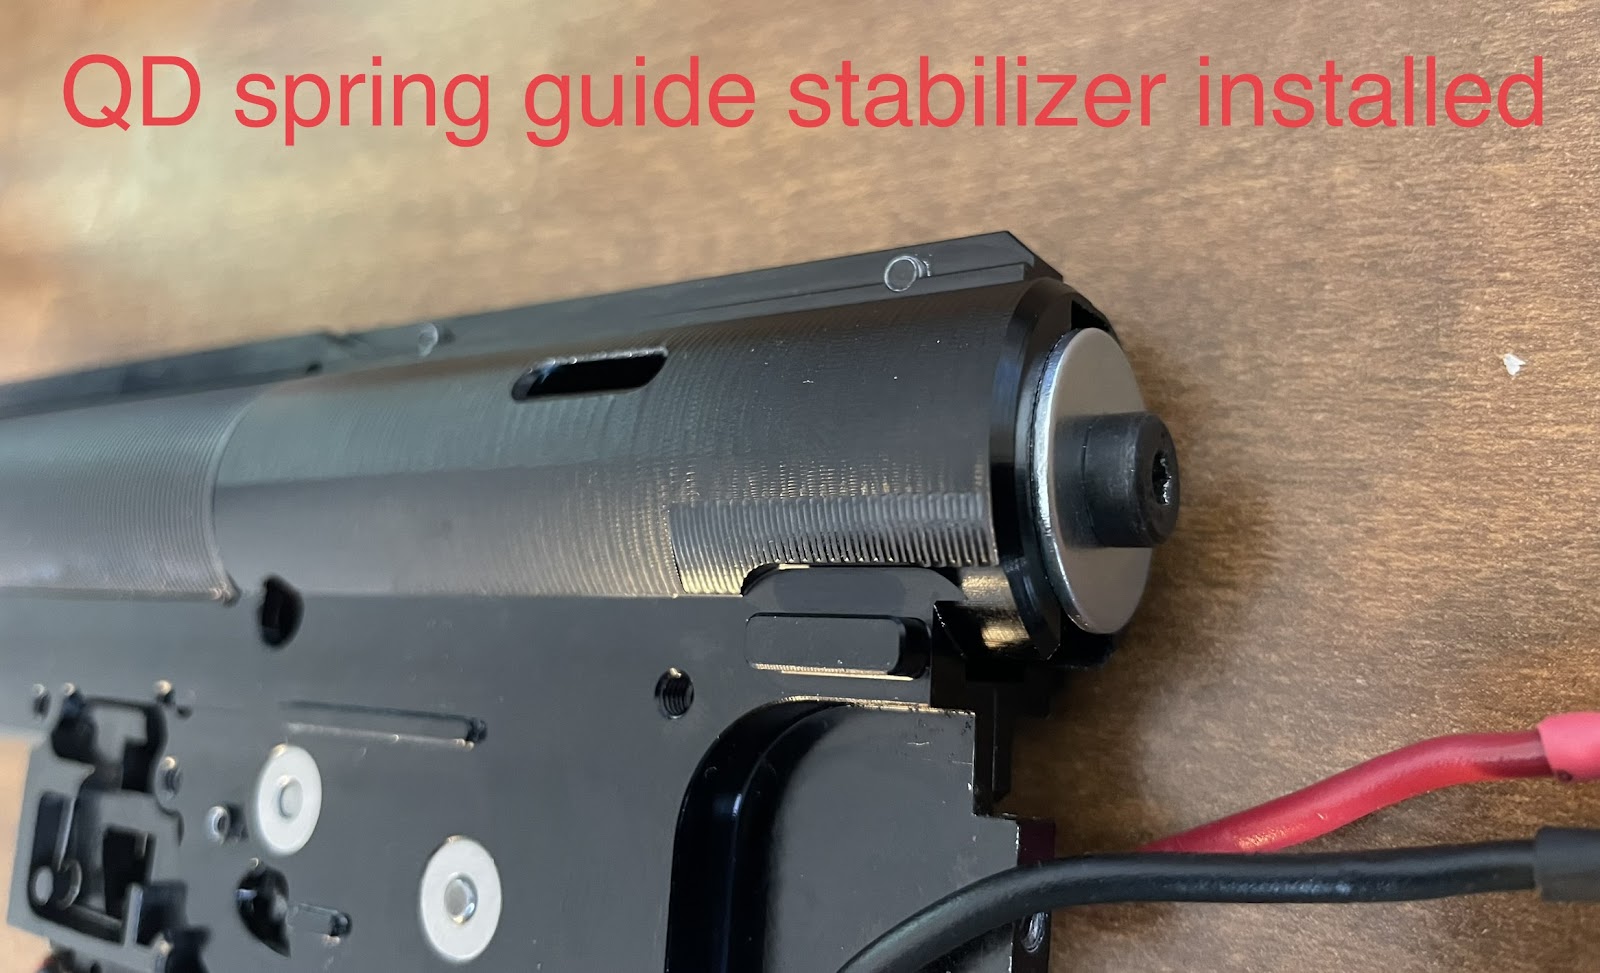
I added a M5 x 10mm bolt and 0.19 in ID / 0.75 in OD washer to my spring guide in an effort to keep it stable and aligned while the gearbox cycles. This has worked perfectly without significantly affecting the QD function: all I have to do is remove the bolt and washer before popping the spring guide out.
-
Gears
-
VFC gears may give you some trouble when installed in a Retro Arms gearbox. This is because VFC kinda does their own thing with internal part specs, which can make installation into a non-VFC gearbox shell a real nightmare.
-
If you choose to reuse your stock gears, be prepared to file down the axle sleeve on the sector gear. Otherwise, you may not be able to fit any shims underneath the sector gear. Once this is done, be advised that your entire drivetrain will be laterally misaligned, so you’ll likely have to shim components that you don’t normally have to mess with. For example, my antireversal latch was dragging on my spur gear, so I had to shim it upwards to get it to function consistently.
-
ZCI CNC steel gears are a good quality, affordable option to avoid the above issues. If I had to do it again, I’d absolutely go for new gears.
-
Wide steel shims are great for maintaining gear stability. Prometheus makes a 24-piece set that fits the bill perfectly.
-
-
Bushings
-
Bushings - not bearings - are the correct choice for high power builds. You might want to get a new set if using an aftermarket gearbox shell, since removing the stock bushings from the stock gearbox is a real pain.
-
The FLT 8mm steel bushings I ordered for my Retro Arms gearbox were a very, very tight fit. They had to be carefully hammered into position, using an old bevel gear as a punch.
-
-
Antireversal latch
-
Standard V2 ARLs are compatible, if you want to upgrade yours. Note the dimensional differences between VFC’s ARL (left) and a more standard V2 ARL (Prometheus, right). The short upper axle portion of the VFC ARL can make it difficult to tell if the ARL is properly seated when the gearbox is closed.
-
Getting spare springs may be a good idea since they are proprietary, VFC part number V0D0SPG001.
Electronic system components
-
Motor
-
A high torque (22+ TPA) motor is highly recommended.
-
I went for the ultra torquey 28 TPA ASG CNC Ultimate 18k motor for my rifle. Its relatively low power draw is great, and the slow full auto rate of fire enabled me to electronically semi lock the gun.
-
Trigger switch assembly
-
No upgrades available. I don’t think it’s possible to fit an optical MOSFET in there, which is a real shame.
-
Cutoff lever
-
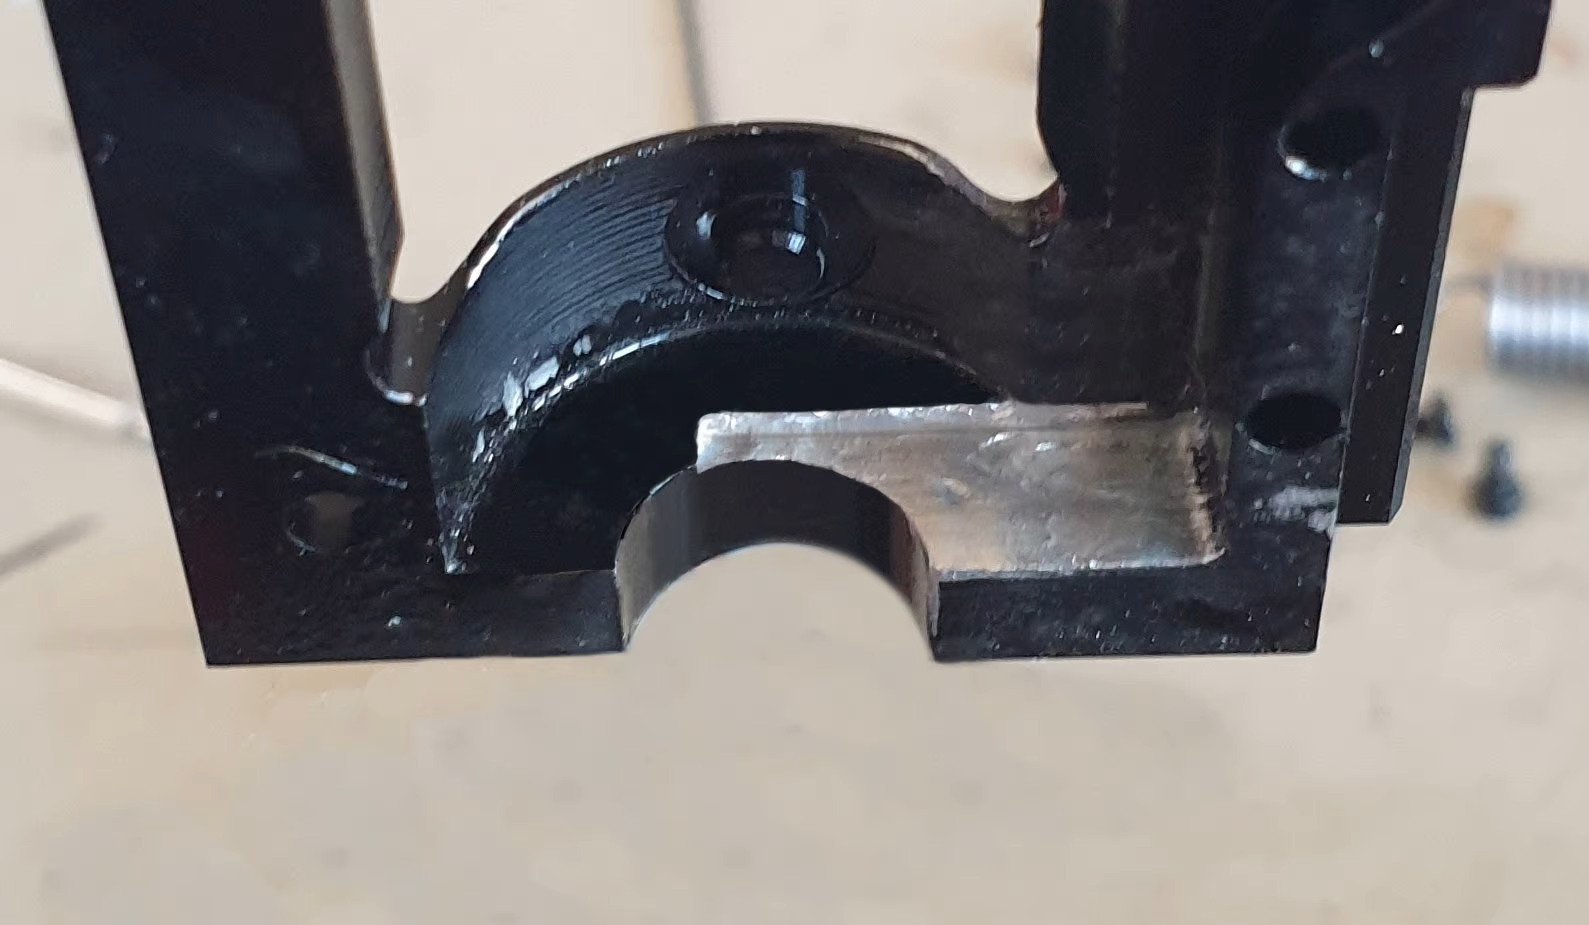
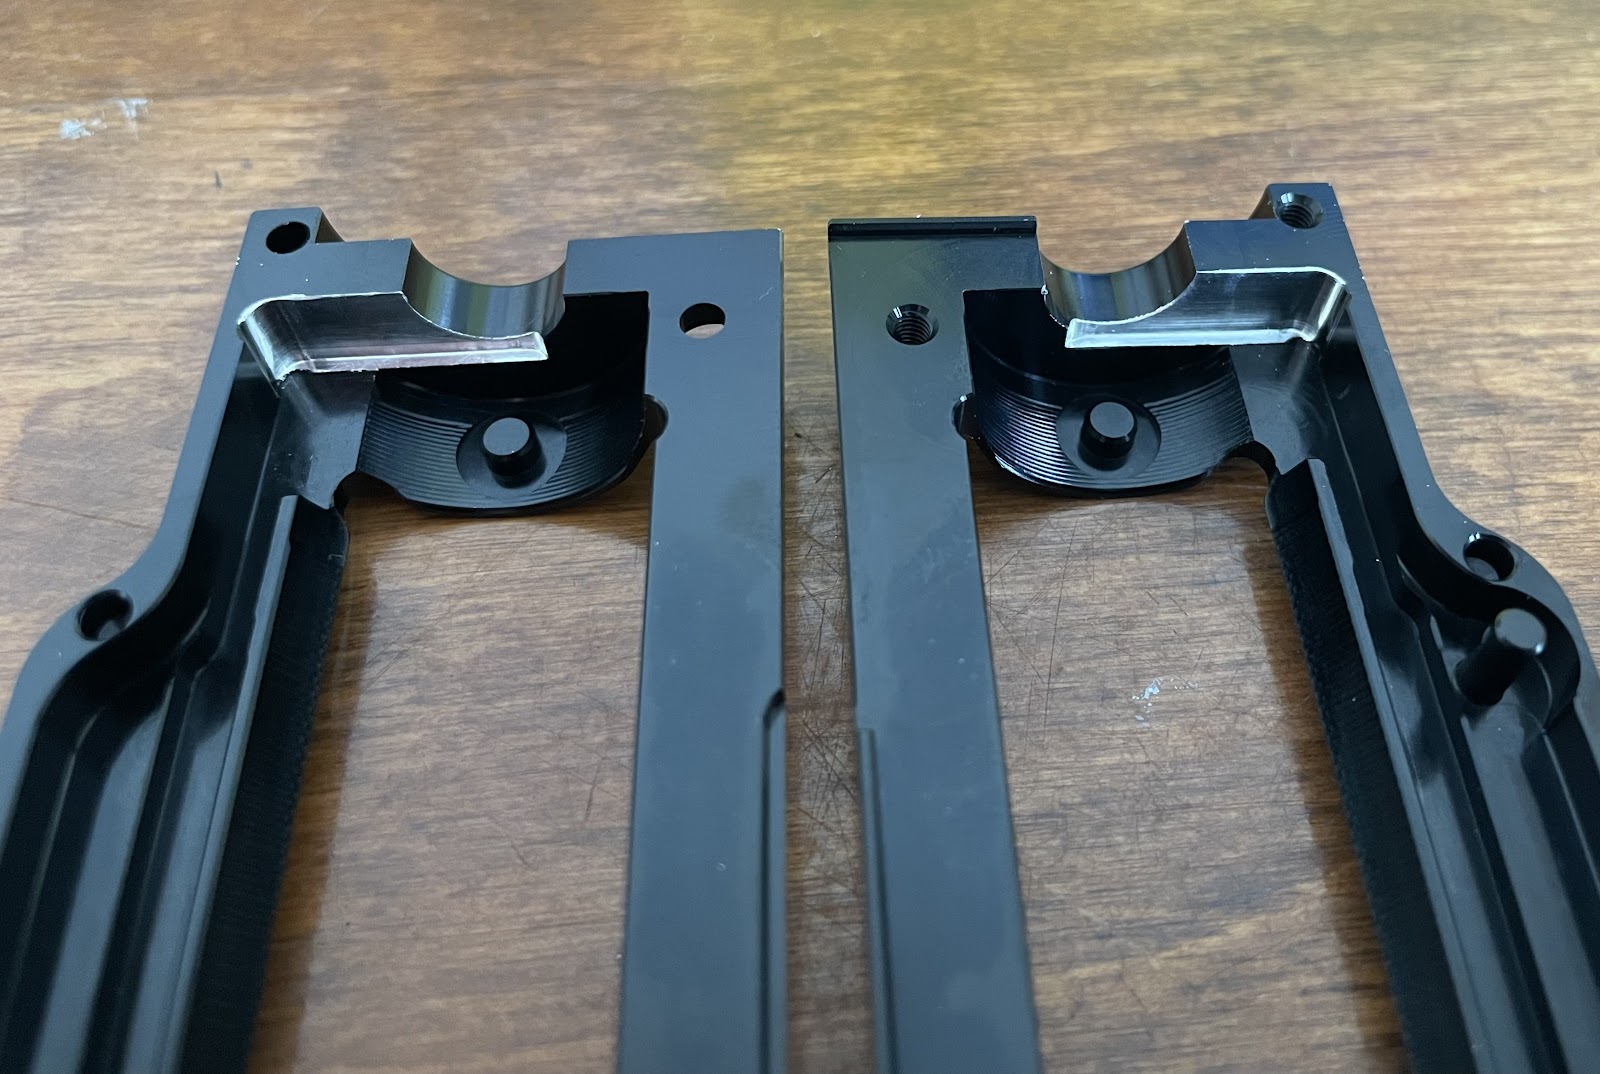
Getting the cutoff lever to play nice with the Retro Arms gearbox shell took some work.
-
I had to file down the surface indicated in the top-left picture for the cutoff lever to fully seat in position. The precision of VFC’s cast parts leaves a lot to be desired.
-
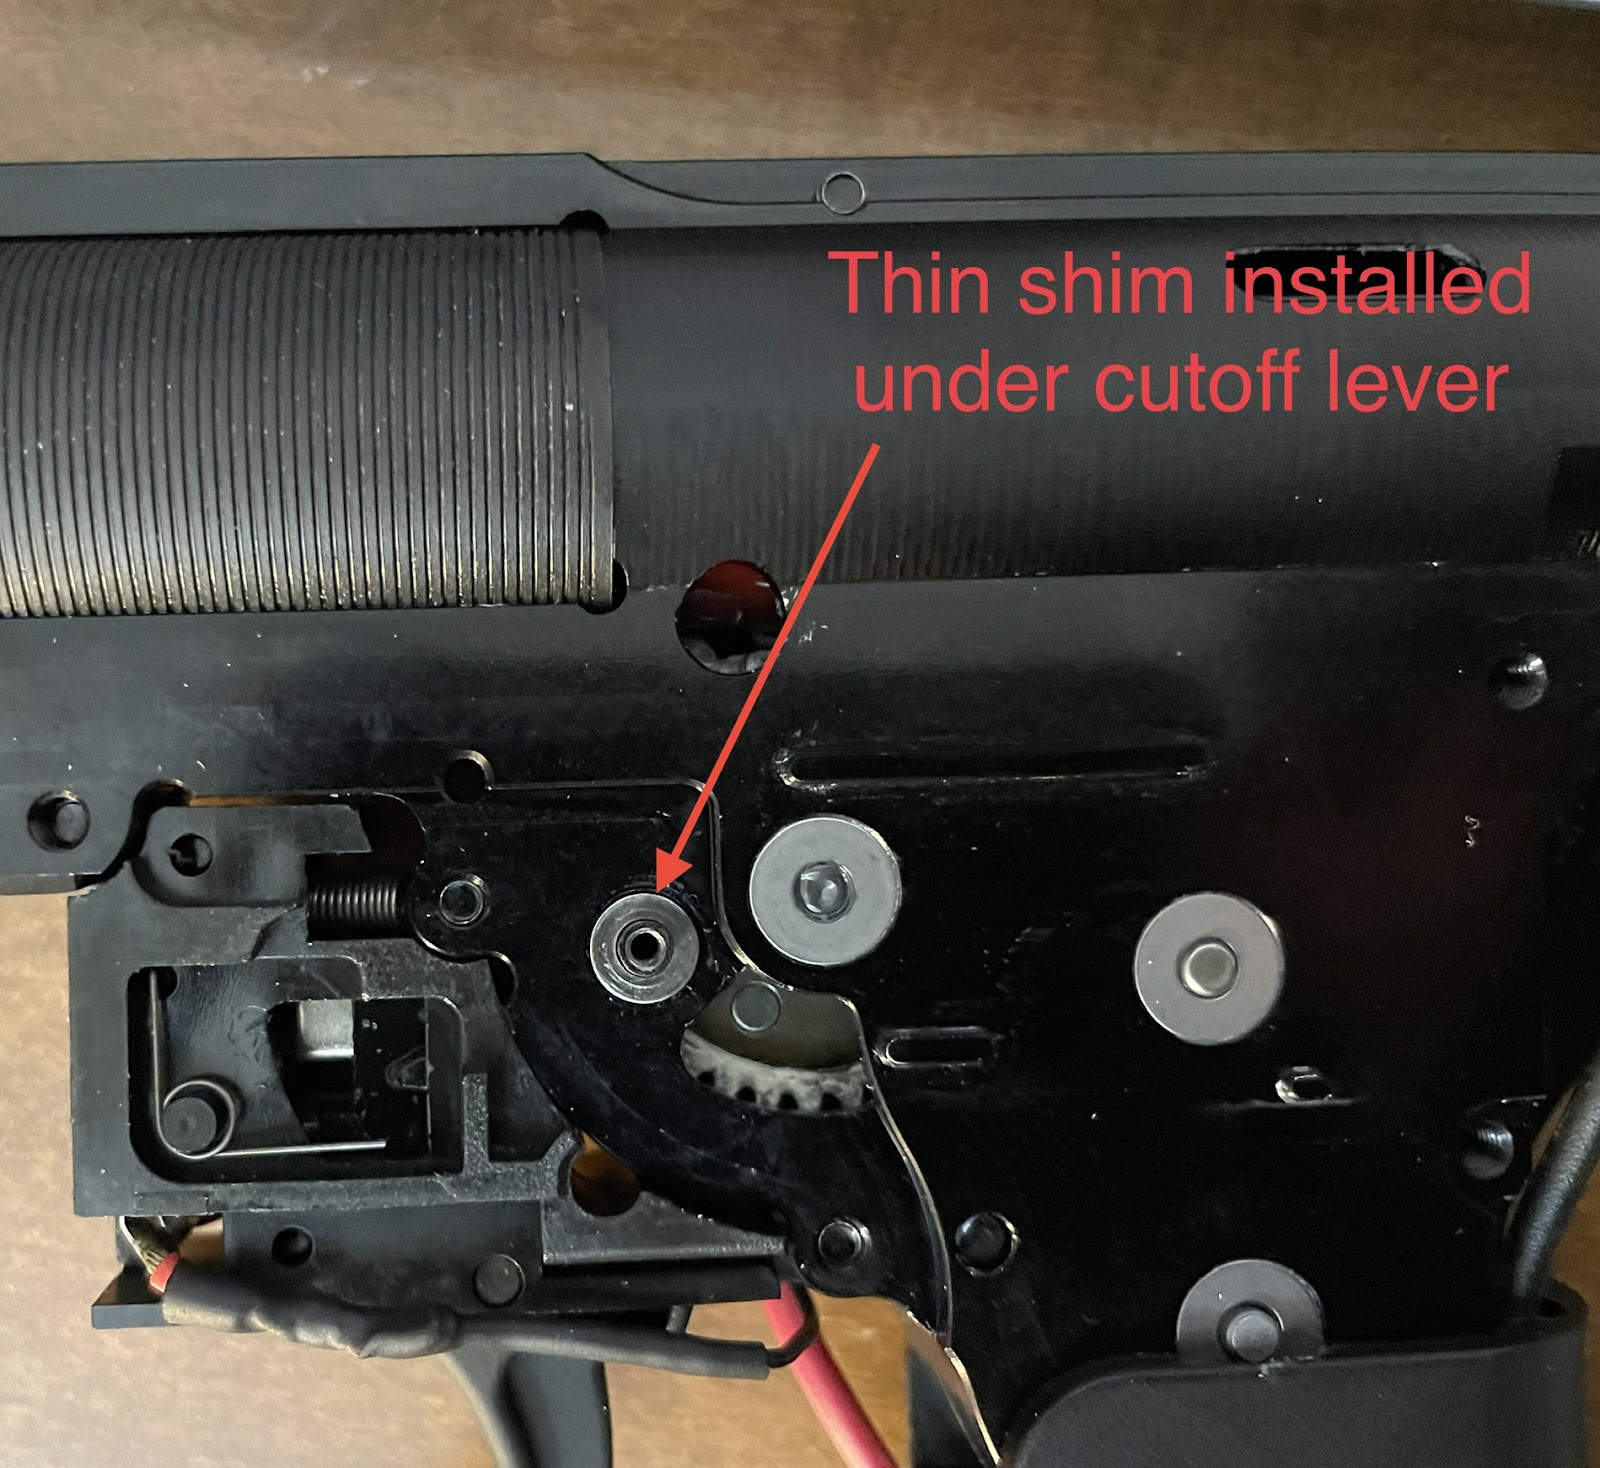
When installed in the gearbox, the cutoff lever had quite a bit of lateral play. In order to remove this wiggle while simultaneously ensuring smooth and free rotation, I had to install a shim underneath the cutoff lever as shown in the top-right picture. This worked perfectly.
-
After these modifications, I had to verify that the cutoff lever was seated correctly. The lower picture shows the narrow, uniform gap between the cutoff lever and the gearbox shell, with the sector gear rotated so the nub was clear of the cutoff lever itself. The cutoff lever spring is holding the cutoff lever in position.
-
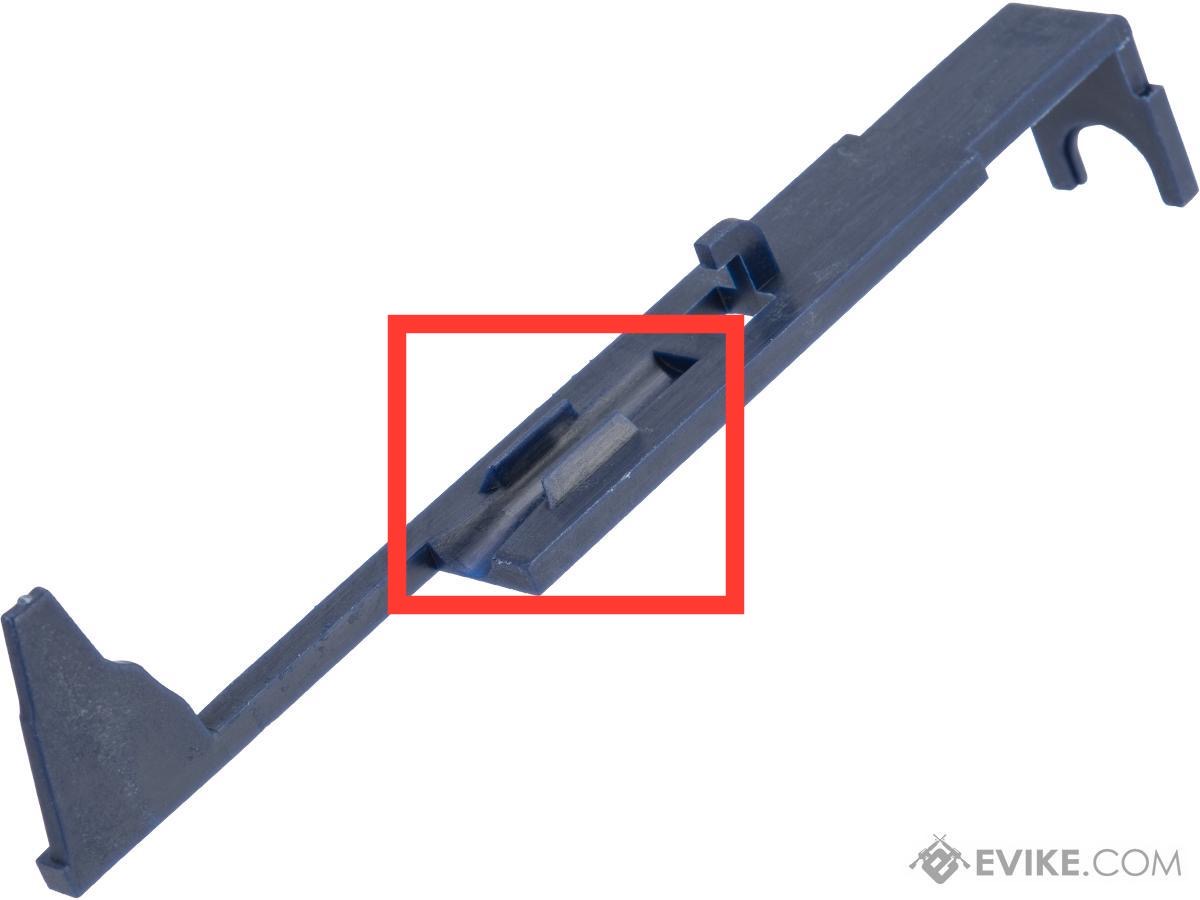
Selector plate
-
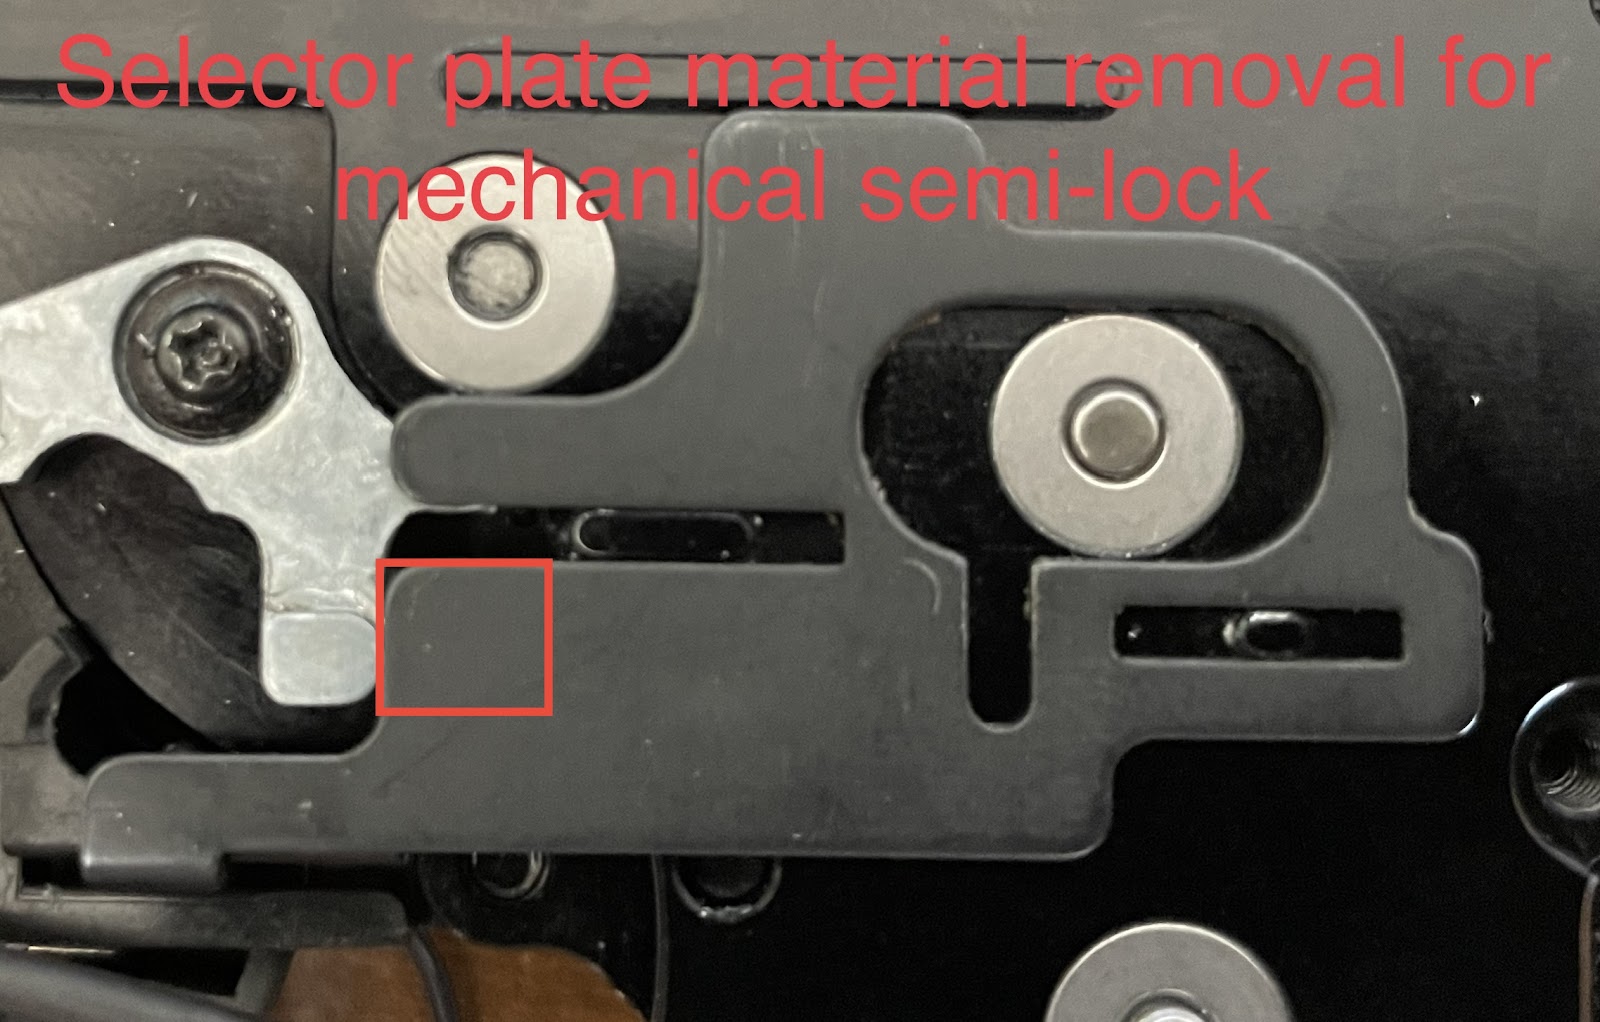
If you would prefer to mechanically semi-lock your gun, grind out the selector plate material indicated by the red square in the picture above. This will prevent the selector plate from disengaging the cutoff lever.
-
I didn’t go this route, since this leaves you without any way to unlock your gearbox if it experiences semi lockup.
-
MOSFET
-
If a programmable MOSFET is desired, the Gate WARFET is a great replacement. My install is pictured above.
-
The new wiring harness should incorporate the included dual signal wire setup, either spliced into the existing trigger switch assembly wires or soldered directly to the contact tabs.
-
You’ll need the Gate WARFET programming card to get your WARFET set up properly.
-
It may be possible to electronically semi-lock the platform, if desired. Your results will depend on quite a few parameters, which need to line up for this to work (motor, battery, spring, gears). The settings that worked for me are as follows:
-
Modified wiring, semi/burst
-
Burst length: shortest
-
ROF control: 50%
-
Smart Trigger: on
-
Active braking: can be on or off, but I prefer the reduced motor brush wear by keeping it off
-
-
The above settings made my semi auto painfully slow, so I enabled the precocking feature and dialed it in following Gate’s instructions. Now my semi auto is reasonably snappy, considering the heavy spring that is installed.
-
Adding precocking creates a new problem: how do you de-cock the piston when the gun isn’t in use? With the above settings dialed in, the full auto function fires a single round almost every time. Every 6 or 7 trigger pulls, the gun will spit out a slow 2 round burst, leaving the piston uncompressed. This is the method I plan to use to de-cock the gun at the end of a game day.
-
-
Fuse
-
You should really have an analog fuse, even if your MOSFET has a digital fuse built in.
-
I use mini blade fuses (ATM type) in an automotive fuse holder, integrated into my gun’s wiring harness between the battery and MOSFET.
-
Batteries
-
I’m a fan of 11.1V LiPOs since their performance suffers less in cold weather
-
A “butterfly” type 3 cell/11.1V LiPO will fit in the stock and buffer tube, as long as each cell is no longer than 125mm.
-
Make sure your normal/peak discharge rates are as high as possible. A good minimum value is 20C constant/40C burst, but higher is better. If your C rating is too low, you’ll over-tax and damage your battery.
-
Since Turnigy nanotech batteries are rather scarce at the moment, I ended up buying Hadron Energy 11.1V 1450mAh 30C butterfly LiPOs. Available on Airsoft Atlanta:
-
Battery connections
-
Tamiya connectors are rated to 15A; Deans are good for up to 60A continuous.
-
Since high power builds can pull quite a bit of current, I recommend Deans connectors.
Magazine upgrades
-
My issue with the stock midcaps is twofold:
-
During loading, the follower seems to get hung up at several points, requiring a significant amount of force to continue the loading process. These hangups were also apparent when unloading the magazine, manifesting as fits and starts in the bb flow.
-
The mags can’t feed 0.32+ gram bbs fast enough to avoid dry firing. This issue became even worse when I programmed precocking into my MOSFET.
-
Magazine disassembly guide:
-
Magazine follower options:
-
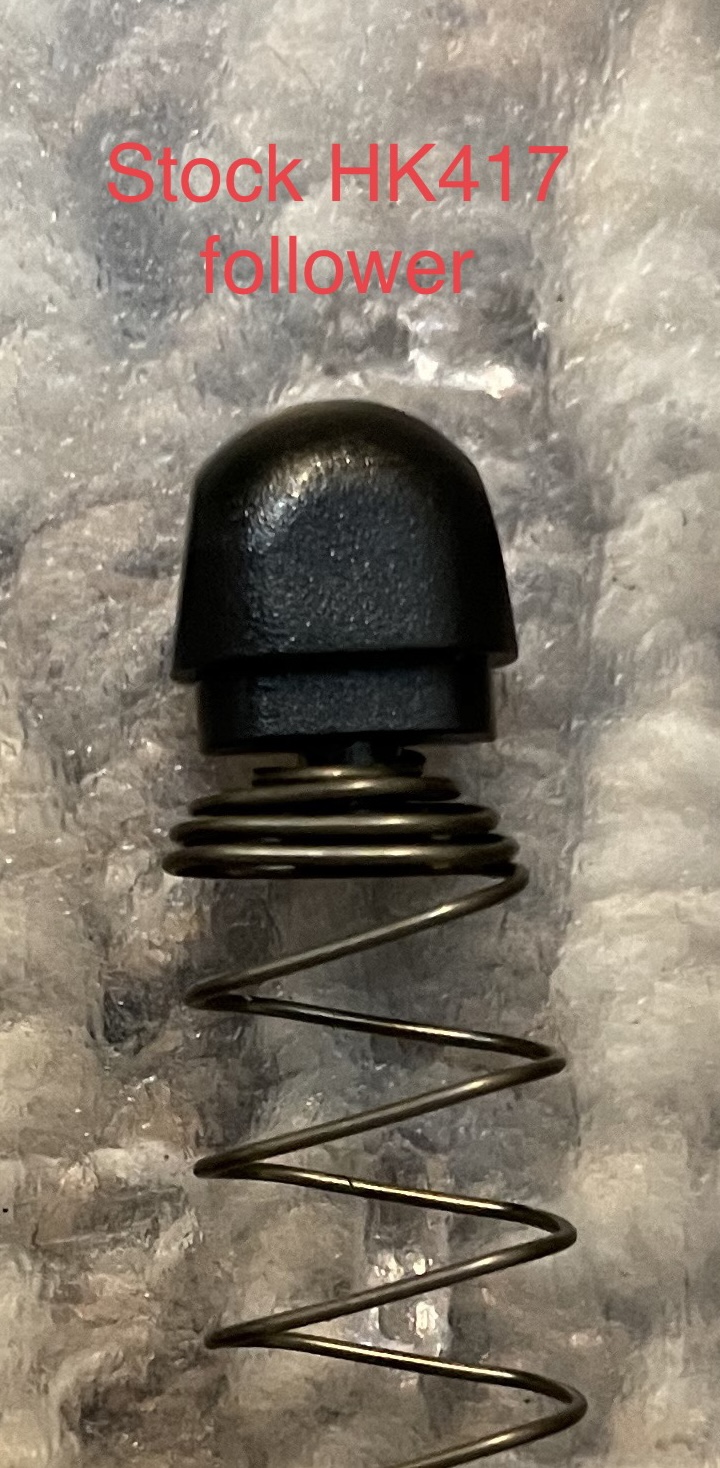
Terrible: stock VFC follower. Has a nasty habit of hanging up inside the magazine at several points during the loading process, which is one of the root causes of the feeding issues widely reported with these mags. If you replace anything inside the mags, replace these.
-
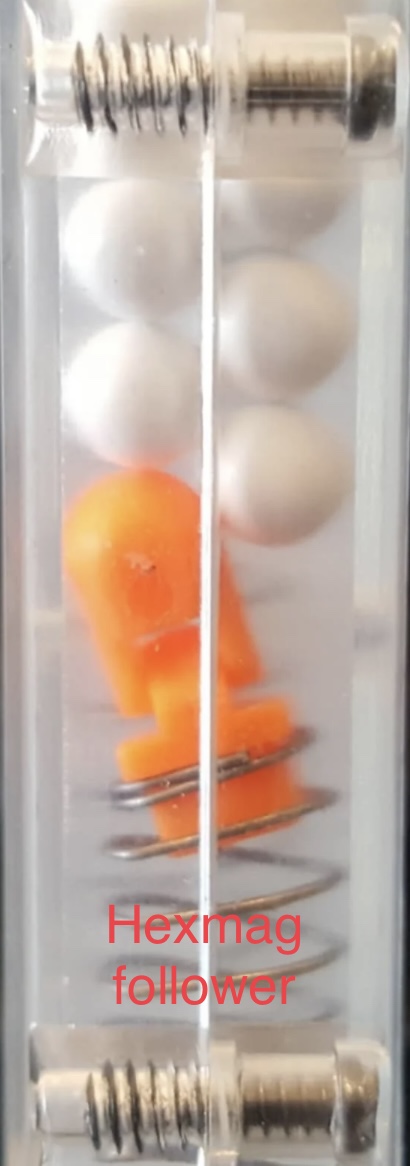
Good: Hexmag follower. The addition of a hinge is great for ensuring smooth movement around bends inside the magazine, but the follower is wedged under the stack of bbs and may bind up.
-
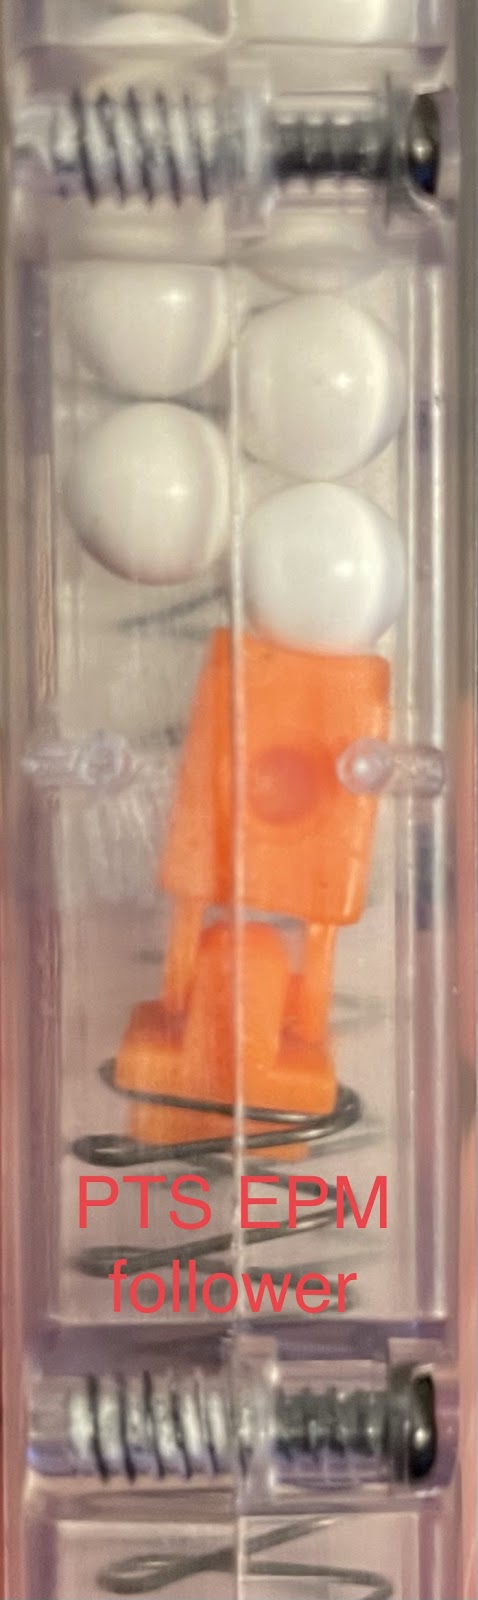
Better: PTS EPM/EPM1 follower. This follower is similar to the Hexmag follower, but with a cupped top that reduces lateral pressure (and therefore friction) on the bb track inside the magazine. These followers are a huge improvement over stock, but still slightly hang up around the 85 round mark.
-
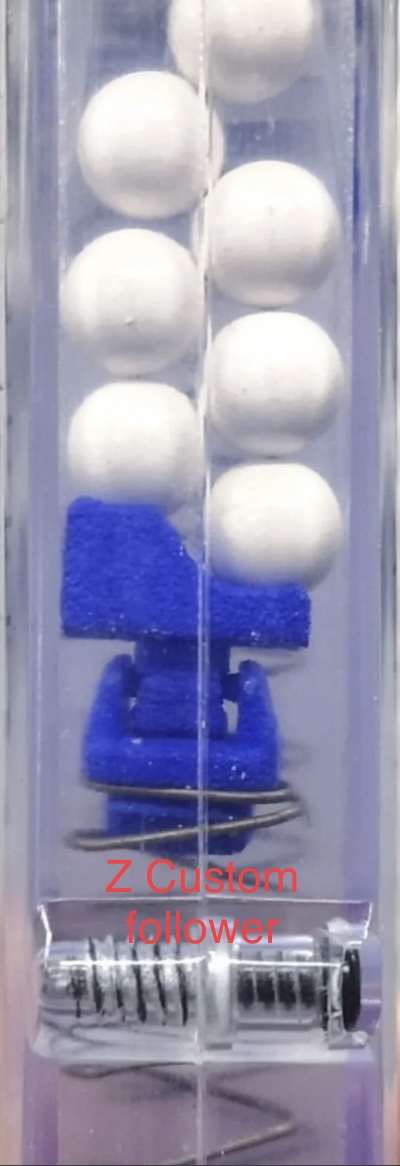
Best (maybe?): Z Custom Airsoft Works/ZTW follower. This follower features a hinge just like the other two upgrade options. Most significantly, the follower is fully aligned with the stack of bbs, exerting very little lateral pressure on the magazine’s bb track. These are difficult to get unless you’re in Canada; most shops that stock them won’t ship to the US. As such, I have not tested them to see if they are any better than the EPM followers I chose.
-
Magazine spring options:
-
Good for 0.30g or lighter bbs: stock spring
-
Needed for 0.32+ g bbs, or if precocking is enabled: Maple Airsoft Supplies SuperFeed spring, cut to 26 inches (or 117 coils). After a few loading cycles, the spring will compress down to its final length of 20.25 inches.
-
A note on reassembly:
-
VFC seems to have issues with their specs on clamshell-type assemblies, whether it be gearbox shells or magazines.
-
I recommend loosening all the screws that secure the magazine halves together. Backing all 8 screws out by a half-turn should slightly reduce the tension on the bbs in the channel, improving feeding.
-
-
Prometheus barrels tend to be a bit thicker than others, presumably in the interest of stability and accuracy. I doubt the AK74MN specific tightbore is any thicker than any other Prometheus inner barrel, but I can’t be sure.
You might need to lube the new inner barrel so it slides into place. Failing that, I imagine the outer barrel will need to be bored out very slightly. Not sure how that would be accomplished though.
-
1
-
-
19 hours ago, NevadaZielmeister said:
Does anyone know which bucking I should get to replace the stock one? I am trying to think of wearable items and find replacements.
I’m a fan of Prometheus purple buckings. G&G green buckings are a decent substitute if the Promy isn’t readily available.
19 hours ago, NevadaZielmeister said:Can you give a link for this barrel upgrade? My apologies for not being able to figure it out as the only thing I could find was this one (https://www.evike.com/products/83137/)
The barrel you linked is the correct one.
-
1
-
-
3 hours ago, Turt0416 said:
*UPDATE* thought I’d drop this here to maybe help anyone else out who may have a similar issue. After trying 4 after market 21.00mm nozzles I have finally found that (at least on mine) my hopup unit only likes the stock nozzle and it’s the only way it will work correctly and seal. Perhaps other nozzles will work but the 4 21.00mm nozzles I tried won’t fit due to the diameter of the nozzle and hopup unit. Maxx MP5 21.00mm, VFC MP5 21.00mm and Lonex LMG nozzle don’t fit my lambda. Hopefully this helps those looking to upgrade.
The SHS MP5K nozzle I installed works very well, for the record.
-
6 hours ago, Turt0416 said:
Have you had any luck with the hopup units? I currently just rebuilt my Mod 1 (US internals so A&K) and ripped them all out and replaced with upgrades. The gearbox is running very solid but for some reason I am having so many issues with the hopup between trying to jam immediately and almost complete loss of air seal (0.3J or less) any tips you may have on how to get the stock unit to seal would be appreciated! Thanks for all the other info.
I would check to make sure the hopup bracket inside the receiver is allowing the hopup unit to slide back fully into battery. I found that, if the bolts on the receiver hopup bracket are too tight, the hopup unit will be stuck in a position spaced away from the gearbox.
On 9/21/2022 at 9:02 AM, ardrummer292 said:The hopup alignment bracket is an interesting departure from standard CA/A&K M249 designs. Instead of only cradling the bottom of the hopup unit, it completely surrounds it. Be warned that overtightening the two bolts securing the top half of the bracket may lead to the hopup being stuck out of battery, resulting in feeding and/or airseal issues.
-
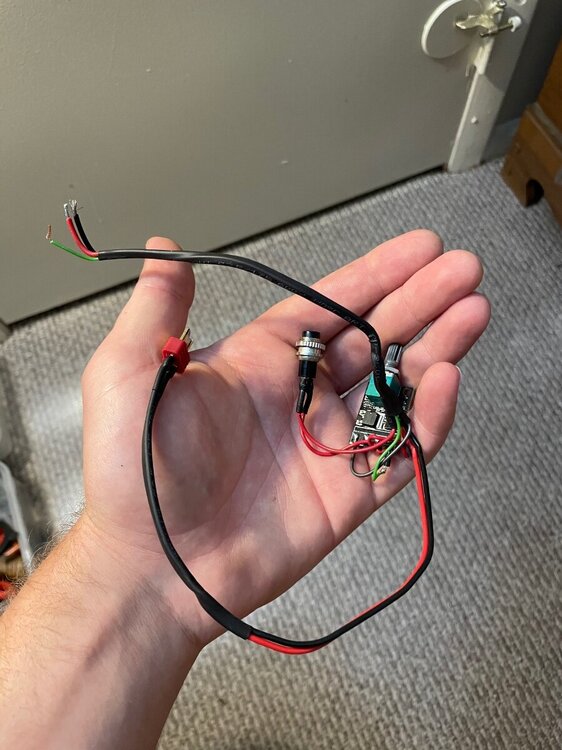
Got the new WARFET-based wiring harness made up and installed. The gun is a happy camper, especially with the Bullgear insert pumping rounds in as fast as the gearbox pumps them out. Dumped about 1000 rounds through it as a test fire, with no hiccups or drama.
-
On 12/4/2022 at 7:34 PM, PayloadCo_Blazes said:
I'd love to build something very similar to your underfolder since I've had the S&T steel folding stock on my very first spring shotgun ever since I started and would love to immortalize it in some way. Yours is real pretty!
It was a super cool setup, but definitely not easy to complete. Finding a machinist willing to modify the stock-to-receiver interface was difficult, and the loss of the folding function (due to routing the HPA line through the hinge) was kind of a bummer.
-
1
-
-
A few more picture from the boxmag conversion:
Wiring removed from the Bullgear Mk48 boxmag insert. Cutting this wiring out deactivated the adjustable rate-of-fire feature as well as the push-button feed feature. While those are handy, wiring them up was going to be too fussy. A simple on-off arrangement should work just fine.
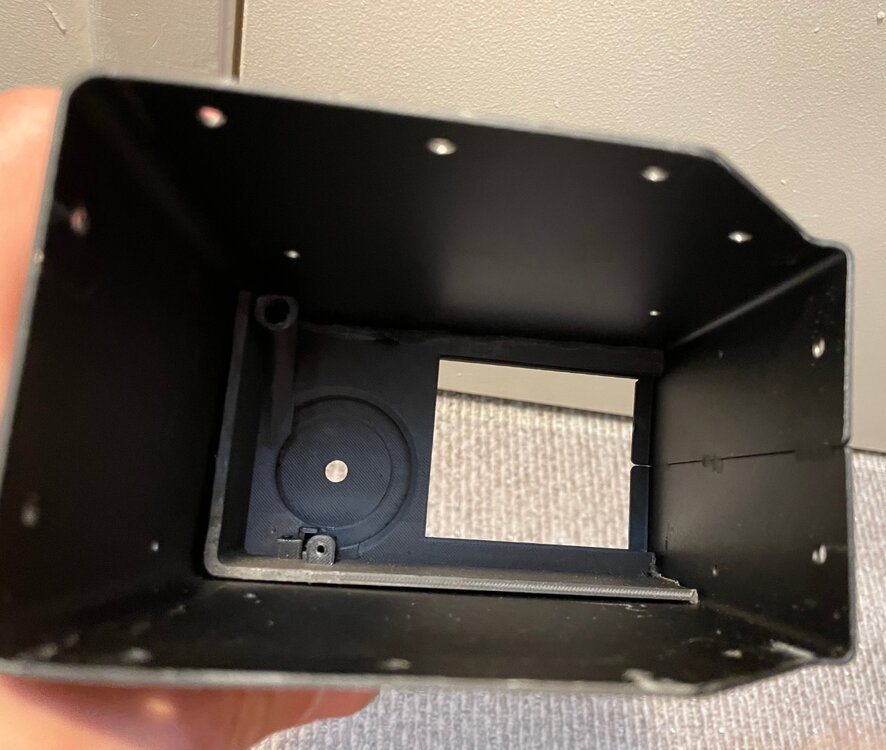
Bullgear Mk48 boxmag insert, cut to size. The sliding bottom trap door is not inserted, allowing you to see the lip at the bottom of the Lambda boxmag body. This will support the boxmag insert quite nicely, while shielding it from impacts.
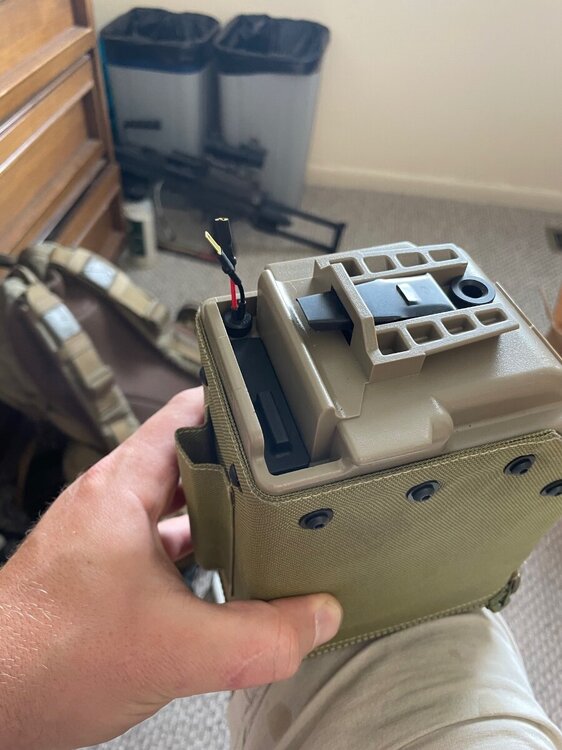
I opted to use simple spade connectors to power the boxmag. There's no need for bulky high amperage connectors (like deans) with such a small motor. I also added a small rubber plug in the wiring pass-through, which should help keep rain out of the boxmag.
-
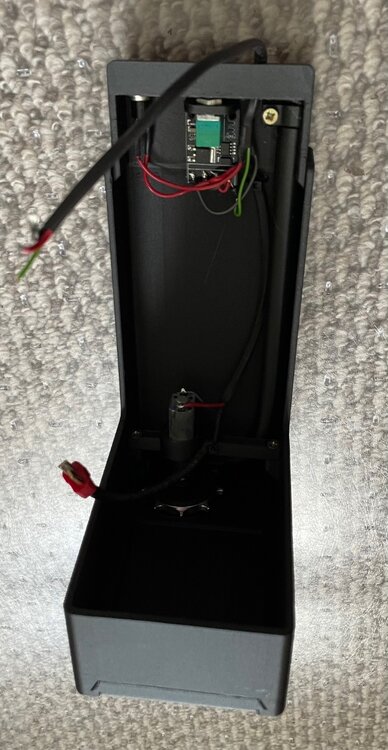
Bullgear boxmag upgrade complete, now awaiting testing. Here's some pictures to show a broad overview of the process:
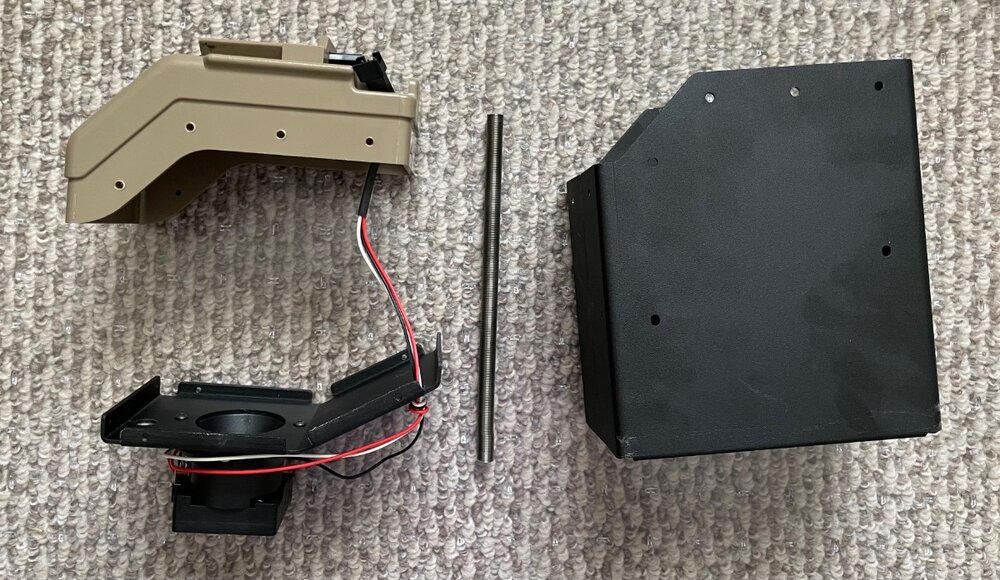
Stock boxmag, disassembled. The cordura cover is not shown.
Bullgear Mk48 boxmag insert, in stock form. This insert is designed to fit a real Mk48 nutsack, not the Lambda replica. Cutting was required to ensure fitment.
Bullgear Mk48 boxmag insert, heavily modified. I cut it to size in order to fit it into the Lambda housing, which involved cutting off two of the vertical "walls," trimming the bottom sliding trap door, and creating a new motor support with a plastic support, nut, and bolt. The 3D printed plastic feed tube was tapped with thread compatible with the coiled feed spring; I didn't do this work, so I'll have to ask what thread spec was used. I also removed basically all of the electronics, leaving only the power leads for the boxmag motor. I intend to wire this up in a parallel circuit with the gearbox itself, leaving the boxmag as a fully slave-powered component.
-
Great input @E_27_R, thanks!
On 9/25/2022 at 8:27 AM, E_27_R said:1. The box mag - as ardrummer points out, the box mag provided is a US spec rather than the UK/European pattern. It makes sense that Lambda wouldn’t make a whole new batch of box mags for a very limited run of guns, but I’m told this is on the cards for the future.
[...]
I should also point out that the box mag I received was apparently a revised design with thicker walls - as a consequence, the bipod cannot close properly when the box mag is fitted.
If Lambda does offer alternate box mags, I think a replica of the shorter 50 round version would be beneficial for many owners. Likely wishful thinking on my part though.
My buddy has not experienced any issues with locking his bipod in the stowed position.
On 9/25/2022 at 8:27 AM, E_27_R said:3. The rail system is clone correct for the UK guns. The B&T rail is found on the 5.56 L110 guns only.
I didn't realize this was the case. Happy to be corrected!
-
3 hours ago, ardrummer292 said:
This thing weighs 18-19 pounds unloaded. It’s heavier than my old Echo 1 M240 or CA M249 Para by a wide margin.
Correction: just shy of 22 pounds (10 kg), with an empty boxmag and no accessories. Brutal.
3 hours ago, ardrummer292 said:On the UKSF Maximi variant of the gun, the battery is stored underneath the barrel. An 11.1V 2000mAh battery fits perfectly in this space, with a little room to spare for the addition of a MOSFET and fuse.
The battery I mentioned here is a Turnigy 11.1V 2000mAh 15-25C LiPO, SKU NG2000A.3S.15. Dimensions are 126 mm long x 21 mm tall x 29 mm wide.
I'd recommend a battery with a higher C rating (say somewhere in the neighborhood of 20-40C or 25-50C), if possible. I have been unable to find one that fits the bill.
-
1
-
-
One of my guys recently purchased a Lambda Defense Mk48. It survived for about 500 rounds before it blew a piston, which is how it ended up on my work bench. My notes are below, for reference in case anyone wants to take a peek under the hood.
The version my friend got is actually the limited edition “Maximi” version (as used by UKSF), but I imagine there aren’t any significant technical differences between this model and the more common US-issue Mk48 version that Lambda has in production.
Externals –
This thing weighs 18-19 pounds unloaded. It’s heavier than my old Echo 1 M240 or CA M249 Para by a wide margin.
Construction is almost entirely steel, including the barrel. I would jump on an aluminum barrel if given the option, just for weight savings.
The barrel release lever’s spring is a little softer/weaker than I’d like. I haven’t had any issues with accidental barrel separation, but I would prefer a bit of resistance from this particular control.
On the UKSF Maximi variant of the gun, the battery is stored underneath the barrel. An 11.1V 2000mAh battery fits perfectly in this space, with a little room to spare for the addition of a MOSFET and fuse.
The bipod is… okay. Better than any other airsoft MG bipod (not counting my old Inokatsu Mk43), but still not as sturdy as the real issue item. I imagine it’s easy to install a real bipod, or at least as easy as doing so on a CA/A&K M249.
The FN-style tri-rail system included with the UKSF Maximi variant is solid, but I’m not sure that it’s the correct rail for a UKSF-issued gun. I was under the impression that a B&T tri-rail with extended side rails was correct.
The ejection port is spring-loaded and actually opens, which is a neat feature. Simply slide it either forward or backward to lock or unlock it. This is handy when arranging wires in the receiver.
The gun feeds from the bottom, which is needed since Mk48s don’t have magazine wells. BBs are routed via a standard feed spring from the ammo bag hanger, up in a sideways “S” pattern, to the bottom of the hopup alignment bracket.
The hopup alignment bracket is an interesting departure from standard CA/A&K M249 designs. Instead of only cradling the bottom of the hopup unit, it completely surrounds it. Be warned that overtightening the two bolts securing the top half of the bracket may lead to the hopup being stuck out of battery, resulting in feeding and/or airseal issues.
The hopup alignment bracket has another peculiar feature. There is a spring-loaded pin recessed in the front face, which locks the hopup adjustment wheel in position. This means the hopup wheel cannot move when the barrel is installed in the gun, which is good for countering loss of setting but fiddly when it comes time to zero the gun.
The charging handle does not need to be retracted (even slightly) for the top cover to close. This is a welcome correction to an annoyance present on basically every airsoft M249 out there.
The safety takes a fair amount of force to engage and disengage, much like the selector on the real thing. Clicks into either position are positive and loud.
The para stock included with the Lambda Maximi is absolutely rock solid. It reminds me of the old G&P para stock, which was similarly sturdy. This is miles ahead of the flimsy CA and A&K para stocks, which snap under a moderate amount of force.
There is a small rectangular cutout on the left side of the receiver, close to where the boxmag mounts, for routing power wires out of the gun and to the boxmag. I think this is an excellent addition, as it eliminates the risk of closing the top cover on said wires and clipping them.
Trademarks are… present. That’s all I can really say about them, since I don’t pay much attention to that sort of thing.
Internals –
The gearbox shell itself appears to be an A&K M249 unit. Nothing unusual about it as far as I can tell.
The inner barrel is 460 mm long, and is a standard brass affair with a deep crown at the muzzle. I immediately replaced this with a Prometheus 6.03 mm tightbore in the same length.
The hopup unit is a cast unit, and is proprietary. Feed is from the bottom of the unit. The hopup nub is installed horizontally, much like Bullgear’s upgraded M249 hopup unit; I’m glad Lambda fixed this glaring issue with the legacy CA/A&K M249 platform.
The air nozzle is 21.0 mm long. I have used an SHS MP5K air nozzle as a replacement; while the overall length is the same, the chamfer on the end is shallower. Testing is in progress.
The included cylinder is not ported, and appears to be decent quality. The cylinder head appears to be a Lonex unit, in gold or yellow color.
The stock piston is plastic, with a full metal tooth rack. The stock piston head is aluminum. Angle of Engagement (AoE) is atrocious, which is why this one only lasted 500 rounds before the piston tooth rack snapped in half. I replaced the broken components with a Lonex high torque red piston, Lonex AoE correction piston head, and Lonex hollow piston head o-ring.
The gears are Raptor branded, and appear to be decent quality. There is no sector chip installed to assist with feeding, and SHS sector chips are a loose fit on the stock sector gear.
Bearings appear to be 8mm, but I haven’t pulled them out to check with my calipers.
The motor is a short type, as is expected with this style of gearbox. The stock unit appears to be a ZCI or SHS 16 TPA version, with the relatively high rate of fire to match.
The stock spring appears to be approximately equivalent to an M140.
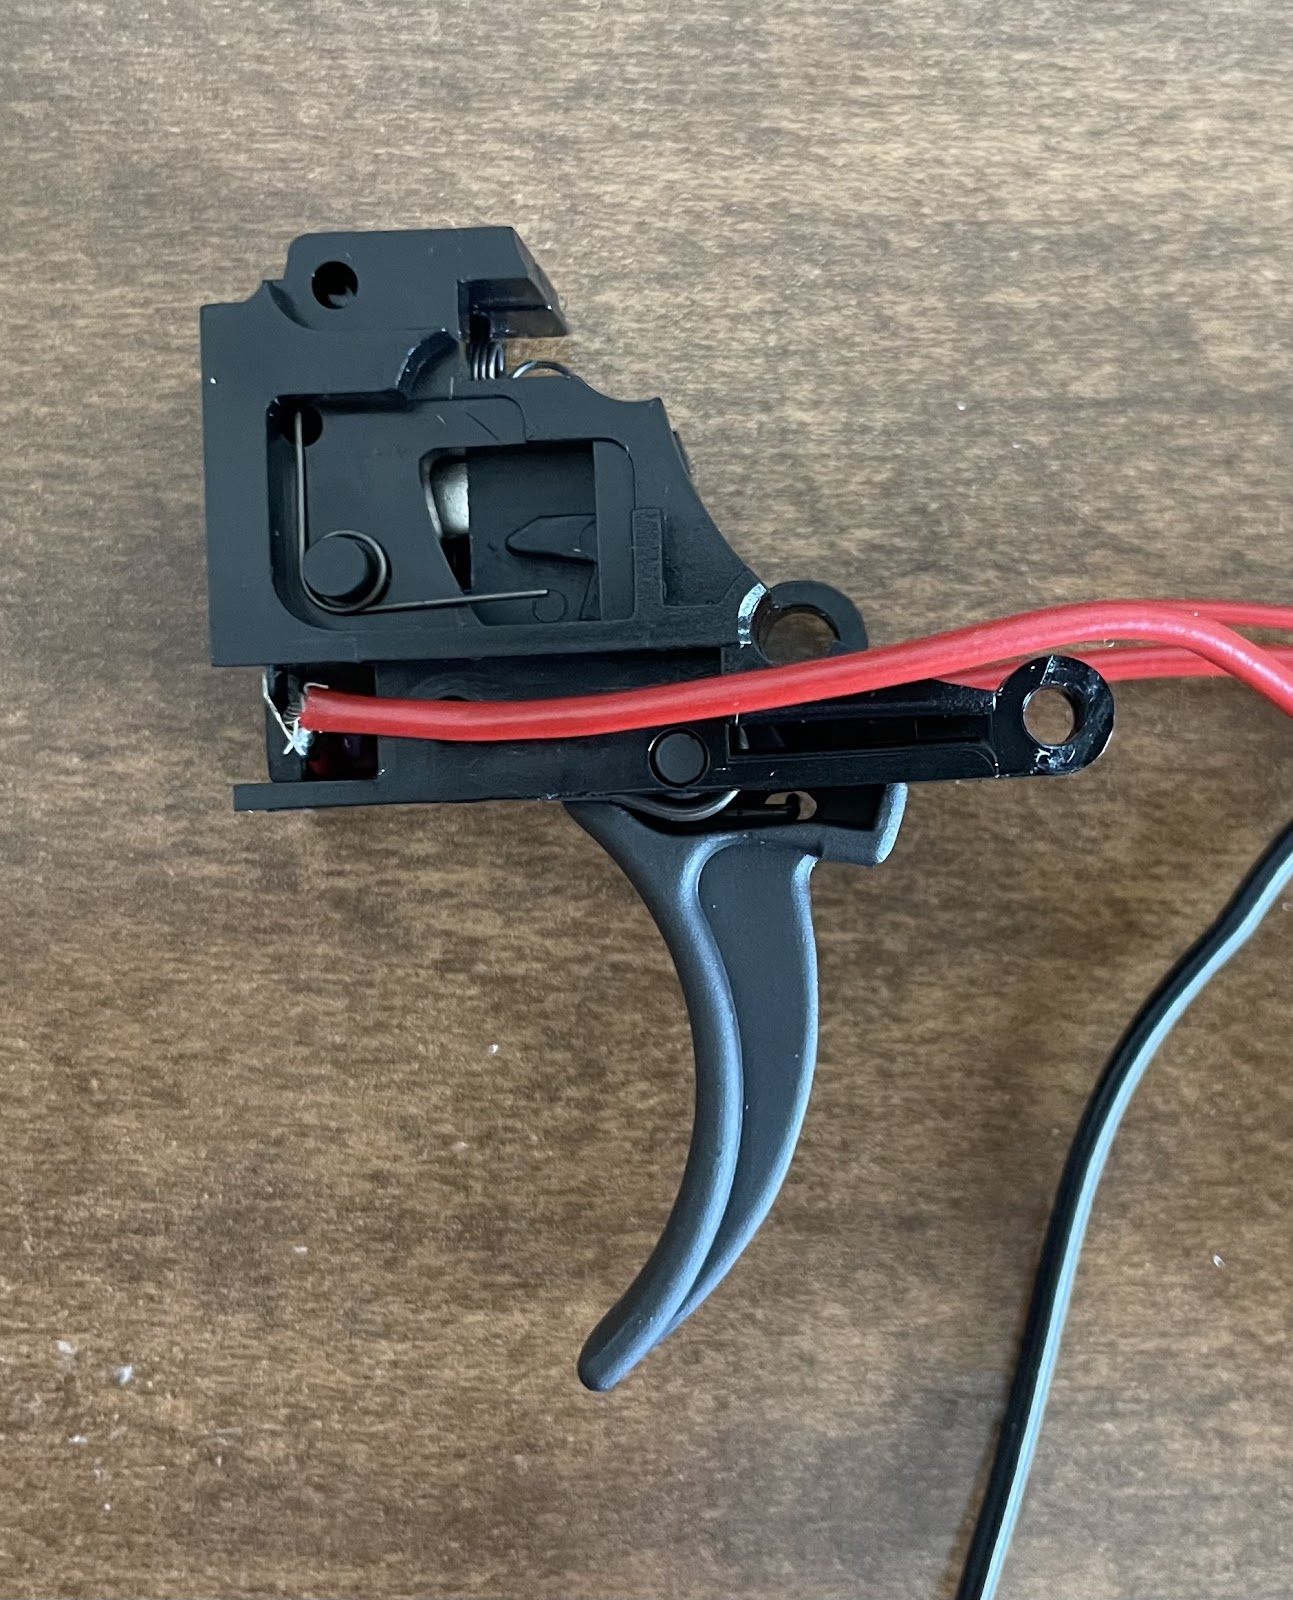
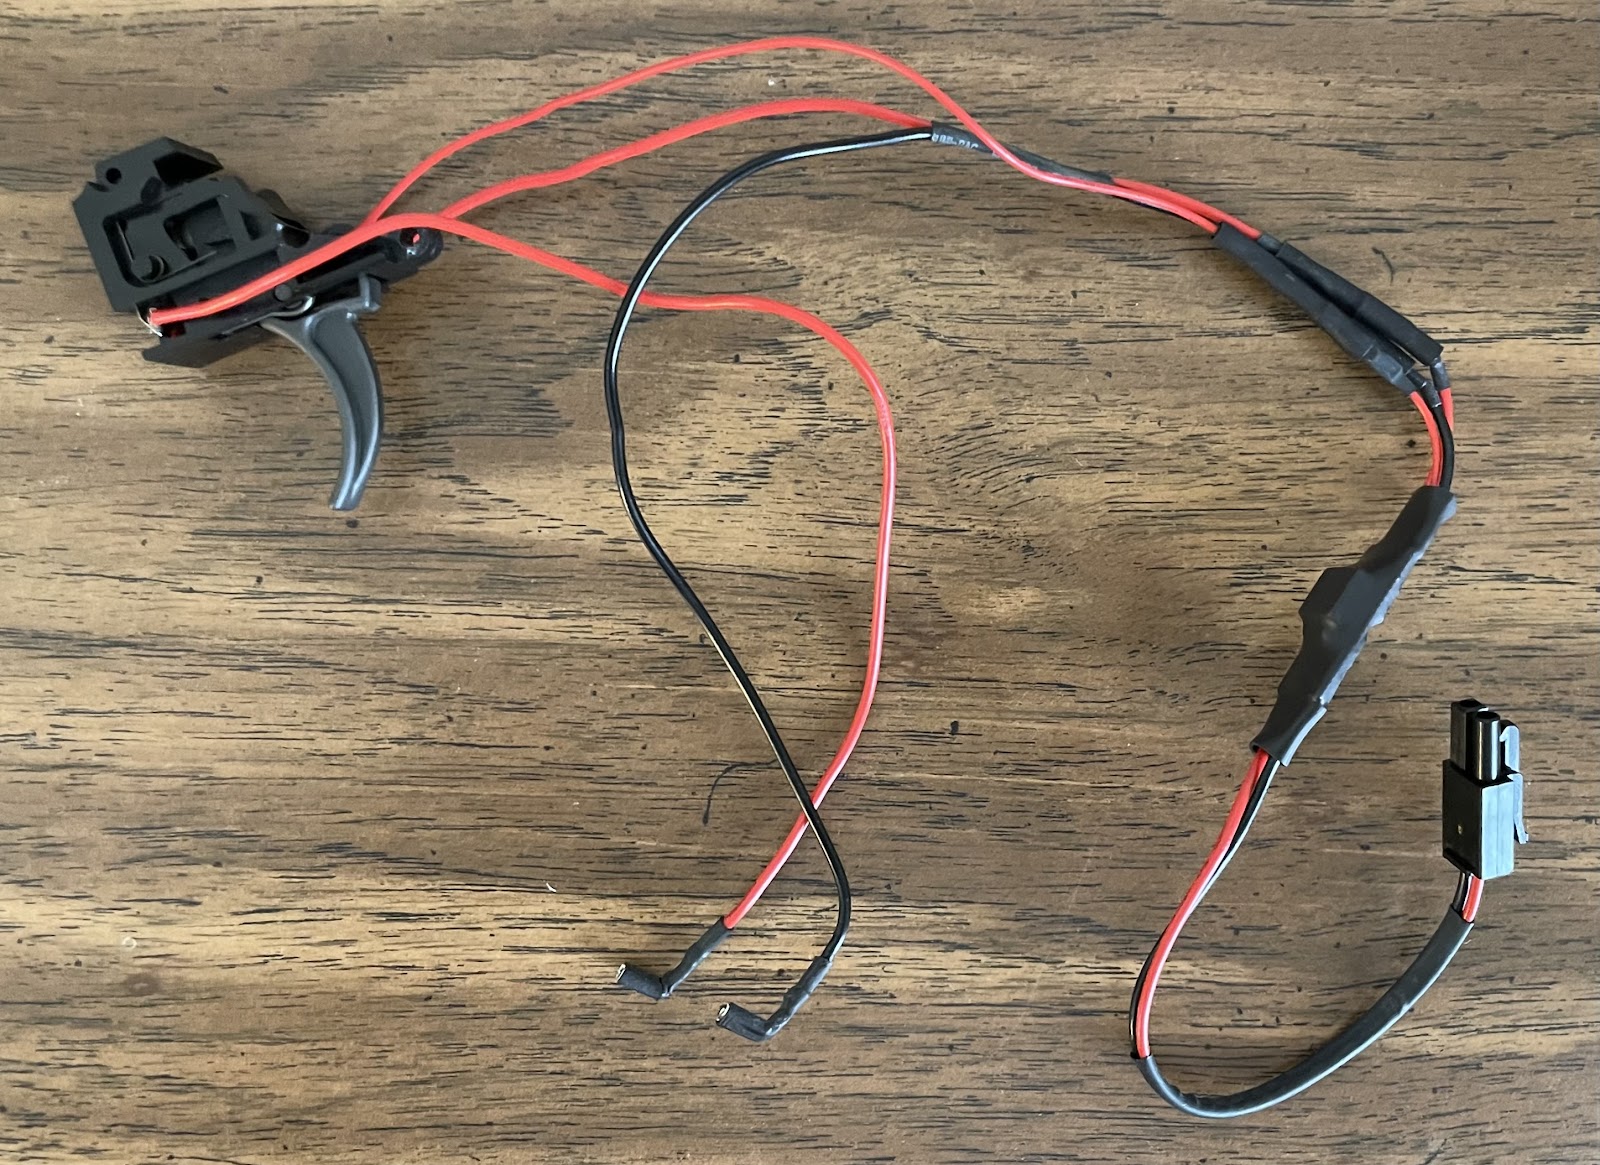
The microswitch is fairly similar to standard M249 microswitches, but does not use the thin metal arm required by CA/A&K M249 trigger groups. Instead, the Lambda Mk48 trigger group directly engages the button on the microswitch. I consider this an improvement.
The wiring isn’t especially exotic, 16 AWG (ish) for the motor and 18-20 AWG (ish) for powering the boxmag. There is no fuse included. This gun is desperately in need of a MOSFET, especially considering the microswitch is only rated for 15 A and a medium MG tuned to US limits will draw around 25 A (as my Echo 1 M240 did).
Box mag –
Externally, the boxmag is a replica of the US-issue 100 rd Mk48 belt pouch: FDE plastic, coyote brown cordura. This is not correct for the UKSF Maximi, which is issued with the FN European-issue color scheme of black plastic and OD cordura.
The cordura cover is secured to the boxmag body via allen screws instead of rivets. I have not yet removed these screws for boxmag disassembly.
Filling the boxmag appears to be accomplished via the ammo belt slot. Dump in however many thousand rounds the mag carries, then replace the black plastic plug and attached 7.62 dummy belt.
The boxmag draws power from the main battery. The 3-wire electrical connection is accomplished via a small black plug of unknown type.
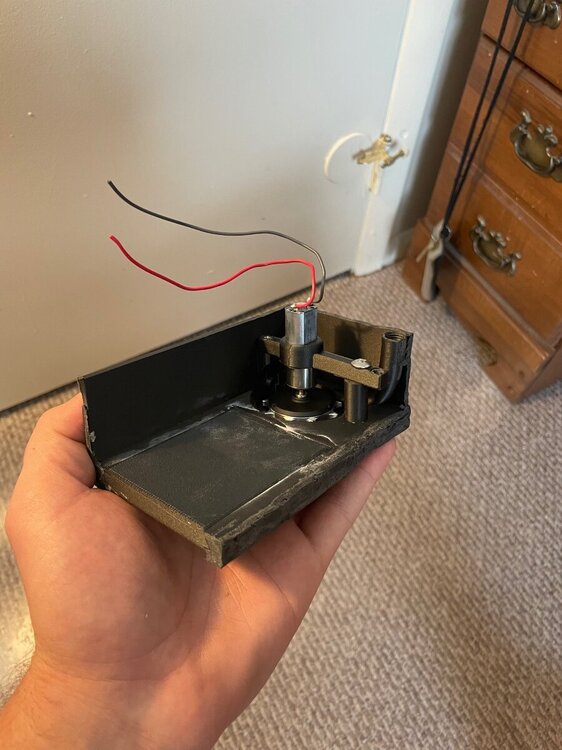
The boxmag operating mechanism is very similar to that used by the Echo 1 M240. There is one pulley attached to a servo (motor), which provides the power. There is another pulley attached to the feeding gear, which spools the bbs into the feed tube. The two pulleys are connected by a rubber o-ring, which serves as a drive belt. I consider this to be a rather poor system, since it is highly susceptible to failure: o-ring gets loose, pulleys get wet, etc.
There are 3 boxmag feed settings, controlled by a 3-way switch close to the pulley arrangement. There is a “constant on” setting, where the boxmag will run as long as it is connected to power. The middle setting is “off.” The third setting is “synch feed,” where the boxmag only feeds when the trigger is pulled.
Other notes –
The stock piston blew out at about 500 rounds, likely due to terrible AoE.
The boxmag cannot keep up with the rate of fire, unless set to “constant on” feeding. I will attempt to retrofit a Bullgear Mk48 boxmag insert into the Lambda boxmag to boost the speed of the feed system.
Tagging @sniperelite7 so he can share his experience with his Lambda Mk48, if he wants.
-
3
-
-
13 hours ago, Jacob h said:
Hello, recently got myself a tm m870 it shoots pretty great tbh. It’s second hand with some “upgrades” but weren’t specified. I’m thinking of getting all this wiltec upgrade parts you reference. Little intimidated by the process but it’s worth a try. I’m currently hpa tapping the stock using an adapter. Got the tank and all.
What would you recommend for my first purchases of parts? Also what should I get for maintenance? Reading this has clued me in that I might need to actually maintain my m870. Which I’ve never done. So that’ll be a long and daunting task. But oh well
thanks
Jacob h
Honestly, if it's running the way you want it to run, I'd leave it be for now. A parts breakage is a better reason to crack it open than a non-specific desire to "upgrade." If the shotgun is lacking in one specific area, that can inform your upgrade path. What do you want it to do better/differently?
I wouldn't worry about maintenance too much, since that will also involve disassembling the shotgun. When it comes time to take it to bits, you can handle installing upgrades and performing preventive maintenance all at once.
-
On 5/25/2022 at 11:50 PM, PayloadCo_Blazes said:
I've been back and forth to this thread the past couple years and I finally got my full-size 870 put together largely inspired by you man! I'll attempt to fine-tune the hopup, but for now the tighter spread at range I get with the full-length inner barrel set from WiiTech seems like a good upgrade! This weekend I'll be fielding it for the first time. I'll post a picture to show you after but I wanted to thank you! I'll let you know how the simple mods I've done affect my gameplay
I also have a question. I've been told that to chrono a tri-shot, you can just load a shell with one bb and regardless of the fact that the other two barrels are empty, the loaded one still shoots at the same power. That doesn't sound right to me, how have you been measuring?
Sorry @PayloadCo_Blazes, just seeing this now. I'm glad you found my writeup useful. Going "whole hog" with a build like this is a process, but it's fun to push the performance envelope of a system to see what it can really do when the work is put in.
Chronoing tri-shots is tricky. In a perfect world, loading a shell with one bb would give you a clean, realistic velocity reading. In reality, the other two barrels being empty absolutely effects the flow and pressure within the system, affecting the reading you get from the one loaded barrel. I've found that chronoing the shotgun when loaded as normal provides decent results. You're likely to get the odd crazy value (way too high or way too low), but I think it's safe to discard those since the chrono is likely picking up the entrance of one bb and the exit of another.
-
1
-
-
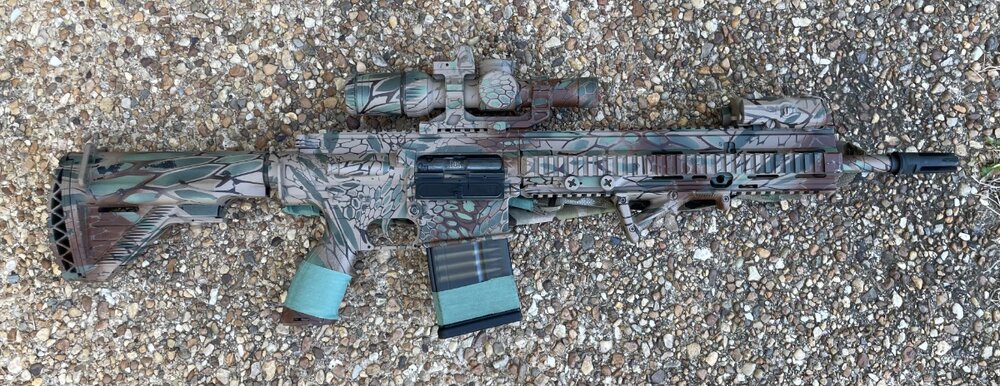
Wrapped up my VFC Avalon-based L119A2 build recently, complete with horrifying (but kit correct) Kryptek paintjob.
-
2
-
-
On 7/13/2021 at 2:48 PM, CatgutViolin said:
It will be a serious missed opportunity if Marui doesn't combine this gas engine with the feed system of the shell-fed shotguns to produce something like that.
A GBB SPAS-12 or M1014 would be a hot item for sure.
My thoughts exactly. The delineation in the Saiga magazine between bb feed and gas supply gives me hope that this is TM's intent.


Lambda Defense Mk48/Maximi notes
in Rifles (AEG)
Posted
I spoke a little too soon on this topic. One of the Maximis owned by a friend fractured the stock bipod. He sourced a real-steel replacement, which wasn't too terribly expensive. Note that the UKSF Maximi uses an older-style standard M249 bipod, not the newer side-folding version or the prohibitively expensive Mk48-specific bipod:
https://www.midwestgunworks.com/page/mgwi/prod/49505
I plan on whacking a short section of 1 1/4" OD x 1" ID aluminum tube inside it, which is required to make the real bipod fit. Link to my guide showing the same bipod upgrade process on a CA/A&K M249: