

Spudgun
-
Content Count
726 -
Joined
-
Last visited
-
Days Won
3
Content Type
Profiles
Forums
Gallery
Blogs
Calendar
Posts posted by Spudgun
-
-
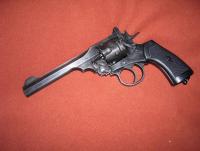
My Webley arrived today. Bliss.
-
Love that Cortina.
I had the German version (It was called the Taunus) when I was in the Army. Nice car.
-
I would like to nominate last years Torchwood: Miracle Day for some airsoft fail (Yeah, OK I know where the stuff came from, but that's not the point). Look at the UK footage closely. Muzzle flash; Check. Spent cartridge ejection; Check. Slide flying back; Fail! Somebody either: Didn't gas the magazines or didn't know how to disable the slide lock. We had quite a chuckle about this at the site where I play.
-
And now for something a bit different.

-
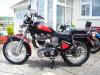
If any of you have read my rantings in the other section of Off Topic, then this is the bike that I'm trying to get Registered. It's a 1999 Royal Enfield 500 Lightning. I've owned it since March and I've only managed to ride it to the MOT test station and back (Total Distance: 4KMs).
-
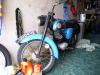
I've just dragged my 1967 BSA Bantam out of storage (where it's been sat since 2001). I've had it since 1977. I'm currently working on it and (fingers crossed) it'll be back on the road for July.
-
That's Webley and which one. their's dozen's to choose from?
As far as I'm concerned, there's only two worth bothering with. That's the MkVI and the Fosberry.
-
When Preperation H just isn't good enough.
-
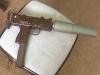
OK folks, here's mine.

Upgraded to the hilt and a real-steel mag and inert ammo added for effect.
-
This isn't so much a review, it's more a set of observations. It's to help/inform/whatever anyone who's bought one and they think that something is wrong. Firstly, a little back story.
On Tuesday the 6th, a friend brought to out local club his newly aquired AGM XM8. We were quite impressed. Well, I was impressed enough (sudden salty smelling wet patch in my trousers impressed) to buy one from Actionhobbies the next day. On Friday it arrived (Spiffing service Actionhobbies!). Now the following is the culmination of my friends comments made on Tuesday and my observations made on Friday.
My friend had already stripped his XM8 down and upgraded to 1J. He commented that is gearbox had a mixture of metal and plastic bearings. He thought that the makers just put in bearings that they had to hand at the time. I stripped mine down and found that my bearings were all plastic. What he said is probibly true.
His XM8 was quiet as a mouse. He then fitted a sliencer and the report was further muted. He reckoned that in a woodland and being 40 foot away from a target, you wouldn't be able to hear the AEG at all. Mine sounds like your average AEG (whirrr, phut, clank).
He had changed his battery from the supplied ni-cad to an after market nimh. I had a nimh supplied with the gun. He commented that when he first powered up his gun, the motor would slow down and speed up. Mine works perfect. Again, it's reckoned that AGM put in batteries that were to hand at the time. Others have commented that Chinese batteries are generally rubbish. Mine's a good-un.
The following are my own observations.
Although the gearbox is a clone of the TM V3, they're not the same. I put the XM8 gearbox next to the one on my TM AK47. The only difference worth noting is that the cylinder on the XM8 is longer than the one on the AK. I've no idea if this will effect upgrade options as I haven't that far.
The hop-up unit is a slide type similar to the one found on the TM AK, but again, they're not the same. The TM hop unit wont fit the XM8. THe XM's hop is shorter from the mounting holes to the gearbox and longer from the mounting holes to the barrel socket than the TM hop.
Lastly, TM G38 mags will fit the AGM, but only if you modify the XM8's hop. The diameter of the tube (where it plugs into the magazine) on the XM is slightly smaller than the TM. Simply stick on a piece of tube over the XM's hop and all will be well. I haven't done this and this is what my friend did.
-
that does look pretty nice tho, shame about the grainy pic
Photography was never my strongpoint. Try this one:
-
I've been tinkering again. I've gone for a quasi Man From UNCLE look. I think it looks quite snazzy.
-
Here's my 18C. Hmmm, Glockyness...
-
I'm left handed and most of my shots are on target. However, I do get the odd BB that has a mind of it's own.
-
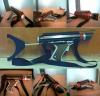
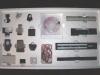
OK, my turn. I hope nobody minds if TV guns are included. All of these items were built my myself (Hell, I am a modelmaker after all).
Pictured:
Blake's 7 Federation Troopers rifle
Blake's 7 Federation Officers pistol (Built for someone else).
Star Trek Starfleet Flintlock Phaser (I didn't design it, I just built it for a friend).
Space:1999 Stungun.
Not pictured.
M1A1 Pulse Rifle (My baby! Standard TM Thompson and conversion kit).
Robocop Auto 9 (Reworked airsoft springer).
Space Precienct Officers Pistol (another scratchbuilt model)

-
Your kit must be different to the one on mine then. Unfortunately mine counts down for every shot and then resets back to 95 once it hits 00.
Well, it's what's supposed to happen (according to other reports). I haven't actually fired it yet. I've discovered that I've put the wrong connector on the end of my homebrew battery. Whoops!
-
if only there was a light detector for the number of BB's which had gone through the gun, so the numbers on the side could count the BB's
There is. The detector is mounted near the end of the barrel. It's conected to a divide by two circuit that's mounted in the mag well. When you push in the mid-cap, the counter racks up 95. For every two shots fired, it counts down one.
-
As to the different brands of kit, my guess is it's all the same, just different branding. Probably a knock-off like those cheap resin kits.
I reckon you could be right in saying that it's all the same, but different branding. There's no markings on the box or kit parts to say who actually made them. I have to entertain the possibility that the kit is produced at one factory (minus screws, assembly CD, etc) and then sold to other establishments who add the minor parts who then sell them under their own brand. Until a number of Pulse rifles can be put side by side (for comparison purposes), it's going to be hard to say if there's a 'knock off' factor involved.
-
Right, here's an update.
As mentioned above, I've been doing a spot of 'fettling' (That's making sure that everything is 'just so' to you at the back) and I've found a couple of problems.
The pictorial instructions for assembling the grenade launcher internals are WRONG!!. If you assemble the link between the slide to the external grip as shown, the battery won't fit into its tube. The linking rod is offset. It took a while prising apart the two halves of the launcher, pulling out the slide and linking rod and reversing it. Everything is now well in that department.
The magazine cover is none to clever. The clip that holds it into place doesn't do its job all that well. Not enough tension is provided to keep the cover in place. The upshot is that it would fall off if the rifle was used (as is) in a game. This problem was solved by removing the clip from the cover and with a lighter, warming up the areas where the plastic bends, and bending outwards the two catches.
The cover doesn't fit correctly onto the rest of the gun. The reason is that there's a switch that controls the power to the ammo counter. This switch isn't even mentioned in the assembly instructions!! The switch lever protrudes into the overlap area of the magazine cover. I fixed this by removing the plastic from the magazine cover where the plastic overlaps into the mag well. The cover now fits snugly and the modification isn't visible externally. Used in conjunction with modification above, the magazine cover fits correctly and it's secure enough to be used in a game.
-
OK, I've finished building the Pulse rifle, so here's the 'skinny'.
First up (since the question was asked), the kit is advertised by Airsoft Scotland as being made by ASC. I agree that it looks identical in the photo's to a G&G kit, but since I've not seen one 'in the metal', I couldn't say if there were differences or not.
Disassembly.
The pictorial guide on the CD is pretty good here. Unscrew this, pull that, slide the other and the Thompson comes apart perfectly. You will need a couple of screwdrivers out of your toolbox to do the job, but this sort of thing everyone has knocking about the house.
Assembly.
The nightmares start here. Whoever did the pictorial guide must've been on Saki or something as parts appear in one picture, then vanish in the next. A LOT of detail is missing! One example is the sliding stock. Although the parts required are shown and how it goes together is shown, no mention of the fact that a protrusion on the back of the upper reciever has to be ground off in order for the stock to fully retract and lock. It took me a while to figure this out and after removing this lump with the trusty Dremel, the stock worked perfectly.
Another bugbare were the screws. Again, the screw concerned was shown in the pictures, but not the type. Was it a hex-head, or a Phillips type? How long was the threaded portion supposed to be? Thankfully, more than enough screws were provided so the choice is yours. Another downer (still with the screws here), was the type of screw provided. Why were machined screws provided when self-tappers were needed? Self tappers were provided to secure the retractable stock latch, but machined screws were provided for everything else. You don't secure a plastic panel to a plastic frame with machined screws! Undaunted, a blob of superglue in the holes ensured that the mechanical strength was maintained.
The battery cover provided problems. The muzzle of the launcher acts as the pivot for the battery cover. As portrayed in the photo's, the cover just slides onto the rear of the pivot before it's secured with a circlip. I pulled the parts out of the poly tray and test fitted them. They didn't fit. I had visions of getting out the Dremel again when I noticed that the pivot rattled. The bleedin thing unscrews! There's no indication of this in the pictorial guide, so it's a bit of a black mark.
Fitting the two halves of the main plastic frame is fiddly. The extended battery wires had a mind of their own and tended to move around making assembly impossible. I superglued the wires into position to make things easier. The frames use interfearence fit roll pins to keep them together. There's about a dozen of them in all. It takes a lot of pressure to get the two halves to mate correctly. Since plastic is the material used here, the use of a hammer was out of the question. It was a case of using your hands and squeezing like hell. Somehow, I don't think that getting the rifle apart is an option.
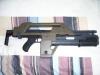
Once assembled, the rifle looks the biz. I've yet to do the 'fettling', but I can't do that until I've brought the battery back from work (yeah, I've left it behind).
I should mention that building the Pulse rifle from a kit is NOT for the feint hearted. If you're not mechanicaly minded, or have little patience, buy a completed item. Tears are the last thing you want when you've spent this amount of money!!
-
I've wanted an Aliens Pulse rifle for a number of years now. I first saw the airsoft version around 5 years ago on an American site. Suffice to say, it was expensive and I couldn't afford it. It wasn't until the VCR Bill reared its ugly head that I looked around at what was available within the UK. To cut a long story short, it was available and if I bought the Thompson and the conversion kit seperately, I could afford it.
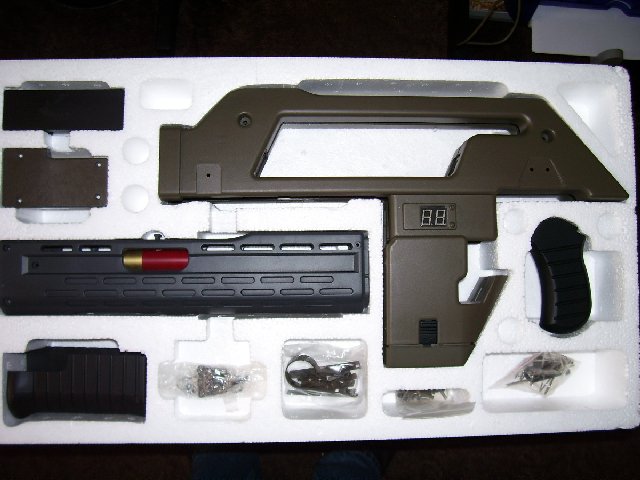
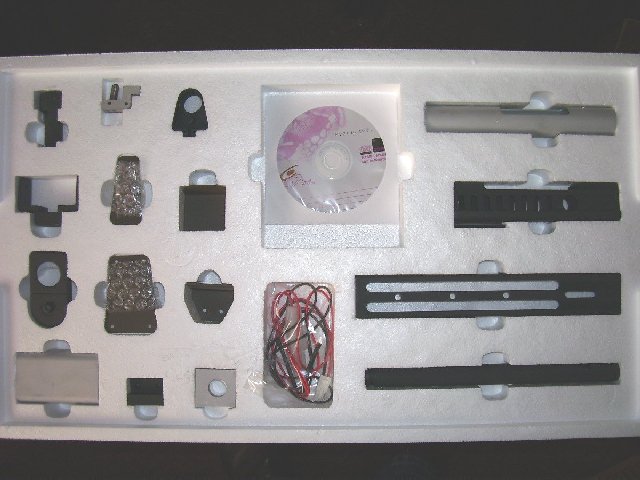
I actually bought the Thompson from Airsoft Scotland (Nice peeps!!) last year. I also bought the mid-cap from them as well (you'll need one). However, every time I had the money for the conversion kit, everyone was out of stock. It's taken until now to have the money and an available kit to occur at the same time. Under normal circumstances, I would've bought the kit from Wolf as they were doing them for £300, but they were out of stock (even though their site said they had them). It was back to the best (in my opinion) airsoft retailer in the Country to get the kit as they had them in stock. Now, Airsoft Scotland wanted more than anyone else who were (at some point) selling them, but I had the money and they had the stock. End result, they got my custom........ again!! Cutting another long story short, the kit arrived today, so what's in the box?
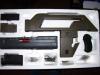
The box itself is rather plain. There's no writing on it to indicate what is contained within. Who cares anyway? I want what's on the inside! On removing the lid, you're presented with a clear plastic lid which covers the upper of two poly trays. In the upper tray are the major plastic components of the Pulse rifle. Each component has its own slot and each piece is snugly held. The pieces ooze quality. There's no moulding flash and the finish is excellent. In one compartment is a bag of pan-head Allen screws. Even better, Allen keys are provided. There's certainly no skimping here!
The bottom tray contains the parts that are almost all metal. These are mostly brackets and the fittings to the underslug shotgun. The parts all appear to be machined and not cast. Once again, the finish is excellent. One other part that's in the bottom tray is a CD. This CD contains a 'manual' for building the Pulse rifle.
The 'manual' is actually a series of photos. A little care needs to be excercised here as the folders in which the pictures are contained are confusing. One folder is called "Uninstall". You might think that this folder should contain a program or something that removes a software program. It doesn't. It contains a set of pictures to aid in dismantling the donor Thompson. The other folder is called "Assembly". Of course, this is where you put you Pulse rifle together. The sequences presented are clear. However, the English used (Text that's on the photo's) is a little fragmented. If you can get your head around this (I won't know until I build the thing) you should be OK.
Anyhoo, I'm off for a spot of Pulse rifle building. I'll keep you updated.
-
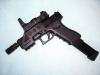
Here's a rave from the grave. It's the M9 made by LS

-
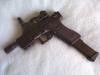
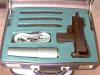
Well, here's my full metal KSC Mac11, complete with a custom converted briefcase. 'scuse the funny colours. I've used an old banger webcam and it has probems with the colour black.
-
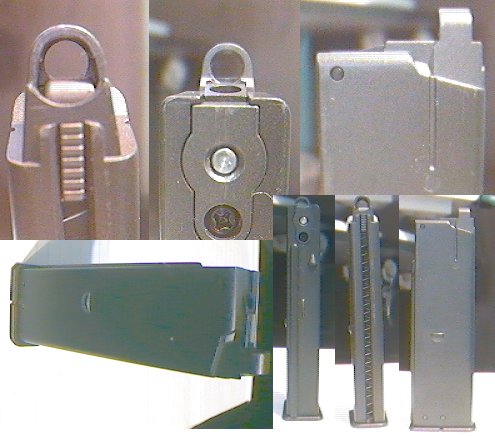
I've been asked a question about the interchangeability of mags between the Marushin and the HFC. The answer is; I don't know. Can anyone answer the question? Here's a pic of the HFC mag.


Pictures of your Rides Mk 2
in Off-topic Pictures
Posted
My two current rides.