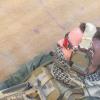
Bucko Posted July 11, 2012 Report Share Posted July 11, 2012 After numerous requests for a tutorial on my M4 Noveske/Magpul Recce rifle's paint job, I finally stopped being lazy and put one together. Please feel free to ask questions or contribute your own suggestions for aspiring painters, as I'd like to see this be a resource for anyone who wants to make their gun a little less obvious in the field. You can apply this technique to almost any hard gear you have, from helmets, FastMags, and rubber knives, to holsters, sidearms, optics, and suppressors. If you take your time, follow the steps, and aren't afraid to be a little creative, you'll end up with a great result! Good luck! What you'll need: - 2 cans of your base color spray paint (1 may work, but there's not much worse than getting halfway through and running out of paint) - 1 can/ bottle/ bucket/ vial each of your secondary and tertiary colors - 1 can/ bottle each of any additional colors you may want - 2 different types of sponges (preferably some you don't mind tearing up) - Cardboard, plasticard, or a proper paint mixing surface - Water (to reduce opacity of certain colors) - Painters tape - A swatch/ sample of your camo pattern you're trying to replicate Method: - Before you begin, use your painters tape to cover any trademarks that aren't engraved deeply into the gun that you don't want to lose, any working, moving parts that you don't want painted (or better yet, just disassemble your gun to the receivers and accessories), and mask off your workspace. - Start by spraying your gun with your base color of choice (in my case, it was Krylon Camouflage Ultra Flat Tan). Your base color does not need to be perfect, as you'll be painting over most of it anyways. - After your base coat dries, spray a few spots with your secondary, darker color (Krylon Camouflage Ultra Flat Brown for me). A few splotches, stripes, or patches here and there should be enough to start your pattern. Don't worry about the fact that it's clearly been sprayed - you'll clean that up in the next step. - The rest of the colors should be a mixture of various tertiary colors for your camo (brown, grey, green, and a touch of reddish earthy color in there somewhere for my A-TACS, perhaps different shades of tan and brown for Desert, greens and browns for Woodland, and so on and so forth). Use several different sponges to dab paint onto the gun, taking care to not simply dab and move on, but fill in major areas so you're not left with an obvious sponge paint job (it'll be sponged, but make a big attempt to fill in areas instead of dabbing a sponge and moving on, leaving awkward un-painted spots in the pattern). - Once the various stripes and shapes are finished, use an extremely watered down darker color as a blending color between the dark and light areas, and over the tertiary colors to diminish any shocking brightness they might have (I think this is the real secret to getting the look on the M4 below, and the reason the greens varied so much). - After you get some decent "Organic Pixel" shapes (for A-TACS, or whatever shape you want for your pattern, ie. stripes, stars, horse shoes, whatever...), finish the paint job by dusting the whole thing with your base color again to reduce the contrast between the different colors. This may not be necessary if you utilized your watered down paint effectively, as that may reduce your contrast well enough. Quick tips: - Pay attention to the way you blend each different color into the next (light to dark, greens around darker areas, etc). - Don't leave the little un-painted "sponge marks" in a given area (those are a dead give-away to a poor job, and if you can manage to fill them in with just a few extra dabs in any one spot, turning the sponge so it's not the same shape every time, you'll get a much nicer finish. - Utilize a super watered down secondary color for blending. Dab or even wipe (depending on your pattern) it over the hard edges and into the darker parts of the pattern to create natural shading and reduce contrast. FAQ's: Is there any particular sponge you would recommend? - Honestly, I grabbed the first thing I could find which was one of those expanding dish sponges, ripped it into a bunch of smaller pieces, and went to town with the torn edges. Seems to have worked out just fine. The tearing was important, so that no two patterns looked exactly alike. I'll also assume that your technique for sponging is to spray a small puddle onto a piece of cardboard or something and just dab into that. - Actually, I had a bunch of model paints left over from some model planes and such. I just used those, mixed them together on some plasticard (any kind of hard plastic type thing that won't absorb the paint or cause it to dry rapidly works), and started sponging. Any decent quality model paint should do. In using the wet sponge, I guess Krylon doesn't set so fast that it can't be manipulated with water? While using the wet sponge with the diluted brown was your focus mostly on color edges or more generally over the entire surface? With regards to Krylon and wet sponges, see previous answer. As for the focal areas, I started by focusing on edges, then created a few "blotches" using the watered-down paint itself. The edges are important given that if they're too strong of a contrast, well, frankly, it just looks poorly done. If you reference a large swatch of the pattern (I kept looking at my combat shirt for help), it'll give you a better idea as to how to effectively blend the various colors together. I probably covered about 40%-60% of the gun with the watered-down paint, which really darkened it all up. The final dusting of tan brought it back to a more workable color scheme. Examples: Link to post Share on other sites
TerranCmdr Posted July 11, 2012 Report Share Posted July 11, 2012 Excellent tutorial, thank you for posting this. I'll likely try this technique on my incoming WE G39k, but in ATACS FG. Does the Krylon "Camo" line do well with plastics? Link to post Share on other sites
Bucko Posted July 12, 2012 Author Report Share Posted July 12, 2012 You're most welcome! I hope it helps a few people out. I'd love to see people post their work in here so we can see how the method works out for them. As for the Krylon and plastic, it's done well so far. The G39K pictured is a WE Tech, and was painted using the Krylon Camo line as well. It's held up as well if not better than my WE M4. Cheers! Link to post Share on other sites
TerranCmdr Posted July 13, 2012 Report Share Posted July 13, 2012 Great! Any tips for painting the G39k in particular? Link to post Share on other sites
Bucko Posted July 13, 2012 Author Report Share Posted July 13, 2012 It wasn't any different than painting my M4 really. Just be sure to tape off everything you don't want painted. We removed his trademark stickers to be safe too. Take your time and it'll come out great. Link to post Share on other sites
TerranCmdr Posted July 13, 2012 Report Share Posted July 13, 2012 Cheers, really appreciate your input. I'll be sure to post it when I paint it. (first I have to get the gun...) Link to post Share on other sites
NeoVeNoM Posted August 10, 2012 Report Share Posted August 10, 2012 really nice tutorial, I am going to see if I can do some kind of ATACS-FG on my sniper stock. Base coat is drying as we speak. Any tips regarding the dusting? thx. Link to post Share on other sites
Bucko Posted August 21, 2012 Author Report Share Posted August 21, 2012 Just caught up on your post mate. By now you've given it a go, but my recommendation is that you be at least 12"/ 30cm away from the item being dusted. Give it as many coats of dusted paint as you feel is necessary to get the look you're going for. It's a process - no ones gun will look the same, guaranteed. Link to post Share on other sites
weekenny Posted August 27, 2012 Report Share Posted August 27, 2012 Nice paint job. Very tempted to do an ATACs paint job on my mk18. Link to post Share on other sites
Bucko Posted November 27, 2012 Author Report Share Posted November 27, 2012 Just out of curiosity, has anyone else had any success with this method? I've taught a few teammates, and they've all had good results. I'd like to see what the rest of the world has to offer! Cheers! Link to post Share on other sites
WestyIII Posted December 8, 2012 Report Share Posted December 8, 2012 Yes, but on my RC tank, not an airsoft gun! Link to post Share on other sites
Recommended Posts
Archived
This topic is now archived and is closed to further replies.