|
SG1
Gearbox Takedown / Repair
or
"How to fix an SG1 after you trip and fall on it"
Well it had to happen
one day.. The lovely upgraded SG1 broke last time I took it out
to Combat South (25/03/00). Now to be fair to the rifle, it didn't so
much break, as get 'broken'. I tripped and fell and gave the SG1 a fairly
good thumping as I fell down. Unfortunately I was firing the rifle as
I fell... This is NOT recommended; the only thing more painful
than falling on a tree is finding out that your favourite AEG won't
fire after you get up.
|
Although the
information and photos here refer to a G3SG1 the theories, guidance
and advice can be applied to any G3 variant, as the differences
are merely cosmetic (folding stock/shorter barrel etc.).
The SG1 receiver
comes in two parts, a lower and an upper half. The division between
the two halves is shown in the diagram to the left..
|
Receiver
Front/Top
Receiver
Lower/Back
Stock/Butt
|
 |
The front/top
half of the receiver
contains the hop-up unit and the magazine feed system, and the lower/back
half of the receiver contains the gearbox and the motor.
The join between the two is where the gearbox nozzle seats inside the
hop-up unit. This means that if you flex the SG1 (as I did when I fell
firing it), the gearbox nozzle gets moved to an awkward angle, and can
jam in the hop-up.
When the gearbox drive-gear
moves to pull the nozzle back it snapped the nozzle off in the hop-up
unit, which meant that no bb's could be loaded into the firing mechanism.
Luckily I had a spare nozzle left from when I replaced most of the gearbox
guts with a Systema FTK. I took this opportunity to detail how to strip
a G3 variant down to the gearbox, taking photos as I did the work myself.
 |
First
things first: You should remove
all accessories from your rifle, this includes magazines, scopes,
slings and flashlights. They provide additional weight to the structure,
and just get in the way when you are working on the receiver.
The important
thing to do is to turn the hop-up off. To turn the hop-up
off, turn the dial located behind the shell ejection cover against
the direction of the silver arrow on it, until it will turn no further.
This helps to ensure that the hop-up unit is not damaged when the
G3 is disassembled.
|
|
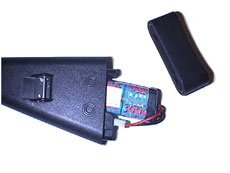
Stock
removal: The stock of a G3 couldn't be easier to remove.
First remove the butt plate, by pushing it down, (in the direction
the pistol grip points), then remove the battery from the stock,
if it's present. With the cover removed, you need to remove the
two pins that secure the stock. These can be found behind the pistol
grip close together.
Using a flat-blade
screw driver, unscrew these two bolts. You'll find that they come
apart in a standard nut & bolt fashion, with a nut that has
a screw head on it and a thread, and a bolt with a recessed thread.
When you have removed the pins, thread the nut back into the bolt
- this helps you not loose these small parts. With the two bolts
removed the stock will now slide back and away from the receiver.
Be careful as you do this, as there is a battery lead running through
the stock from the gearbox. When you get the stock off a small amount,
you should be able to see two electrical connectors inside the back
of the receiver, carefully with a small screwdriver, prise the securing
pin on the top of the connector upwards, and disconnect the two
connectors, then completely remove the stock.
|
 |
Receiver
removal: to get the receiver out
there are two final bolts that need to be removed. One is located through
the mag release catch, and is removed exactly like the pins in the stock,
the other can be found inside the back of the receiver, and was previously
covered by the stock. The bolt at the back of the gearbox has a large
crosshead screw head, and is screwed into the back of the gearbox and
the spring-guide. When you have removed these two securing bolts, you
will find that the rear half of the receiver will slide out backwards,
and away from the hop-up. Make sure you keep everything straight as you
do this, you don't want to snap anything off in the hop-up unit and break
it. At this point you will be left with the lower receiver, with the gearbox
still mounted inside it.
 |
Pistol
grip removal: The pistol grip houses the EG700 motor.
Unlike the AK47 and a few other TM rifles which have a motor that's
held captive in the gearbox chassis, the G3 motor is held sprung
against the gearing in the gearbox simply by the pistol grip.
To remove the
motor and grip, you need to first remove the metal plate at the
base of the grip. To remove the plate simply remove the two philips
head screws on either side of the plate.
|
This plate has a Allen-key
head bolt in the centre of it. This bolt is for setting the pressure at
which the motor, and primary gear mesh together. It is very
important that this is not moved from it's current (working) factory pre-set
position- if it is you'll have to spend ages adjusting it, if it's too
tight it can burn the motor out, if it's too loose it will shred the primary
gear.
With the two screws
removed, note the position of the metal plate, and remove it. When the
plate is removed you can slide out the motor. At the base of the motor,
you'll find a small round metal plate, located between the motor and the
grip plate. - This metal plate is what the Allen screw presses against
to keep the motor securely meshed with the gearbox. It's sometimes stuck
to the base of the motor with a little grease, so it's easy to miss.
|
Now to remove
the grip, you'll find two screws inside the grip, in-front of where
the motor was. These screws thread into the base of the gearbox,
unscrew them, and you'll find that the grip slides away.
As you pull
the grip away, you'll have to feed the motor cables carefully out
of the grip - these cables aren't very flexible so they aren't that
easy to get out of the grip.
|
 |
Fire
select switch removal: Before you can safely remove the
gearbox from the plastic housing, you'll have to take the fireselect switch
out.
 |
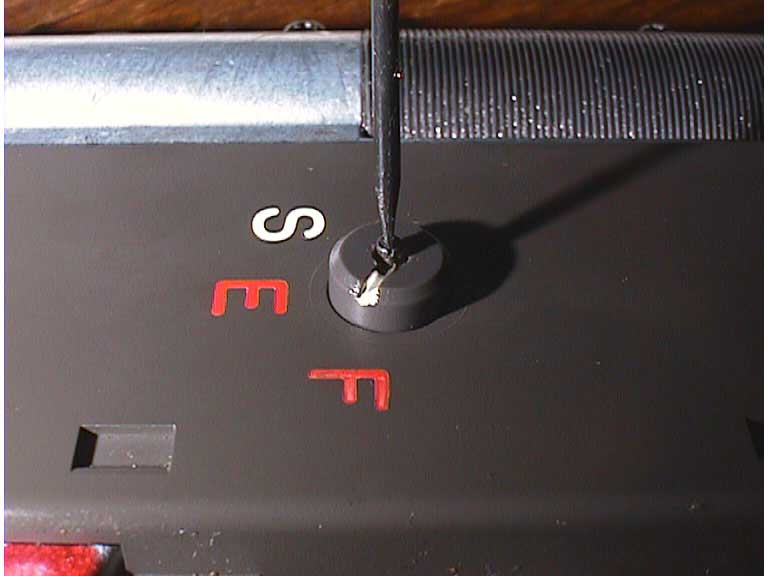
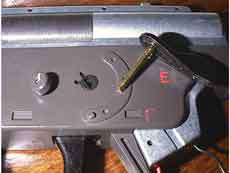
Step #1:
On
the right had side of the rifle, you can find the fire selection
indicator. In the centre of this round piece of plastic you'll spot
a small screw.
Before you continue
any further set the firing action to 'auto' (F). The reason for
this will be come clear later.
With a sharp
jeweller's screwdriver, remove this screw, and the small round piece
of plastic that is secures.
|
 |
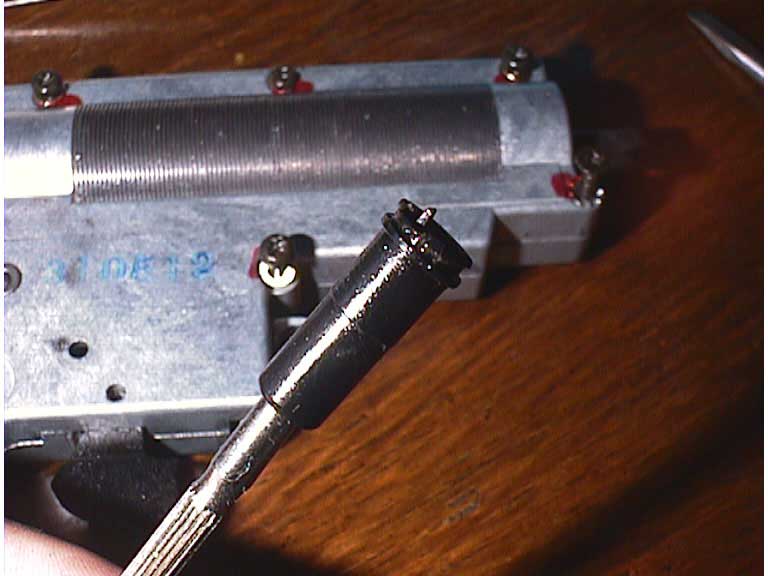
Step #2:
Now
turn the rifle over and push the brass pivot rod, with the switch
on it, out of the housing.
Carefully store
these parts that construct the switch, as they are small and very
easy to loose. I recommend screwing the selection indicator back
into the end of the brass pivot.
|
|
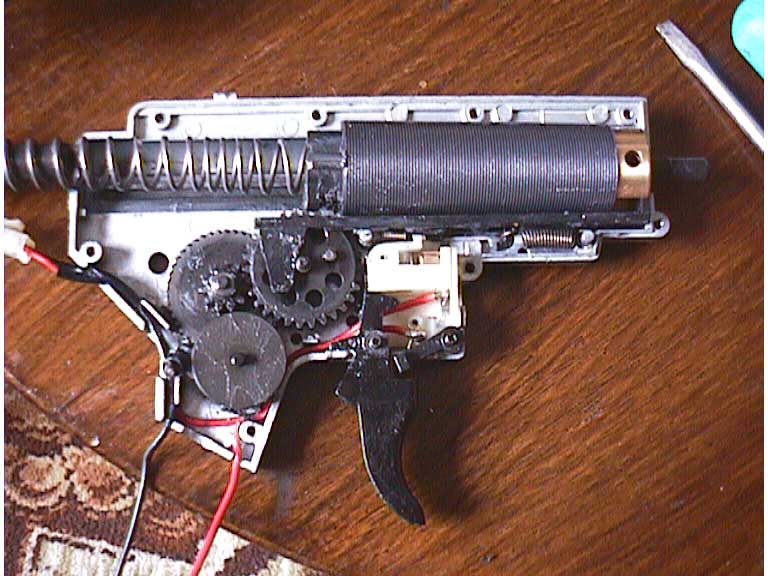
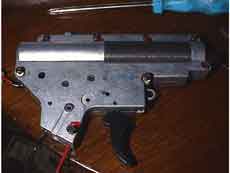
"Here's
one I made earlier": At this point you should have
a something that looks like the image to the left. To remove the
gearbox slide it upwards out of the plastic housing. You may have
to depress the trigger slightly to do this.
This is why
you previously set the fire-select to 'F' - if it was set to safe,
the trigger would have been locked in place, and you wouldn't be
able to get the gearbox out easily.
|
 |
 |
So where's
the broken bit?
It was at this point that I found the broken nozzle inside the hop-up,
rather than on the end of the the cylinder, where it should have
been.
The photo to
the right shows the nozzle on the end of a screwdriver. You can
clearly see that one of the two rims around the top of the nozzle
is broken, and missing. This meant that it wasn't attached to the
nozzle lever, and hence wouldn't load bb's.
|
| Now
to crack open that gearbox. To get the gearbox open you'll
need a philips screwdriver, and a #1 'torx' bit (one of those star
shaped screw heads). There are four screws along the top of the gearbox,
one at the front near the nozzle, one at the back, and one just above
where the gearbox meshes with the motor. Note their positions as you
take them out. The easiest way it to use a piece of card with a rough
sketch of the profile of the gearbox on it. Then simply poke the screws
through the card at the appropriate position, as you take them out.
That way, you won't have to worry about which screw goes where when
you put them back. |
 |
|
When you remove
the last screw the two sides of the gearbox will stay together,
as there is plenty of friction from the bearings and the various
attachments between the two sides.
The separate
the two sides, place a long sharp screwdriver into the hole in the
back of the gearbox as far as it can go. This sticks into the spring
guide, keeping the screwdriver there ensures that the spring doesn't
fly out the back as you separate the two sides of the chassis.
To separate
the two sides, slide a sharp screwdriver in-between the two parts
of the chassis, and carefully pry them apart.
|
 |
You should end up
with something that looks like the image above. My gearbox already has
a Systema FTK in it, and has had the stock components removed. If you
have a stock gearbox, you'll have a smooth brass cylinder, and a white
nylon piston with an spring moulded into it. The gearing will also be
look more basic, and be a lighter metallic colour.
With the gearbox in
this condition you can now carry out any work you like on the internals
of the gearbox. Obviously, re-assembly is the direct reverse of the above
instructions.
If you want more in
depth details of gearbox internals, and details of fitting an FTK, I'd
recommend reading my AK47 FTK fitting
guide. The gearbox is not exactly the same, but the methods detailed
still apply as the differences between the two are minor.
|