

wdahm519
-
Content Count
208 -
Joined
-
Last visited
Content Type
Profiles
Forums
Gallery
Blogs
Calendar
Posts posted by wdahm519
-
-
Its finally time to sell my KJW M4 guys... you can check it out in the commerce.
-
I sure hope so... I am literally waiting for the announcement of your mag's release date to purchase a KJW M4. I will then proceed to purchase 8 of your magazines

Yup pretty much this.
-
Sweet looking gun! Did you have any issues with the UBR?
Bastel, the search function has a 4 character limit (I thought I was trippin when I was doing research myself).
Has anyone tried to add the WA super recoil kit to this yet?
How about red gas?
And lastly, who has the highest FPS?
Yes, I had to custom mount the UBR by drilling and tapping a mount with a screw in the rear of the buffer tube. It actually didn't take that long. There were a few fitment steps other than that, but that was the main challenge - not that it was much of a challenge. In this thread further back I wrote up how to custom mount the UBR to the KJW M4, however after reading through this thread most of these questions have been answered 2 -3 times in this thread.
-
Which RIS Systems fits without problems? Does AEG RIS Systems fits?
I tried the search function, but nothing comes with the key word RIS...
Eh you might have to file down certain parts of a standard KAC style 7" RIS. For the best effect, I would purchase a free float RIS with a proprietary barrel nut. That way you know it will fit. However, this doesn't fit some rifle "kit" looks if you're going for a dated era.
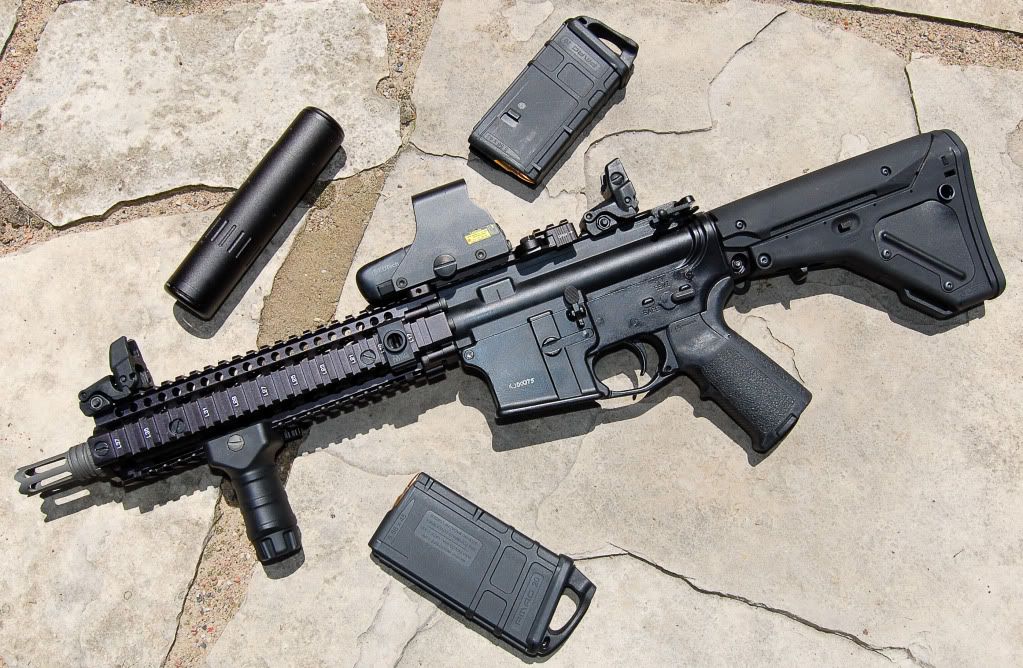
I just wanted to let you all know that the serialized M4 still lives. I got this rifle way back on page (insert low page number here!) and its still a trooper. This was back when there was only one KJW m4, the full length M4 barrel type, and you had to machine your own 10.5"! My 00075.

-
Its nice to have metal smashing metal and all, but as we have seen over and over again from Raven1's testing on the KJW M4, the plastic incorporated into the bolt lightens it and therefore yields an extremely reliable gas blow back system unlike any WE or WA system seen before. What I'm worried about with the GHK PDW is that its going to be another WA wanna-be with all metal 100% realism inside - which as we've seen DOESN'T WORK WELL!
Unless you're running at extremely high pressure with CNC'd parts, you're either not pushing enough power or you're sacrificing reliability for realism. I can foresee history repeating itself with this model.
I may be wrong, but only extreme testing will tell.
I'll wait.
-
Wow that is pretty. So the UBR went without a hitch?
PTS? RS? ACM?
Its ACM, I even wrote up a HOW-TO Guide for installing it perfectly I think it was a page ago, maybe 2 pages back in this thread. Go check it out if you're interested.
The ACM UBR is $70 shipped from T-Tiger on ASF, and the installation is more or less simple. It requires removal of the old tube, tapping of the rear cap, and installation of the new tube. That's about it. Took me 30-40 minutes in total, which included fiddling around with what to do, etc.
-
I partially finished a build of mine today. The only thing that needs to come in is the Surefire M600c Scout Light and Surefire M76 Scout Light Mount. They're not too important for the actual gun though.
-
Lol, yeah I have a very good idea about what I'm going to do this evening and tomorrow to get it all working. Thanks for all the info. I'll post up a Co-DIY that will give both of us credit maybe at the end of the weekend or something.
I can't edit my post anymore, so I'll just post again...
I just finished modding my ACM UBR. It was really easy.
Thanks to Rookie Ab for helping me out with this and giving me some great ideas this week!
This guide works well for all UBR's made to work with AEG's (AEG type buffer tubes), if you have one thats meant for a gas blow back rifle (has threads on the buffer) read the extra step.
1.) Unscrew the grub screw from the bottom of your original stock tube, after removing the stock you had on the tube beforehand. Also, at the time remember to remove the buffer and buffer spring from your buffer tube.
2.) Unscrew the rear cap from the stock tube. If you're is stuck, try using some Vice Grips and then turn them while they're clamped on to the cap. This should give you the friction you need and is way better than using some ridiculously big flat head screwdriver on that enormous cap. Once you've gotten that off, slide off your old stock tube which should expose the brass inner buffer tube unique to only KJW's.
GBBR Threaded Buffer Tube EXTRA STEP: If you've got a GBBR UBR, you're going to need to wrap the brass buffer tube in some kind of heavy duty tape in order to beef up outer diameter. Since you can't use the UBR buffer tube, you're going to need to translate the UBR parts onto the original KJW buffer. I have not done this so I don't know how, but you can PM "Rookie Ab", as he has utilized this method.
3.) Now that you're ready to slide on the UBR buffer tube, you'll realize if you do this, there is a gap between the buffer and the receiver. This can be covered up in some electrical tape, or any other black tape. I used Gorilla Black Duct Tape, and it worked just fine. Keep test fitting the tube to make sure the tape doesn't stop the tube from coming all the way forward, and to see if you've covered up the gap enough.
4.) This is the fun part. Take a #8 or 5mm drill bit. Screw the end cap onto your brass insert WITHOUT THE UBR TUBE ON IT (duh, you can't!). Once its on nice and tight (its not coming off again baby, better make sure its tight) place the UBR buffer tube over the end cap and and brass buffer tube. Put the #8/5mm drill bit onto your favorite powerdrill and use the hole from the UBR buffer as a guide and drill through the end cap.
5.) After you've drilled the hole, remove the UBR buffer tube, exposing the brass buffer tube, and take your handy dandy tapping tool, and tap an M6 x 1 thread into the hole you've made. You have now made the correct threading for the screw you need to insert into the back of the UBR to hold it in place.
6.) Take your M6 x 0.75" long black screw (with one of those angled heads.. forgot the name of them right now) and screw it through the UBR buffer tube, and into the now tapped end cap that is sitting on your brass buffer tube. It should be super sturdy now, and even sturdier after you screw in the screws that hold the cheek piece over the UBR buffer tube.
7.) Slide the UBR stock onto the UBR buffer tube system, and bam, you're done!
Took me about 35 minutes!
Pics later.
-
 1
1
-
-
Lol, yeah I have a very good idea about what I'm going to do this evening and tomorrow to get it all working. Thanks for all the info. I'll post up a Co-DIY that will give both of us credit maybe at the end of the weekend or something.
-
PM'd you for ideas.
-
Well, since no one else really seems to know how to mod a UBR to a KJW m4, I will take the stand.
I just ordered an ACM UBR through T-Tiger on ASF, and when it comes I will do a full HOW-TO on modding a UBR (AEG Type) for your KJW m4. I was frustrated that no one had made a DIY for it, and I'm sure many others have been before me. However, hopefully by next week I will have a full how-to for this application.
-
Has anyone found a guide or just knows how to install the Magpul UBR (PTS, NON-WA) onto the KJW m4? I'd really like to put one on my build, but I just don't want to risk $170 to a stock that won't work.
-
For those of you interested in the DD rails that use the Lite or RIS II proprietary barrel nut, the Daniel Defense Lite/RIS II Tool made for that different barrel nut is now $10 instead of $19, which is nice. I bought the tool for my real steel and I thought I'd pass on the info.
T_hum, did you ever hear from Clare?
-
I get the two pack of coleman bottles at our local walmart for about 5.15 or so.
I checked my parts and they still have grease on them. Its weird, Im not sure why the cup chipped.
I get 4 packs of Coleman for $8-9 at Dunhams. You guys are overpaying for Propane.
-
I got the Element steel CQBR barrel in today. I had to increase the depth of the bore for the barrel to fit, as explained previously.
However, the Element barrel requires the cut on the bottom side as well -- the bolt face comes in contact otherwise.
Dahm, I'm pretty sure that's your problem. Didn't you get the Element?If you didn't cut the notch, the little tab that you mention being chipped has been damaged by striking the outer barrel.
Ohhhh, that could be!! I'll look into it. Thank you man.
I just checked. You're absolutely right! I shone a light in there and low and behold, there is a giant chunk of barrel in the way. I wonder why it worked fine until mid day? No clue.
-
I had a strange problem with my KJW at a CQB game today. I was hoping some members here could help me out.
Here's what was happening:
- Insert a mag with the bolt locked back
- Hit bolt release, bolt slides forward
- Bolt doesn't slide forward all the way, stops 6mm short
How I know its 6mm short?
- When the bolt comes forward, the bb from the mag hits the bolt (like it should, with the tab underneath the half-star cluster on the front of bolt), but then, instead of going up that feed ramp into the hop up, it gets stuck just in front of the mag.
It happens on every shot now.
Anyone know whats happening? Should there be a ramp between the mag and the hop up? I can't really see one. Also, the tab on the bolt that knocks the bb's into the hop up seems like it may have been worn/chipped.. its hard to tell without comparing to another persons.
-
1) PM T_HUM
2) Send T_HUM $$$
3) Kick back and wait for a few days for UPS.
4) Install new TBB
5) Shoot all your friends.

Win.
And I think they're $45.
Oh I meant to add earlier: The stock length KJW inner barrel goes about 5mm short of a 10.5" outer barrel. I know we had an official measurement once, but that was ages back and I thought I'd give a personal comparison length for those interested in running short barrels like I did.
-
Its been available by emailing or PM'ing me for a few months now. Again, it needs to be up on the site but every time I get close to finishing the new site I have to take a break for another huge project at work. Four more weeks and that will all change and I should have enough time to do the complete revamp and marketing work.
Alright, thanks t_hum. I was just curious because I'm counting down the rounds until this thing gives... I wanted to make sure it was still available.
Does anyone know if sandblasting increased the overall width of a piece or decreases it? I'd like to sandblast my bold carrier, but I'm worried that if I do and it end up increasing the width of it, its going to get stuck/not slide easily in the upper.
Thoughts?
EDIT: I realize though that the actual part of the "bolt" you see is plastic, which makes sandblasting a moot point.
-
T_hum,
What ever came of that buffer tab fix that you had going on for a while? I never saw it on your website. Did that become more like a DIY?
-
Add Dboys M4A1 outer barrel to the DIY list as it does not require boring out the inner diameter to fit the hop chamber. There are only 2 cuts to make; notch for nozzle extension and one of the side walls for depth of hop chamber within the barrel. Both easily accomplished with a Dremel.
Travis, BTW, does your PMAG comes complete or do I need to purchase RS PMAG bodies? Thanks.
I don't know, that sounds more complicated than the Element one. Instead of making two cuts, you just have to use a drill or dremel to make the recess inside the barrel a little deeper (1/4" about). Its great because on the Element one, all the premade notches fit perfectly with the KJW hop up chamber.
However, I guess the Dboys would be a good choice if the Element one is either not in stock or not on the buyers favorite site.
-
WDAHM519,
Did the barrel already have the notch for the nozzle extension?
Yeah that's what I had said previously. The Element ones come with a large cut out notch at the top. That way it saves you the more time consuming part, which is cutting that notch. Its easy to drill into the barrel, which is all you need to do.
-
Attention! All who wish to modify outer barrels, read this! Your life just got way easier...
What you'll need:
- Element brand Steel barrel of your choice (I say steel because its just stronger for the lathing/milling/dremeling process)
- Lathe/Mill/Dremel/whatever you can use
The Element brand outer barrels are great because they are both cheap, and they already come with the top notch cut out large enough for the hop up arm in the KJW m4 hop up. That means all you need to do is lathe/mill/sand/dremel a bit more room inside the barrel for the bucking unit that attaches to the inner barrel. I used a lathe myself as I had access to my race teams shop and it took about 30 seconds.
You'll need a ~0.421" drill bit, and that's all.
I did mine tonight, and here's how she turned out - solid as a rock!
I've tested it, and it works perfectly. No hop up functionality problems at all!
-
Thanks Johnyew, that gives me a bit clearer idea about how to do this. T_hum, you bring up a good point. It will mostly just be trial and error. I'll report about how it goes. It'll take about 7-10 days for the barrel to even arrive here at my place, so it will be a while still.
-
Hey guys, who here has modified a new outer barrel such as a 10.5" to fit the KJW? I have the measurements saved in a word file from way back in this thread, but I wanted to know if anyone had a picture of their barrel. I'd like to see what that notch for the hop up looks like. I just purchased a steel 10.5" CQBR outer and I'm going to modify it to fit the KJW.
Thanks.
KJW M4
in Rifles (Gas)
Posted
I have a how to for exactly this if you look way back. Just search it.