

bean
-
Content Count
64 -
Joined
-
Last visited
Content Type
Profiles
Forums
Gallery
Blogs
Calendar
Posts posted by bean
-
-
I think oakleys QC is quite hit or miss. I know some people with oakley stuff that lasts forever and others there stuff falls apart.
-
Almost 100% sure you have a set of Gen 1 Oakley boots. I've been running a set of Gen 2 (military only, ID required to purchase) for close to six months and have beaten them really really hard and they are holding super strong. Hell, yesterday I slogged through over a foot of mud and grit, Lake Ontario water and sandy beach; plus actually having to assault over a lot of high walls and they were champs.


I got mine in an oakley forces order. I received mine in September but due to school didn't have a chance to field them at work much until after Christmas when I started doing the army thing full time again. Mine look exactly like yours do and so did my roommates. We had the toe come unstitched in his as well as the sole separating from the boot and the eyelets at the top of the boot coming out. The leather is not strong at all and comparing it to any other boot I own it sliced and ripped very easy.
Its just like the oakley gloves there great for short term work but basically disintegrate while wearing them. That being said I still buy oakley gloves because there comfortable and when you get them on sale its not to bad.
-
They were on sale at Mountain Equipment COOP in Halifax when I was home last.
-
Awesome the orange ones are on sale for 30 dollars at my local hiking store I shall pick some up to test out. The *suitcasey* thing is I wear them in 14g and its hard to find that size.
-
Boots are something I can comment on with a lot of experience of brands.
-Oakleys were terrific for comfort terrible for staying together. Everyone I know who has had them and used them in the military have had them disintegrate in one way or another within 6-8 months.
-Belvilles are tough *albatross* boots. They are reasonably comfortable but I would replace the insoles in most of them. However any smart person should do that anyways.
-Bates are terrific in comfort not as good as Oakley but they fit the bill. However if your feet sweat to any degree these aren't the boots for you unless you use them in cold weather like I do.
-Magnums I am not sure where to start with these. I have a love hate relationship with them. There super light and for the most part breathable which is good in my case. However the shock absorption of them is garbage. If your a heavy walker like I am your feet will hate you. That said I wear my magnums every ruck sack march because I find them the most broken in. Sure my feet will hurt at the end but they will not be bleeding.
-Original Swats are the current boots I am trying and so far have served me well. They are a bit warmer then I would like but I haven't had many issues.
I have tried quite a few others on my search for the perfect boot but those are the ones that stood out in one way or another. Now when it comes to a recommendation for insoles I can highly recommend Super Feet insoles. I use the green ones and in my magnums have had a set in there for several years. The set is finally starting to show its age and will be replaced soon. I did see a new color the orange type for hiking and hope to try them. I will post pictures of some of my boots that I have here with me on base. The Oakleys are sitting in the Fredericton dump.
-
Pantac Warthog Backpack
With my coyote tan 3 day assault pack starting to show its age I decided it was time to find a replacement. I was often asked why I wore a brown backpack as a school bag. The reason I used it was because it was a terrific bag. It stored a lot and was really comfortable. It was great for hauling around tons of engineering books, or when I was at work cans full of ammo. With that said it would be a hard bag to replace, would the warthog be a sufficient replacement?
Outside
We shall start with the top of the bag because I think it's pretty cool. I had the bag at work and decided to see if a man pack would fit in this bag. Now fitting the radio in most bags is not a terribly hard thing to do. However routing the antenna and headset through the bag is rather troublesome and often requires the bag to be left open at the top. On each side of the top there is a large flap that is held closed by snap and Velcro. This flap covers a hole roughly two inches long and half an inch tall. This means both the antenna and headset can be pushed through. Now you're likely sitting there going that's rather stupid when will I ever use a setup like that in airsoft. You likely won't in fact 99.9% of people who play airsoft would not. This does however mean you can pop a hydration hose through with ease. It also means you won't have to remove the nozzle from the hose to stuff it through a tiny hole. It helps so you can remove the hydration carrier and place it in when you need it with relative ease. At the top is also a one inch wide webbing carry handle.
On each side of the bag there are two compression straps which help keep your load from shifting around. Much like most recent bags released by Pantac you have the TAD style webbing keeper at the end to keep strap mess to a minimum. Where the zipper ends you also have a loop for attaching a carabiner or whatever you need to. The loop has a circumference of roughly three inches which is a generous size for random nick nacks. Directly beneath that there is 3 rows with 4 columns of Molle webbing. There is a small D ring at the bottom to aid in attaching a waist belt if needed.
The bottom of the bag has 3 rows with 6 columns of molle webbing. In between the rows of webbing there are four grommets to aide in letting water and dust out.
The front is covered in two sections of molle webbing. The top has 5 rows with roughly 4 columns each. I say roughly because the bag tapers outwards and the fifth and sixth rows are variable in size getting bigger as they go down. Attached to some of the rows and between them at the top is a large Velcro rectangle that allows in the attaching of name tapes or morale patches. The bottom of the bag has a deep circular zippered pouch. This pouch has 3 rows with the top having 4 columns and the bottom two having 6. This pouch is also attached to one of my favourite features of this bag. It has another zipper at its base. This zipper gets you into the bottom of the bag so that you don't have to take everything out to reach things at the bottom.
The arm straps have two D rings on each as well as a nice set of 3ish inch long strap running the length to route hydration or comms. At the bottom of the straps are two quick release buckles so you can drop the bag in a hurry. The straps are also part of the only complaints I have with this bag. The chest strap doesn't physically attach to the bag it relies on friction to hold it on. So unless you crank it down or thread it awkwardly through the d ring it's a relatively big time waster. My other thing isn't really a complaint more of a personal preference. It has these nice looking braided zipper pulls that allow you to have some para cord in an emergency. I prefer the regular single strand with a knot though they feel less clumsy. This seems to be a new trend in Pantac's gear since my MBSS carrier has similar pulls.
Inside
This section will be relatively short since there aren't a ton of features inside the bag. It has a nice snap right at the top to attach a key ring or other small item to. It also has a single row with 5 columns of webbing at the rear and top of the bag. There is also a nice laptop holder which doubles as a spot to separate your hydration carrier. There is also a nice clear zippered pocket so you dont have to open it and fish around to see what you have stored in it. The bag is missing the regular two loops of Velcro at the top to secure your hydration carrier.
Conclusion
The Warthog is a terrific bag capable of adapting to many situations. It can't quite store as much as my 3 day assault bag however it is a bit more low profile. For me this bag is going to be used as a school bag. For the average airsofter it will make a great field bag without making their figure to big when moving around.
Pictures
Stolen from Pantac since I still don't have my photo setup here.


-
-
-
Pantac Forward Deployment Pack
Outside
This bag is covered head to toe or I suppose carry handle to bottom in molle webbing. Not only is it covered in webbing but it's also covered in pouches. There are a total of six zippered pockets hidden over this bag. To give you an idea of size this is bigger than the 3 day assault pack.
Each side of the bag has a extremely long zippered pocket that almost spans the entire length of the bag. The pocket is four inches wide and is not a raised pocket so it can't hold overly much. It is good for holding the random bits of kit you need to store. Behind these full length pockets you have space to cram things down a long open pocket like a tripod or what have you. The outside of this pouch has 9 rows of 3 channels of molle webbing. The sides of the bag have two compression straps per side with TAD style Velcro webbing keepers at the end to tidy excess webbing from flopping about.
The smallest of the outside pouches is at the lower side of the rear of the bag. This bag is roughly 2.5 inches deep so it can store some larger items. It has 4 rows of 6 columns of molle webbing on the outside and is a reasonably standard pocket with two drainage grommets at the bottom. There are two loops on each side of the bag to attach a carabiner. Above this pouch is the Largest exterior pouch. This pouch is also roughly 2.5 inches deep and has 5 rows of 6 columns of molle webbing on its exterior. At the top of the pouch it has a Velcro id patch as well as a built in pouch. The built in pouch is fairly deep but has no real depth so again not for the large items. However the main pouch its attached to is a very good size and can fit both top and bottoms of my combats in it. This pouch also has a carabiner loop on each side and two drainage grommets at the bottom.
The straps for your arms are very comfortable. They are mesh backed on the body side to allow breathing so you don't sweat to bad. The straps have the usual adjustments at the top and bottom as well as the cross chest buckle. The bottom section of the straps have a quick release buckle if need arises to drop the bag fast. The waist belt is very comfortably padded and also festooned with molle on the outside. The pad where the waist belt attaches is also very comfortable and helps lower the strain on your lower back. The two vertical pads on the back of the pack are semi firm and allow for airflow near your spine. This pack is so far my favourite for comfort with a load. It passed my beans 1000 km full load ride test.
Inside
The inside of this bag is very large. It holds the most of any of the Pantac bags I currently own and I own almost all of them. The section closest to where your back is has been covered entirely in molle so you can mount pouches on the inside for organization. It has two small Velcro loops at the top for attaching the molle storage devices Pantac makes as well as a hydration bladder. The top of the internal part has three spots where you can route the hydration house out of. On the outside of the bag at the bottom there are 3 rows of 4 columns of molle.
Conclusion
This is by far my favourite bag when it comes to carrying things and comfort. It holds a lot of stuff and I can't find any faults with it. The stitching is top notch like normal. If you need a bag with a bit more storage go for this.
Pictures
Promo pictures from Pantac the Multicam version does not have Multicam webbing on the outside its the same color as the webbing on the inside.


-
http://www.arniesairsoft.co.uk/forums/inde...howtopic=160187
I sure do I pretty much own every backpack Pantac makes including there two new ones which will have reviews soon. I do have to say I prefer the way the tad replica carry's a load it feels more comfortable but I much prefer the storage space of the 3 day assault as well as the plastic and metal bit you can mold. I have to say I really like the new forward deployment backpack. It holds a ton and is by far the most comfortable.
-
I have been far to busy as of late to pump reviews out at the steady pace I once did but I plan to try to get 3 out a month. I buy a lot of stuff and would love to tell the masses about my purchases so they can decide if they also need one. As always please comment so I can find areas to improve I do these for you guys not for me.
Background Info
The Weesatch was designed by HSGI to be a similar rig to there very popular Wasatch. It is a tad lighter due to it being able to hold a few less mags 12 vs 10. The pouch in the mesh area at each side of the vest is not there to save on space. There is also no smoke grenade pouch on the side. Aside from this I cant seem to find any major differences.
Features
Front
The Flyye version much like the original is chest rig designed to be able to carry plates in the front and back. It has space for 10 m4 magazines in the front. However the pouches are adjustable using the Velcro to allow other magazines to fit like AK or in my case I had tec9 mags in it for a bit. It apparently can only hold 5 M14 or AK mags due to there thickness and width. Each mag pouch is closed using Velcro and can be opened with a pull on the green tab. I like the tab being a different color because at first when you are getting used to the vest it makes it quick to grab using a bit of glance down. There is a pouch on the right side but due to the magic of Velcro can be moved to the left designed to hold a radio. It was meant for a MBITR but other radios do fit. The radio is held in with an adjustable elastic cord. The mag pouch area has three rows with 12 columns of webbing to add pouches in front if the built in pouches don't hold what you require.
On the bib of the vest there is a pouch that can be opened to store things like a wallet, folded papers etc. The bib pouch is the entire length of the vest so you can put a fair few things in it and with a plate you wont feel any poking you in the chest. The bib can be unsnapped at the top and folded behind the magazine pouch area if need be. The bib has three rows with six columns of webbing to attach an admin pouch or what have you.
The vest comes with shoulder pads that can be removed if you don't like them. I found the shoulder pads to be fairly stiff and hard to secure in place. They moved around a lot and I got pretty annoyed with them as the day progressed. Not that they were not comfortable just that they would have been more comfortable in the place they were meant to be.
Back
The back of the vest is also designed to take a plate carrier or you could drop a hydration bladder in there if you did not need a plate. It has 6 rows with 7 columns of webbing on the back. I used these to secure a MBSS carrier to the back so I could use it for hydration and as built in back pack. It has a buddy handle that is securely stitched to the top of the vest.
Workmanship
Now if you have read my previous threads on the Flyye gear I have had I was slightly upset with quality control. Some of the gear had very off kilter stitches and a not to spec stitch job on one of the molle webbing channels causing pouches to not be attached in that spot. Thankfully it seems they have stepped up there QC by a lot and I have no faults with the vest. The stitching is good and the UTX buckles and snaps all worked great. The vest is also made using 1000d genuine Multicam Cordura. The only minor thing I can say I wish the Multicam and Cordura tags were stitched to the inside of the vest rather then the outside where its visible.
Conclusion
All in all I am fairly happy with this vest its cheaper then the real deal and performs great. There is now a Flyye distributor in Canada if you want to buy in Country.
Pictures
First off let me say these were very hastily taken on a trip home so they are fairly sloppy and not as adjusted as I would like. Velcro isn't put together straight etc. Other then that the vest is fairly simple and the pictures can give you a good idea of the vest. On with the pictures.

A shot of the entire front of the vest

Closeup of the mag pouches

The back of the vest

Inside of the front of the vest

Inside of the rear of the vest
-
Haha I will take my second place
 . I sure do love my classics there far to much fun.
 -

A shot of the monster in its slow process of being converted to a C9

KG9 with the stock folded

KG9 with the stock extended
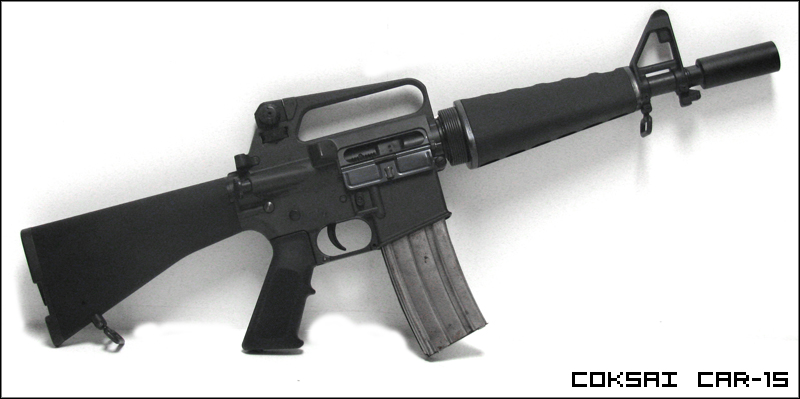
CAR 15 with stock at its shortest

CAR 15 with stock extended fully. There is one position in the middle of these.
The CAR 15 has a scs hopup like my KG9 does. This is an early form of hopup but works well because most classics would eat a normal hopup rubber. The CAR 15 has a nice slow rate of fire and a meaty sound. The scs gives it a bit of a kick which is kinda cool but no wear near a gbb.
-
Went to add some pouches to the flyye rrv and there is a single molle channel that is too skinny to attach pouches. I have notified the company that they need to pick up there quality control.

-
People have this wierd thought that lipo will explode there guns. Its not true to an extent. You will most often get a slightly higher rate of fire which means your gun will die a tad faster then run on just a regular battery. However the decrease in trigger lag, rof boost make lipo a great idea. Give it a go you will like it.
-
I dont think so there isnt a whole lot of room inside this thing. I think lipo is the only way to go.
-
I will be adding an IR laser to mine and will write a guide on how I did it. Thank you for the comments on my review.
-
You require this if you want to slap a battery in it http://rsov.com/index.php?target=products&...product_id=3332 . As always if there are points you would like to see me improve on for future reviews please feel free to let me know.
-
I dont think so. I think lipo is the only way you can get something inside. Rsov sells the lipo battery I believe. I dont own any electric guns currently I only own classics and the vsr.
-
Vanaras ANPEQ 15/ Advanced Target Pointer/ Illuminator/ Aiming Light (ATPIAL)
Info on the real one
The PEQ15/ARPIAL is a product of Insight Tech Gear designed as a replacement for the PEQ2. The PEQ15 is smaller and can be sighted without night vision unlike its predecessor. This is due to the visible laser being adjusted at the same time as the infra red laser. The laser also has the ability to project different shapes so your team mates know who is aiming where.
This info is just some interesting background knowledge since the Vanaras one does not do any of those things. It does help people complete a certain impression they are going for. In my case it’s a base for the infrared laser unit that Vanaras sells.
Overview
First I would like to thank Vanaras for sending me the review samples that they did. Being as this is just a hollow box with some levers I will do the overview section of this speaking of where it is close to the real, where it differs and the overall quality.
Upon receiving the unit I took the box and noticed the plane box with company sticker on it. The sticker includes the product code, product name, quantity, url of the site, barcode and the Vanaras rubber duck logo. The box is small and sturdy and opens with a nice flap. Inside the box you’re greeted with the PEQ15 without stickers on it, the stickers, an allen key, anodized blue training screw, and nice and detailed instructions explaining where to stick the stickers. The stickers are of high quality and they include three main stickers of different coloring for the top so you can choose. It also includes the other various stickers required for the box and a sticker with the Vanaras logo on it with url. The instructions are just super detailed black and white pictures with very few words on them. They show the few features the box has and how to take it apart and add stickers. I will not be photographing the unit without stickers since I am sure you have enough imagination to think of it without stickers.
The PEQ15 itself is a very sturdy piece made of high quality plastic. I was sent the sand version for review. The two filters on the front of the device can be moved off to the side and are held nicely in place by the rubbery straps that secure them. This is where a difference can be noted. The sand version on Insights web page shows tan colored straps instead of the black ones the Vanaras one comes with. All of the adjustment screws for the lasers are non functioning on the PEQ15. The function dial is 100% functional though and turns nice and smoothly. This is where the attention to detail comes in with the blue training screw. For training the screw is inserted in a hole on the dial stopping it from being turned onto high power. There is also the storage spot for it on the side of the unit. The battery cap does not remove and the fire button is non functional. On the insight page the fire button is tan where as its black on this model. I personally prefer the black color of the Vanaras version since it seems like it would be easier to see and hit, however a detail oriented person may complain about that. The stickers fit perfectly in the recessed areas for each one. The rail mount is exactly like the one on the real one and mounts easily on rails (I do not own an AR at this time so I won’t put up a picture of it on my vsr since it looks silly). To open the unit you need to pull the ir/visible laser cover to the side and carefully pull the face plate off. I have to emphasize carefully doing this because I wasn’t and broke a tab. The inside is hollow and Vanaras have released a lipo battery for it. The battery requires you to cut a hole in the bottom of the unit.
Pro’s
Solid unit with great attention to detail
Con’s
Requires modification to use it as a battery box
Could use a tiny bit of reinforcement on the tabs
Pictures

A top view of the device

Left side of the device

Right side of the device notice the hole for storing the training screw

Rear of the device

Front of the device with filters on

Front of the device with filters off

Bottom of the device

Front plate removed

A close up of the blue training screw
-
No problem. I come from a very small group of airsofters and we tend to live several hours apart so its hard to try on new kit. So I figure I will release reviews of everything I get. I will be doing one on the new pantac plate carrier hopefully tomorrow.
-
Pantac RRV (Coyote Brown) Vs Flyye (Multicam)
The real deal info
The Rhodesian Reconnaissance Vest is a relatively cheap (price wise) vest made by several different companies. It is light weight and the straps can be worn in two configurations. The bib can also be folded down to make a low profile vest. The RRV also has the ability to attach a plate in the front of the vest.
Build Material
Pantac- As with all Pantac products quality material is used. YKK zippers, Invista 1000D Cordura, ITW NEXUS buckles etc are used. The stitching looks bomb proof as I have grown accustom to with my other Pantac products. I should mention if you have some of the Phantom stuff from before they became Pantac the quality is far superior.
Flyye- Similar to the Pantac the Flyye is made using nice and sturdy materials. The only noticeable difference is the use of UTX buckles instead of the ITW.
Overview
I just spent the past half hour scouring the internet for pictures of the RRV by its different makers. As far as I can tell the Pantac and Flyye are an exact copy with different buckles then some of the companies may use. With that onto the features of this beast.
The RRV has quickly turned into one of my favorite vests. It is really comfortable and can be configured in several different setups fairly easily. The straps can be worn in a straight over the shoulder setup or in a cross setup on the back. The bib can be unhooked by a snap on the strap that attaches it to a d-ring on each side and placed in a Velcro pouch in the lower half of the vest. The bib has two fabric handles at the top to pull in order to reach the storage pocket in the bib. If you’re rather sleepy like I was when I first tried the vest on you won’t notice that the bib is where the extra elastic strap keepers are hidden. I noticed the bulge when adding pouches the next day which I have removed for this review. The bib has three rows of Molle on it and makes a great spot to mount an admin pouch.
The lower part of the vest has four main rows of Molle with seat bealt style webbing stitched behind three of them. There is an extra shorter row of Molle directly above these that is in line with the bib. This is where the first quality control issue has come up in this review. At the very bottom of the vest on the Flyye the fabric underneath the last row of Molle is not cut evenly so the left side if you’re looking at the vest or right if wearing it is longer than the other. There is also a crooked stitch directly above this. Now these don’t effect the overall quality of the vest they do slightly detract from its aesthetic appeal. I should also mention that this may not be evident to the average user I am just going over these vest with a fine tooth comb so I noticed easier.
Flipping the vests over you can see how the plate is mounted to the vest. Rather than an internal pocket the plate is held in with mesh elastic pocket with a strap. I can’t say how well these work at this time but will update when I receive a plate (hopefully in the near future). Both vest use the exact same system however the Pantac has a slightly stronger main securing strap for the plate. Pantac have also affixed a very nice logo to this strap whereas the Flyye opted to stitch there logo to the right the plate mount. Both vests have no stitching issues here and all stitches look clean and strong. The back of each vest have a system of snaps on the bottom which look as though it is for attaching to a cummerbund(if I am incorrect about this please tell me).
The shoulder straps of each vest are nicely padded however the Pantac seems to have used thicker stiffer foam here. The stitching on the Flyye looks a bit better on the straps then the Pantac. The Pantac has a few messy stitches with loose threads. The only other difference with the straps is that the Pantac has chosen to remove the right angle corners at the end of the shoulder strap and have gone with a forty five degree angle instead. Other then that the vests are pretty much identical. Each vest also includes the buckle to attach there brand of MBSS back panel. Due to each company using different buckles they are not cross compatible.
Conclusion
My conclusion is both vests are very similar and it’s hard for me to choose. If I had a gun to my head I would go with the Pantac due to the slight fabric issue on the bottom of the Flyye.
Pictures
I apologize in advance for the use of a pillow instead of a mannequin. I sadly don’t own the upper torso mannequin to properly display these items and am not into the basement commando shots. I will take donations of one though
Pantac from the front

Flyye from the front

The back straps of the Pantac

The back straps of the Flyye

The bib of the Pantac folded down

The bib of the Flyye folded down

The plate holder on the Pantac

The plate holder on the Flyye

-
Thank you for the kind words. Its the second in a series of hopefully many reviews. The internal dimensions are 53cm x 13cm x 13cm so if your rifle fits that you will be good. You are correct they are two separate companies that happen to be competing. As I have said before any suggestions criticisms etc of my review please feel free to let me know. The only way to improve is by knowing what people are looking for.
-
Pantac vs Flyye Go Bag
The real deal info
The S.O. Tech Go Bag was designed for vehicle drivers and chopper crews. Its small cylindrical design is made so that it can easily store in the confined spaces of the vehicles where a traditional bag would not fit. The carry straps on each end allow the Go Bag to be grabbed by the crew when they need to get out in a hurry. I have been using mine as a random gear bag for a week now. I have stored everything from tools to clothes in it. I have nothing but good things to say with this design.
Build Material
Pantac- This Go Bag is built using quality materials such as YKK zippers, 1000D Cordura in your choice of colour, and ITW Nexus buckles.
Flyye- This Go Bag is built using roughly the same material as the Pantac with a few differences. The buckles are not ITW they are UTX. The handle for the main bag zipper is thinner seatbelt material then the Pantac. The snaps are different then the Pantac ones having Flyye pressed into the female part of them. The drainage grommets on the Pantac are larger than the Flyye.
Overview
Since both of these bags are pretty much the same I will go over the features of the bag and then explain any quality issues that arise as I go through.
The Go Bag setup is a great idea. It’s a small bag with various storage pouches on it as well as Molle webbing to expand storage. The main pouch is close to the back to aid if a zipper is to blow out allowing your things to be securely kept in place. Inside the main pouch is also a pocket for hydration bladder. The hose for the hydration pack would have to be routed through the back zipper. This is one part I think the design falls a bit short. It would have taken very little effort for a hole in the top of the bag to be made much like the TAB with a Velcro cover. However as far as I can tell the S.O. Tech version does not have this feature so the purists will be happy. Other than that the main pouch is devoid of any other interesting features. The main pouch is opened with two YKK zippers attached by material so that each side can be opened at the same time. This is where the difference I spoke about before comes in. The Flyye has a lighter weight nylon seatbelt material and the Pantac has a thicker and stronger looking/feeling one. Both get the job done but I see the Flyye failing before the Pantac’s would (not that I see either failing any time soon).
The single shoulder strap on this bag is designed to be worn across the chest to allow the bag to be easily rotated from back to front to get items out quick. The straps can be adjusted for length at the bottom or bag position at the top. Both bags are more or less the same in the way they adjust. The straps on the Pantac are more rigid then the Flyye but the Flyye comes with an elastic band to help remove the extra strap from flopping around. On the Pantac the upper strap is attached further down on the large part of the shoulder strap allowing for more adjustability. The shoulder strap of each bag has three rows of Molle webbing on it allowing a single pouch to be attached if the need arises.
Each side of the bag has two sets of Molle webbing on them. Three rows at the top and three rows at the bottom. This allows you to attach any extra pouches needed. Along with the Molle webbing each side of the bag has a zippered pouch that spans the length of the bag however one side has a stitched divider in it. This pouch is great for storing documents or smaller items. I was using these to carry wrenches and screw drivers and it worked great. On the front of the bag there are three equal sized zippered pouches. Each pouch is identical and has a drainage grommet in the bottom.
The last thing I have to really comment about is the stitching. Both bags stitching is more than sturdy for airsoft use. However I would have to hand the better stitching to the Pantac replica. There are no loose threads, the reinforcing is top notch and everything looks neat and tidy. The Flyye is good but it has the occasional thread hanging out here and there and some of the stitching looks a tiny bit sloppy in places. Both bags will stand up to a lot of abuse however.
Conclusion
These bags are similarly priced but I would choose the Pantac due to its slightly better quality stitching.
Pictures
Pantac on left Flyye on right
Pantac on top Flyye on bottom
The front of the bag

The side of the bag the other side looks the same so I will refrain from posting it.

The strap and back of the bag

The top of the bag

The bottom of the bag. Notice the larger grommets used on the Pantac

A close up view of the straps. Notice how each company does it differently.

A close up of the front pouches

The innards of the bag

One of the side zippered pouch's. The other side doesn’t have the stitched divider in it.

The back with the shoulder strap flipped to the other side.


Tactical Footwear Picture Thread
in Kit & Loadouts
Posted
I have those also in side zip but in gortex. They are comfortable but very warm I found. I also think they look like moonboots. For actual military use the side zip is great when you get up in the middle of the night for sentry duty. No screwing around with your boot laces.