

the cleaner
-
Content Count
872 -
Joined
-
Last visited
Content Type
Profiles
Forums
Gallery
Blogs
Calendar
Posts posted by the cleaner
-
-
DONE. . just for you Dave. ..
-
Custom H&K SP89. :
working on functional bolt. . .

simulated weld marks
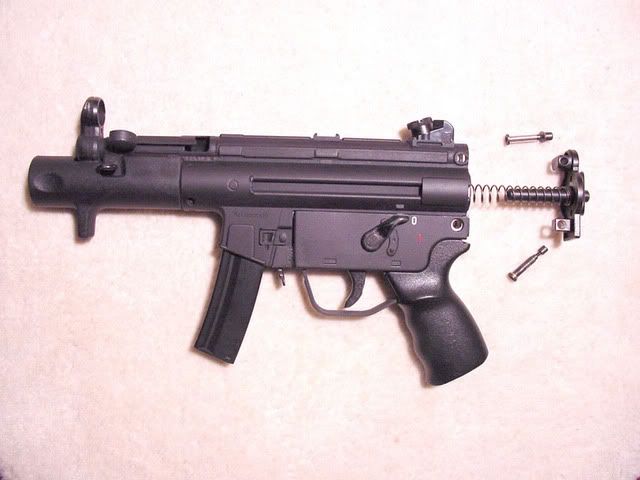
quick change spring like PGC M249 mechbox
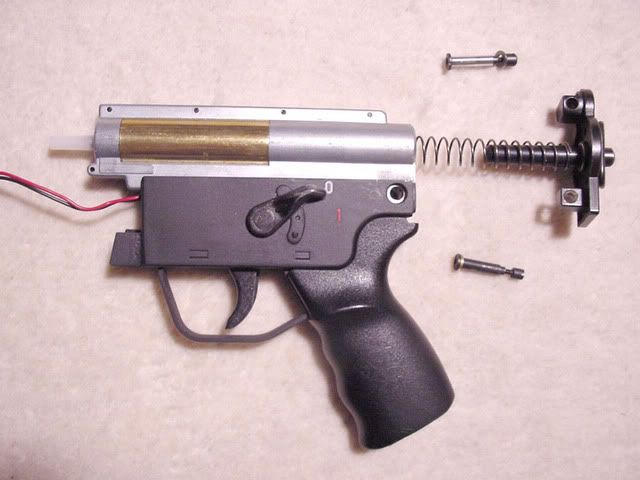
notice Ver 2 mechbox and modified MC51 lower receiver
stock receiver pin going through mechbox. . .
notice the selector stop. . it STOPS at "1"
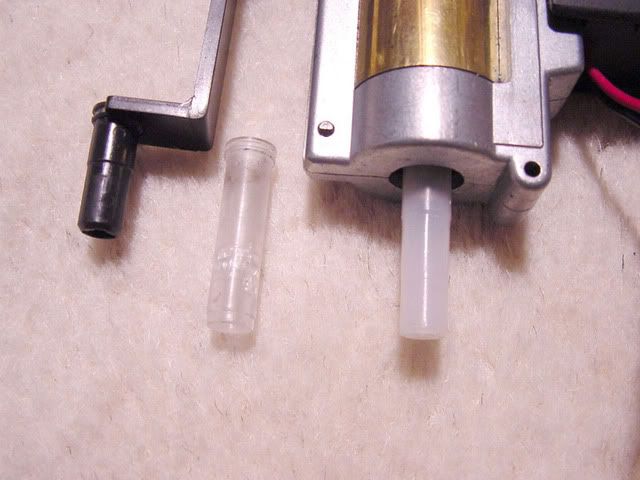
notice LENGTH of custom nozzle compared to stock MP5k nozzle
and I am still not done!!!!
-
some of you may laugh. . but I have at least $1k worth of hours invested into my Custom H&K SP89. :
working on functional bolt. . .
simulated weld marks
quick change spring like PGC M249 mechbox
notice Ver 2 mechbox and modified MC51 lower receiver
stock receiver pin going through mechbox. . .
notice the selector stop. . it STOPS at "1"
notice LENGTH of custom nozzle compared to stock MP5k nozzle
and I am still not done!!!!
-
Yey cleaner and i are in the hk51 club, my box and manual are long gone though sigh
luckily. .I saved my HK51 box (as shown in the pic) but lost my manual. Nothing but the motor, outer barrel, sights are original. .I sold my Hk51 handguard and stock (since switched to G3A3 OD hardware).. .
My HK51 needs some serious updating, 'tis my first ever AEG - needs a new stock after the MSG90 one was snapped in half by some *beep* I lent it to What I really need however is a good RIS for it, as I have the cheapest rail system known to man on there at the moment it actually cost less than £8.00, including postage!No idea what would work without any modifications to an MC51 body at all - anyone know of something that would bolt straight on and provide a good amount of strength and rigidity?
make sure you have the shorter stock buttcap for your HK51. .. ie CA33 or G3A3 buttcap. . NOT SG1
As for off the shelf RIS systems. . CA, Mosquito Molds and G&G all make RIS units for the MC51/HK51. No modification is needed.
But the RIS alone will not provide the strength and rigidity you really want. . that all comes from replacing the cocking tube with the CA metal one. A metal cocking tube, metal receiver and RIS will definitely beefen it all up. . if you can still find it in HK shops. .a company called Armour Gallery built a really nice one-piece outer barrel for the MC51 and SG1 length G3s. This barrel connects to the receiver and really stiffens up the entire front end.
-
btw. .every single gun shown are full metal. .I can't have any stock plastic guns in my collection.
-
here's some of my ol' G3s:

The only one remaining in my collection is the Limited HK51 RIS (#3 down in pic)... converted to full metal(even bolt) w/ G3A3 OD hardware. Only parts remaining from the Original HK51 is the motor, barrel and box.

The MC51 SBS RIS(above) is the only one of it's kind that utilized a Mosquito Molds MC51 RIS that was modified to fit on the MP5 SD cocking tube and SD front sight. Also, the MP5 cocking handle was replaced with the G3 one, cocking tube slot was widened and lengthened. .and the bolt opens with the cocking handle operation.
here's are some other G3 variants:


btw. .the biga$$ light on top also has a IR filter. . .

enjoy!
-
dude you are my hero. i can't believe you did all that, amazing job. Man you have to get my future (soon to be mine) SIG552 to use a M4 stock. I'm going to purchase a VLTOR style stock and rewire it to the back. You'd be the man to customize it for me or at least maybe explain how I could do it.
But hey that idea is fantastic your whole front end must really solid. I think it could have been easier to buy a metal body but who the F*** cares that's a great idea anyway very nice.
Thanks for the nice words (and rep point). . .
it would not have been easier with a metal body. .besides, I did this reinforcement about 3+ years before Hurricane released the metal body. So that, at the time, was not an option.
Even if I just used a metal body, you'd still get flex in the handguard right at the receiver block. . .the stock metal outer barrel doesn't have the greatest support as it is. . with my reinforcement rod. . it solves that issue.
I'd have to see and examine the Hurricane body to see if I'd still be able to install it on it's current state .. my reinforcement rod goes through the entire upper receiver and bolt section so I don't know about clearance issues.
Next Project:
Hurricane metal body. . make another M520A replica. . .design and build a full length flat top rail on top. .I'd remove the current rail and make a new one that would replace both front and rear sights. I would use the existing mounting provisions for the rear sight. . shave off the front sight, drill and tap into the front sight block.
-
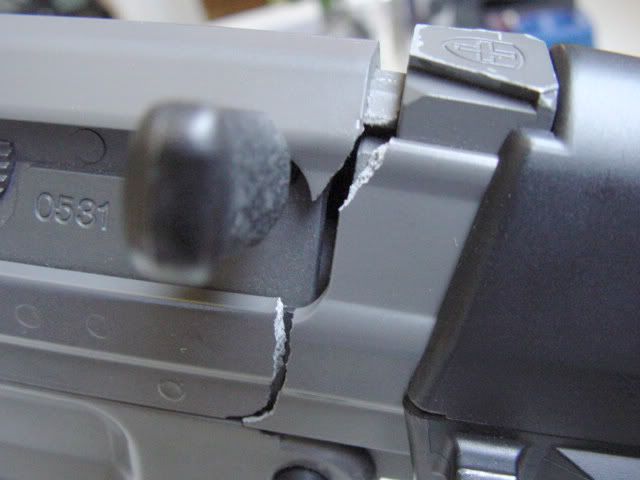
So here's another "custom" SIG 551 I did. . .it's moreso a FIX it job. . but nevertheless, alot of custom work went into it.
Story: Circa de 2000-2001. . . A buddy of mine in HK sent me a SIG 551. .tightly bubble wrapped and stuffed into a large mailing envelope .. WTF? no box? Needless to say. .good ol' DHL cracked the SIG in half. . .when I received the SIG, the gun was bent down about 10-15 degrees from horizontal. .it was like a limp d!ck.
Being I love the SIG 550/551 (hate the 552 because of no burst). .I had to fix it .. and since getting replacement ABS receiver was near impossible since it wasn't until 2004 or so that the Hurricane metal SIG receivers were available.
I'd like to note that there was a metal receiver kit produced for the SIG in the late 90s(way before Hurricane). .in Japan. .but it was hideous and ill fitting. .it was such a bad fit, not many were produced or bought.
Anyhow. . .I first started the FIX IT project by attempting to weld back the ABS receiver with my plastic welding kit (uses about 10-15 PSI and heat source. . looks like a soldering iron but blows hot air at the tip like a heat gun/hair dryer. ABS plastic welding rods were used). . in any case, I was extremely unsuccessful in welding the receiver together. . I actually screwed it up ever moreso. Anyhow, we don't have to discuss that here.
had I known about THF or ABS solvent prior .. I would've not had to use the plastic welding kit.
Anyhows. . .
here's the CRACKED SIG 551:
Can you say OUCH?
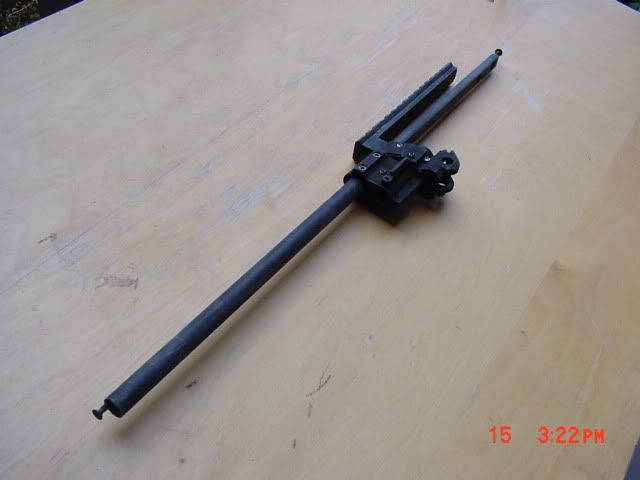
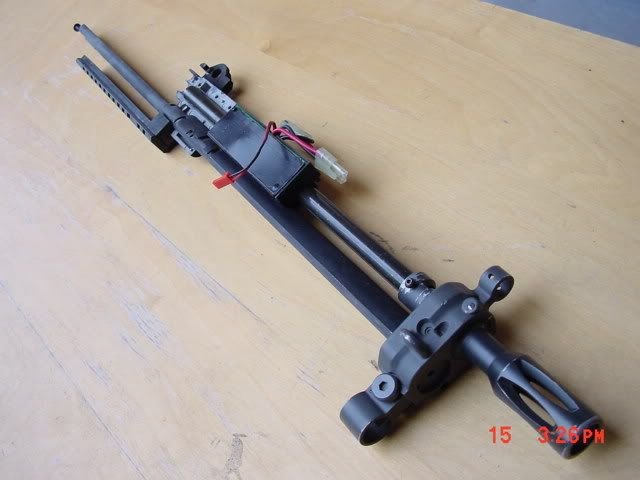
So here's the completed reinforced assembly. You have the main rod that extends from the front sight. . through the receiver block. .and ties into the stock hinge.
The reinforced rod takes up the room where you're stick battery goes. .as well as the entire room inside the upper receiver. Thus, you cannot use a stick battery anymore AND you have to remove the bolt. . however, I am working on reattaching the bolt.
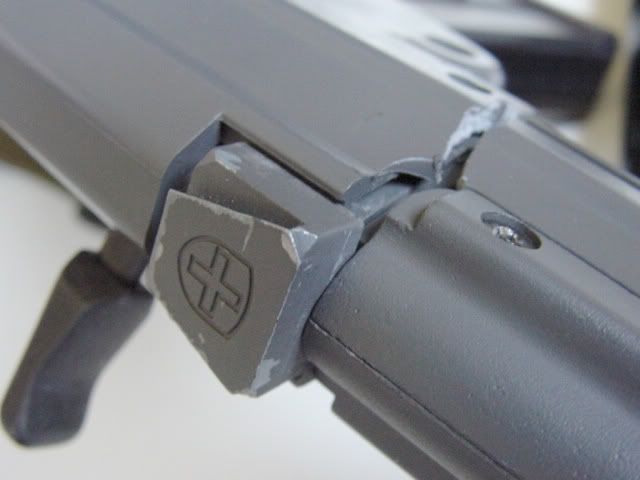
Here's the reinforced rod going through the receiver block. . .
and with both halves of the block.
Also, notice the rail. . custom designed and built so it also directly attaches to the receiver block. It cantilevers and at the other end of the rail is knotched and fits in a slot under the rear sight. Extremely secure.
This rail is a complete different design than what Marui released for the SIG series.
Again, I'd like to reinterate this reinforement rod. . it's tied in 3 of the most secure areas. .the front sight block, receiver block, stock hinge coupling. Absolutely NO FLEX through the handguard area. . no chance of ever breaking in half.
Here's the assembly with the burst unit, front sight and flash hider:
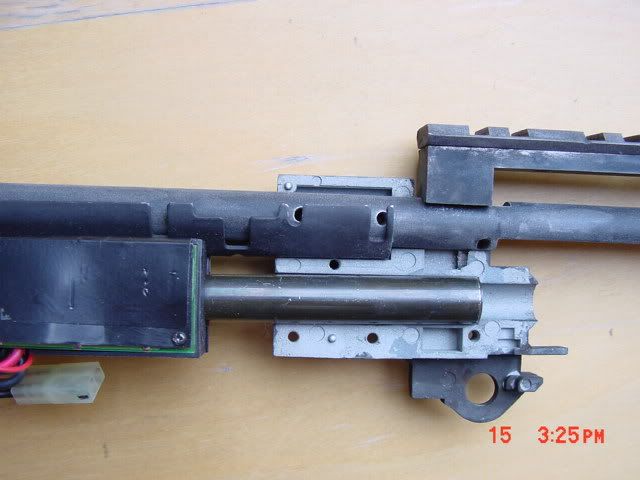
a pic showing position/fitment of the rear profile rail (basicall sits a few mm above the receiver) as well as the reinforcement rod going through the handguard/stick battery compartment and into the front sight:
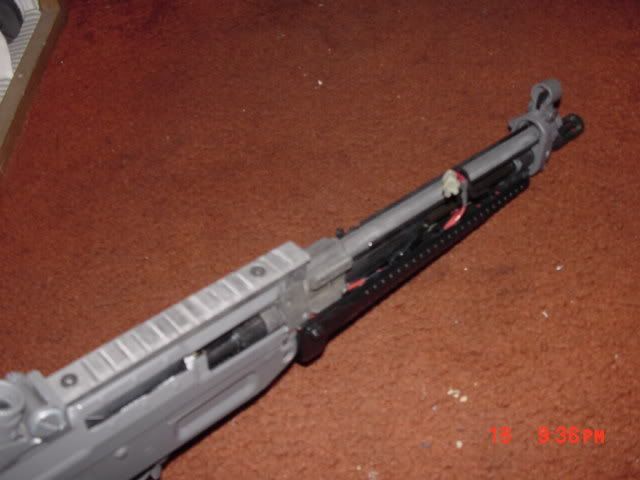
pic of rod through the bolt area. .and how low profile the rail is on top of the receiver:

I had sold this SIG to a friend at least 6 years ago. . he still had it. .I ended up buying it back from him just a couple of weeks ago.
BTW. . .to use the SIG. .I run the wires out handguard and run externally. . add a rail to the handguard, use a PEQ2 battery unit. . .
In any case. .I might do the M520A replica on this SIG as well!!!
Material is machined 6061 Aluminum throughout. . beed blasted and
"aluminum black" coated (which added a rough texture/appearance. .kinda nice, looks like it can handle some beating)
comments?
-
hmm I still think there must be some sort of adaptor out there. Is that top picture I sent a 556 as well? because the stock hinge looks different then the below picture I sent.
And you think you'd be able to do that for me? (make a M4 stock adaptor)
of course one is available in real steel. . but how does the hinge coupling fit on the Marui SIG? Will it even work?
Is one available for airsoft. .again, not that I've seen so far.. only for the G36.
Do I "think" I can make one for you? No question I can do it. . it's just how long you're willing to wait. . I'm a busy man and currently have very little time for airsoft custom work. But again, if you don't mind waiting. . I can do it for you.
I'll need you to supply me the stock hinge coupling off your SIG.
My machining rates start at $50/hr. . charge you $50 for the project.
-
haven't seen it for the SIG.. but WGC has one for the G36 (to attach an m4 style stock to)
I can build an M4 stock adapter from your SIG stock hinge. .if that's an option for you. . although my time for airsoft customization, lately, has been extremely cut back to almost zero.
EDIT (to follow up with Prolific's concern below):
The SIG stock hinge is metal. . so as long as the M4 coupling is metal or machined engineering plastic (ABS, Delrin, whatever) and is attached securely . .it should not be a problem.
-
Thanks Prolific,
551 came in black. . unfortunately, I sold that SIG years ago. .but it's ok, it's not like I can't make another one

(I actually snatched up about 3-4 G&P M500 lights just in case I want to do another one for the SIG or any other AEG)
I do have another SIG 551 in my possession that I can make another M520A replica for. .although it's kinda a project gun that is not quite aesthetically perfect. .
the entire receiver was cracked in half and completely separated from one another. . THANKS DHL!!!!!
Anyhow. . I attached the halves together with a full-gun-length machined reinforcement rod. This rod is screwed into the front sight block, goes through the receiver block and ties into the rear stock hinge coupling.
I'll detail that SIG build shortly on this forum
-
Prolific. . you have some nice model making skills! Great job!
Here's one just for you

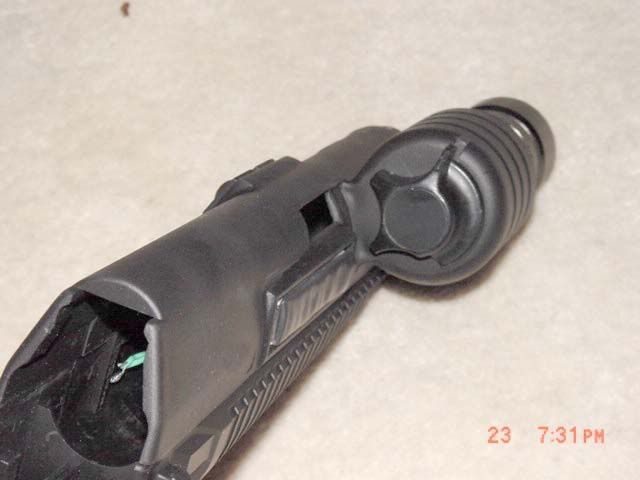
SIG 551 w/ custom built Surefire M520 "replica"
NOTE 1: I built a handguard weapons light for the SIG 551 about 1.5-2 years before Surefire even released a weapons light for the SIG 551. . .Surefire calls it the M520A Millenium Forend .. since I didn't have a name for mine, I might as well call it a M520A "replica".
What: Custom built Surefire M520A "replica" for the SIG 551
How: using a heavily modified G&P M500 M4 handguard light, Marui SIG 551 upper handguard, sandpaper, files, Versalock, THF, polystyrene, glazing putty, primer, spray on Plasti-Dip Plastisol (rubberized coating)
Sorry I don't have pics showing the entire SIG w/ the light. . mainly detail shots of the apparatus.
I do have some pics of the model making process prior to completion/painting though (not shown)
Unfortunately. ..I sold this SIG several years ago so the pics I have is all I have.
When I saw Surefire release their M520A. . I found out my setup had better ergonomics. . ie, power/toggle and pressure switch was more conveniently located so that operation was easier. For the Surefire version, you have to move your entire hand location to use the on/off toggle . . .while mine, you can access both pressure switch and on/off toggle without changing your grip.
Pictures doesn't do this project justice, but I can say, when the project was done, the SIG handguard light looked like an off-the-shelf part.
NOTE 2: After I completed the handguard light. .I went back and stripped the rubberized finish and added several ribs that tied the light portion to the handguard for better reinforcement and to hold up in heavy skirmishing.
Here's pics with the finished product attached to the SIG 551
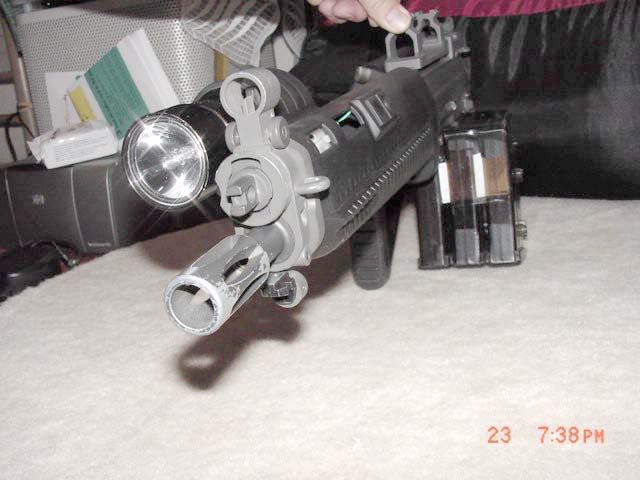
The above pic also shows a silly ol' box mag I made out of two std. mags and 1 hicap. It worked great.. just needed some aesthetic refinement. I definitely did not spend as much time into it like I did with the M520A replica.
Here's pics of the finished product not installed on the SIG 551
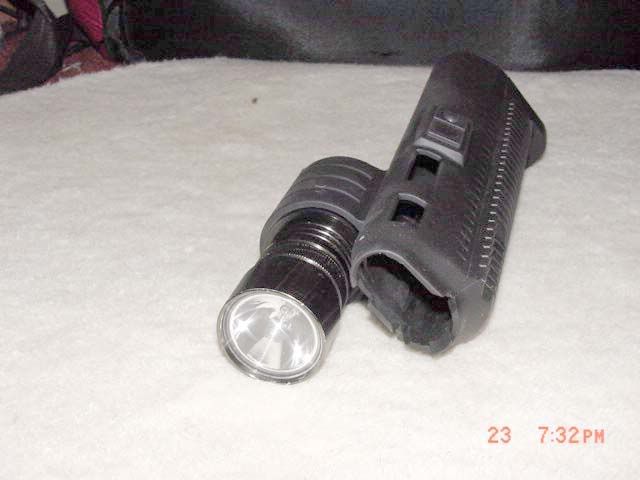
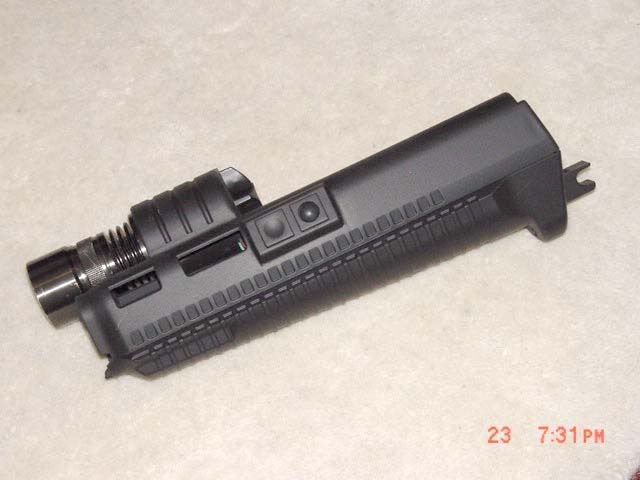
Hope everyone likes it. . .this is truly a one of a kind build. I don't think there's a soul in the airsoft world that has something like my custom built handguard light unless they bought an actual Surefire OR they got the SIG 551 from me.
-
the only difference between the mp5 and mp5-j is the rubber pad on the stock of the mp5-j right?
The MP5J's stock is totally different than the std. MP5. . .it's not just a rubber pad .. .the shape is totally different. . and one other cool feature. .the sliding stock is spring loaded. . when you release the paddle lever. . the sliding stock will eject about 1/2 inch from the back. . making it easier to grab and pull back. .
basically no more fumbling pushing the paddle lever AND pulling the stock out at the same time.
The MPJ (Japanese) is almost identical to the MP5F (French) in real steel.
-
here's my old Marui PDW RIS w/ M4 stock (pics are prior to 2001)

what makes this different from other PDW w/ M4 stocks?
1) Mine folds AND telescopes. .

other specs:
1) Mosquito Molds metal MP5k receiver-Ultra RARE
2) First Factory RIS
3) Guarder QD MP5 silencer w/ HK trademarks-RARE
4) 2ndary silencer set up, SOCOM silencer w/ MP5k adapter (flush mounted silencer) w/ tightbore running entire length of silencer
5) 15x MP5k 28 rnd mags
the Mp5k PDW was my 2nd AEG purchased in 1996. .one of the FEW AEGs I STILL OWN.
-
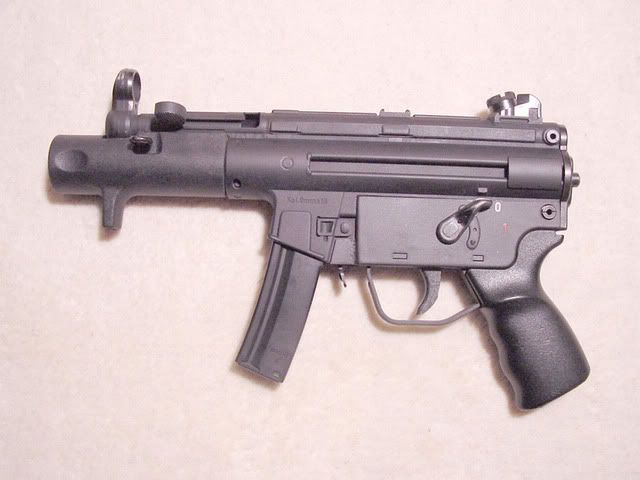
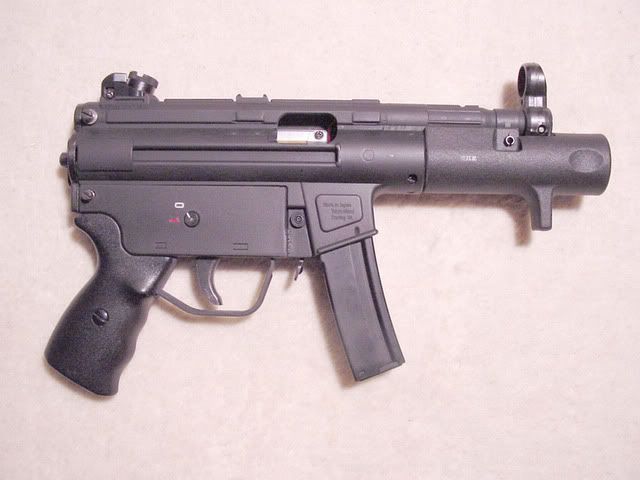
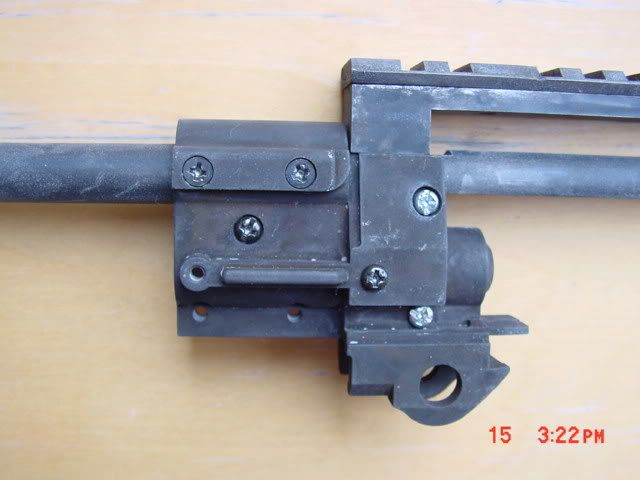
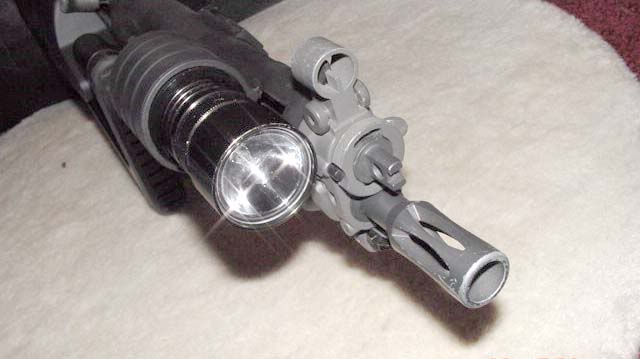
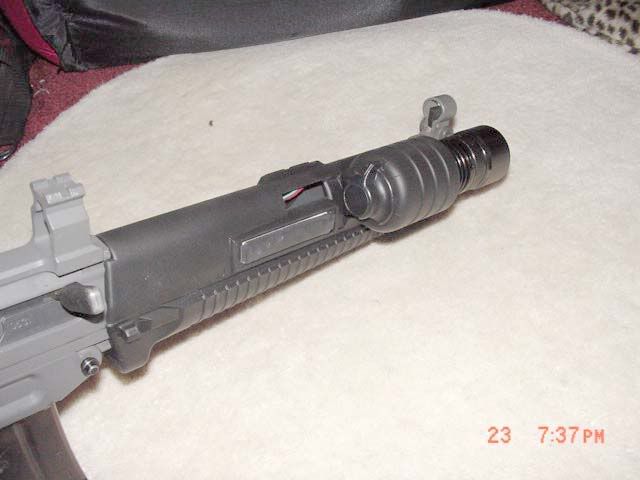
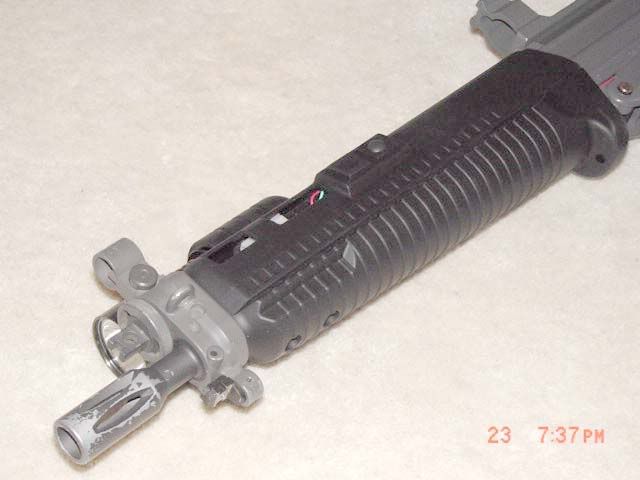
ahh what the heck. . might as well add a glimpse of my HK SP89:

to an untrained eye. .you'll probably say . .. ."so what. . seen SP89s before"
but to real HK enthusiasts NOTICE:
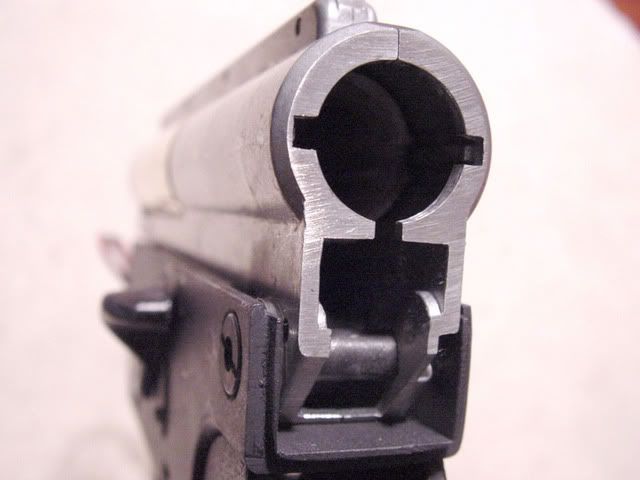
A) lower receiver (MC51. .which means it's Ver2 mechbox inside, which also required a custom built nozzle that's twice as long as the MP5k. . the Ver2 mechbox sits further back)
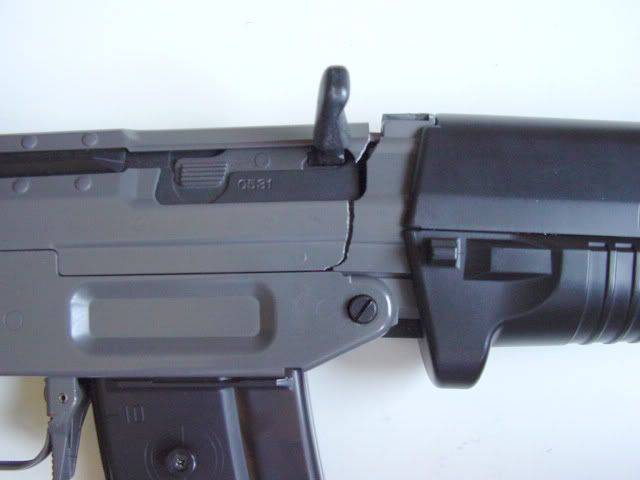
B1) MP5k endcap (wondering how it fits with the Ver2 mechbox and MC51 lower?
B2) Rear receiver pin goes through mechbox as does the MP5k endcap stud, shown in (3).
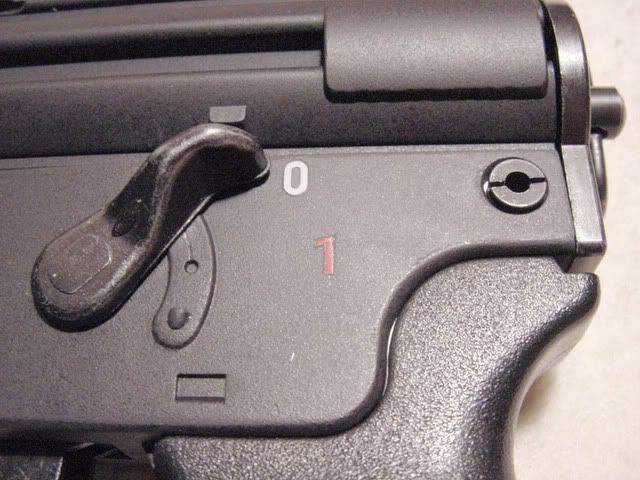
C) trigger grouping (0-1 only, as a true SP89 is semi-auto only, shown in (2))
D) trigger grouping lever indicator ( stops at "1", show in (1))
E) no front receiver pin near magwell, shown in (4)
F) welded tabs in place of front receiver pin, shown in (4)
G) of course the SP89 handguard
here's the MC51 vs SP89:


* It can still go full auto by slightly lifting up on the lever beyond the stop
**still retains usage of a 8.4V stick battery
***highly modified Ver 2 mechbox has quick-change spring feature similiar to PGC M249 mechbox
I can add more detailed pics of all the changes later. . or if requested.
-
I originally had a problem with removing the flash hider. . .and it's not just me. .it's also the techs at Airsoft Extreme that could not remove the flash hider no matter what they tried.
after vising the barrel down and with a 1/2 x 24" steel rod placed inside the flash hider. . heated the flash hider up with a blowtorch. .and then torx off the flash hider. . .
there are TWO threads for the SLR105 flash hider. . the flash hider itself, I believe is threaded the real steel std of 22 or 24mmx 1mm CW. .
the second thread is brass adapter that goes from 22mm (or 24mm) to 14mmx1mm CCW. The SLR105 outer barrel is threaded 14mmx1mm CCW.
Either Classic Army or Spartan Imports lock-tited or glued the flash hider with some pretty permanent stuff. . white hard gunk on the threads after removing it. . .
all I can say is my flash hider "bird cage" is jacked up from having to torx it off. . I've never ever spent so much time removing a flash hider from an airsoft than I did with the CA SLR105.
no idea why CA glued the flash hider on. . maybe so the orange painted flash hider could not be removed from US Customs/Homeland Security. .

H&K Picture Thread
in Weapons
Posted
sorry.. resized for everyone!
yes. . real H&K SP89 forend (nylon/fiberglass). .modified to fit on MP5k
I tried to be as realistic with the details as possible.
Try to find a more realistic airsoft version and you won't find one. . even beats Clarence Lai's and Gremlin Gunworx version. .
the real SP89 is semi-auto only. . .