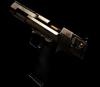
bankz5152 Posted January 12, 2010 Report Share Posted January 12, 2010 Hey, Since watching the New Series of Battlestar Galactica again and finding it absolutely amazing! I decided that i needed the Pistol for Airsoft and the Rifle for shooting. Immediately bought the TM FN 5-7 from Wolf, then painted it to match including some weathering although I may have over done it. The idea was to make to pistol look very used and abused. The plan is to add the Explosive round launcher (ERL) as well but it hasn’t arrived just yet. I ordered the Prop BSG pistol and will use ERL form that. However it won’t be non functioning. I'm planning on using the Madbull Shotgun Shells as the ammunition. Either the 6mmx6 shells which would be good, or use the Madbull 10.8mm shells which would have more of a 'kick'. The idea behind the ERL would be the Madbull shell would sit inside solidly and permanently so it would be non removable. Then drill a small hole into the thinnest part of the ERL body to allow the shell to be gassed up. The charging hole is on the side (see picture). To fire the shell I would use a very simple trigger mechanism. A firing pin a little smaller than the shell 'trigger' with a small spring around it, so the trigger bounces back after each shot. The other idea (which might be better) was to have a push trigger like the Madbull '203s. A firing pin smaller than the shell trigger as above but fixed to a longer pin with a smaller diameter that would protrude all the way out of the back of the ERL and into the 5-7 trigger guard where i will drill a small hole. To keep the pin in place id fix a thin disc that same diameter as the thinner pin. Although this is all assuming that the Madbull shells have a 'push trigger' like 40mm grenades. How do they reset? My idea for this was to solidly glue the firing pin to the shell. Also to strengthen the ERL i was going to fit some thin aluminium sheet to the sides. As for holding it to the RIS i was going to drill 2 holes and put a pin through it and reinforced with aluminium. So it holds it on tightly but is removable. Pictures - Here is a picture of the BSG Warrior for those that don't know what it looks like - Note - This is a fan made prop. Also im pretty sure the grips are like the ones on mine, not like that. Madbull shells - Link Link My Pistol - Explanation Diagrams - The prop kit should arrive by the end of the week. So ill fit the ERL then so I have a full view of what it will look like. Although I’m not going to buy the shells until I get more info on how I’ll make it fire. Also to my knowledge the 10.8mm shells havnt been released. Comments and constructive criticisms welcome. Thanks Josh Link to post Share on other sites
Mike_West Posted January 12, 2010 Report Share Posted January 12, 2010 Your paintjob looks kinda sloppy, just like you didn't care and went all over the gun with watered down silver paint and a huge-*albatross* brush. Link to post Share on other sites
bankz5152 Posted January 12, 2010 Author Report Share Posted January 12, 2010 Yer i thought i had over done it. It does look better in person, and it was meant to look really used and old. Link to post Share on other sites
mattmanic Posted January 12, 2010 Report Share Posted January 12, 2010 But why weather the plastic in silver? The example you've shown is much more realistic. The wear is in the right places although even that may be a little over done. I'm looking forward to seeing the grenade launcher. Will a couple of those shells fit in there? If you can get a few in then that'll be pretty cool Link to post Share on other sites
renegadecow Posted January 13, 2010 Report Share Posted January 13, 2010 If those Madbull shells are similar in design with the original Tanaka shells which they're meant to replace, you'd find that valve impossible to open with a direct firing pin assembly like that. I suggest you put the pin against a lever with the a spring loaded, foldable opposite arm as your trigger. Just pull out the trigger with the tip of your finger or nail, bring it down to lock against the opposite arm and pull. Release and the spring will fold it back up and tidy. Link to post Share on other sites
bankz5152 Posted January 13, 2010 Author Report Share Posted January 13, 2010 In the show the pistols are made out to be made of metal, not 'plastic' like the real one. It was ment to replicate the paint slowly wareing off. Although when the Resin prop arrives ill try a different paint job, if it looks better ill change it. Thanks renagade, that looks good. Although how does the lever stay up? if it proves to difficult to do then would it work just as well but only slightly extended? So it only protrudes a small amount from the E.R.L How difficult are they to push? More difficult than a 40mm? Link to post Share on other sites
renegadecow Posted January 13, 2010 Report Share Posted January 13, 2010 Although how does the lever stay up? would it work just as well but only slightly extended? So it only protrudes a small amount from the E.R.L How difficult are they to push? More difficult than a 40mm? I was thinking of having a small coil spring on the pin that puts the two parts of the lever together. Its tension would make the lever snap back up when let go. How extended will determine its use, which is why I over extended the lever on my sketch. Remember, you have to have the length of the arm that you're pulling longer than the one that's pushing the button to have any mechanical advantage. Making it shorter will make it even harder to activate. The Tanaka shell is loads heavier to push than a 40mm grenade. On the grenade, the button is actually a lock. Once depressed, the valve inside opens on the pressure of the gas. On the shell, the button is the valve and you have to fight against the gas pressure just to open it up. I didn't bother measuring it on a scale, but to give you an idea, a fully gassed (green gas) shell was impossible for me to detonate by pushing the valve with my thumb. I had to brace the shell on one hand and push the valve with the other. Link to post Share on other sites
bankz5152 Posted January 13, 2010 Author Report Share Posted January 13, 2010 Ahhh ok. Well that makes sense and has helped me understand more on how to do this. I was thinking around 2.5cm or so from the bottom of the ERL so it total it would be around ~7cm but that is a wild guess. The coil spring idea sounds good. Only thing is i dont think i habe the pricise manufacturing skills to create somthing that small and pinicity. But ill give it ago. I just thought of somthing, what if the hinge on the trigger snaps? it woulf be rather difficult to repair. Link to post Share on other sites
renegadecow Posted January 13, 2010 Report Share Posted January 13, 2010 Make it out of aluminum? And somehow reinforce the pin hole on the launcher body which would be plastic. Link to post Share on other sites
teflon don Posted January 13, 2010 Report Share Posted January 13, 2010 have you considered using airsoft surgeons shells they work like miniature grenades (afaik) Link to post Share on other sites
bankz5152 Posted January 13, 2010 Author Report Share Posted January 13, 2010 I did indeed look at them, however the dont load gas from the side. The Madbull ones do. Link to post Share on other sites
renegadecow Posted January 14, 2010 Report Share Posted January 14, 2010 To address that, here's a design which allows you to change shells without tools allowing you to use any shell for that matter. The shell is in white, red a tubular sleeve, gray your actual barrel threaded at the end, blue an end cap with a hole in the middle allowing bbs to exit. So basically the barrel is fixed to the launcher body. You put in your shell, fit on the sleeve so the shell won't fall out the front, and screw on the end cap. edit: If you're using an actual Tanaka shell, you'd need an extra part to block the front of the shell. When fired (without a blocker) the front bits have the tendency of flying out. Link to post Share on other sites
bankz5152 Posted January 14, 2010 Author Report Share Posted January 14, 2010 This sounds interesting. Id rather get the trigger mech sorted out first then think about improvments. Although thank you very much for the help. Im deffinatley going to use the madbull shells When the prop arrives im going to take down every measurment, shape and design or it so if i brea i i can make another from wood. Ive just thought of an idea based on your trigger mechanism, well an addition. Exactly the same thing but adding a small either magnet or velcro to a peice of the trigger to hold it in the launcher. I think ive actually fully understood how to make that trigger now. Although i need ot look at the launcher when it arrives. Basically Id cut the back peice off (previous diagram) have the trigger mech mounted in that reinforced with some AL then the shell in the front. One thing is when i cut the back off what is the best and most solid way to attach the two peices of resin back together? I will put AL on the outside aswell for extra strength. Link to post Share on other sites
bankz5152 Posted January 14, 2010 Author Report Share Posted January 14, 2010 The prop kit arrived today. The launcher looks a good size and has a RIS built in means i dont have to cut one into it. The resin also feels alot more solid than i first thought. Renagade - Could you give me the length and diameter of the shells? It looks like it could come together nicley Other thing is now ive got the prop kit i can work on making mine more screen accurate. Pictures - Link to post Share on other sites
X Lupin Posted January 18, 2010 Report Share Posted January 18, 2010 Do you have pics of the resin kit? I'm curious. Link to post Share on other sites
bankz5152 Posted January 18, 2010 Author Report Share Posted January 18, 2010 I can put some up but it has no trigger guard, I cut it off. I've also re-painted the TM 5-7 to look more like the first one but I still but a heavy ware job. It does however look far better than before. Also added the launcher just for show till I get a shell. Link to post Share on other sites
renegadecow Posted January 19, 2010 Report Share Posted January 19, 2010 I don't have the Tanaka ones anymore, but they're 20-20.5mm in diameter, body only excluding the rim. Length is a little less than 3". Link to post Share on other sites
bankz5152 Posted January 19, 2010 Author Report Share Posted January 19, 2010 thanks alot Link to post Share on other sites
jotohomomoto Posted February 22, 2010 Report Share Posted February 22, 2010 yeah, that paintjob has got to go. I don't know which image you are referencing but from what I see in this pic it looks like the light refelcting off the plastic gives it that "silver-ish" appearance. The slide is definately wore down though. Link to post Share on other sites
bankz5152 Posted February 22, 2010 Author Report Share Posted February 22, 2010 I agree. I repainted it a while back, less 'ridiculas'. The ware and tare is now painted inthe correct places, such as on the slide etc. Link to post Share on other sites
renegadecow Posted February 22, 2010 Report Share Posted February 22, 2010 In defense, the picture above isn't an actual prop but a fan made one. Here's a screen shot I took from season 4. These are one of the cleaner ones as it was taken from a guy in security detail. I imagine the ones used in combat like when they were down in new Caprica looked a hell lot worse than the one in your first paintjob. Just remember that the wear has to look natural and not like you just randomly attacked it with steel wool and silver paint. Link to post Share on other sites
bankz5152 Posted February 22, 2010 Author Report Share Posted February 22, 2010 Thanks man. I should put some new pics up. It doesnt look like that at all, more 'accurate'. Link to post Share on other sites
magic_golem Posted February 26, 2010 Report Share Posted February 26, 2010 i really like this project! bsg was great Link to post Share on other sites
Recommended Posts
Archived
This topic is now archived and is closed to further replies.